ClassAddmin
← All guides

Handbook

Platform Console Handbook

ClassAddmin staff running the platform itself.

Download PDF10 topics across 5 chapters

Getting started

What the console is for, and what it is not.

1.Welcome to the ClassAddmin console
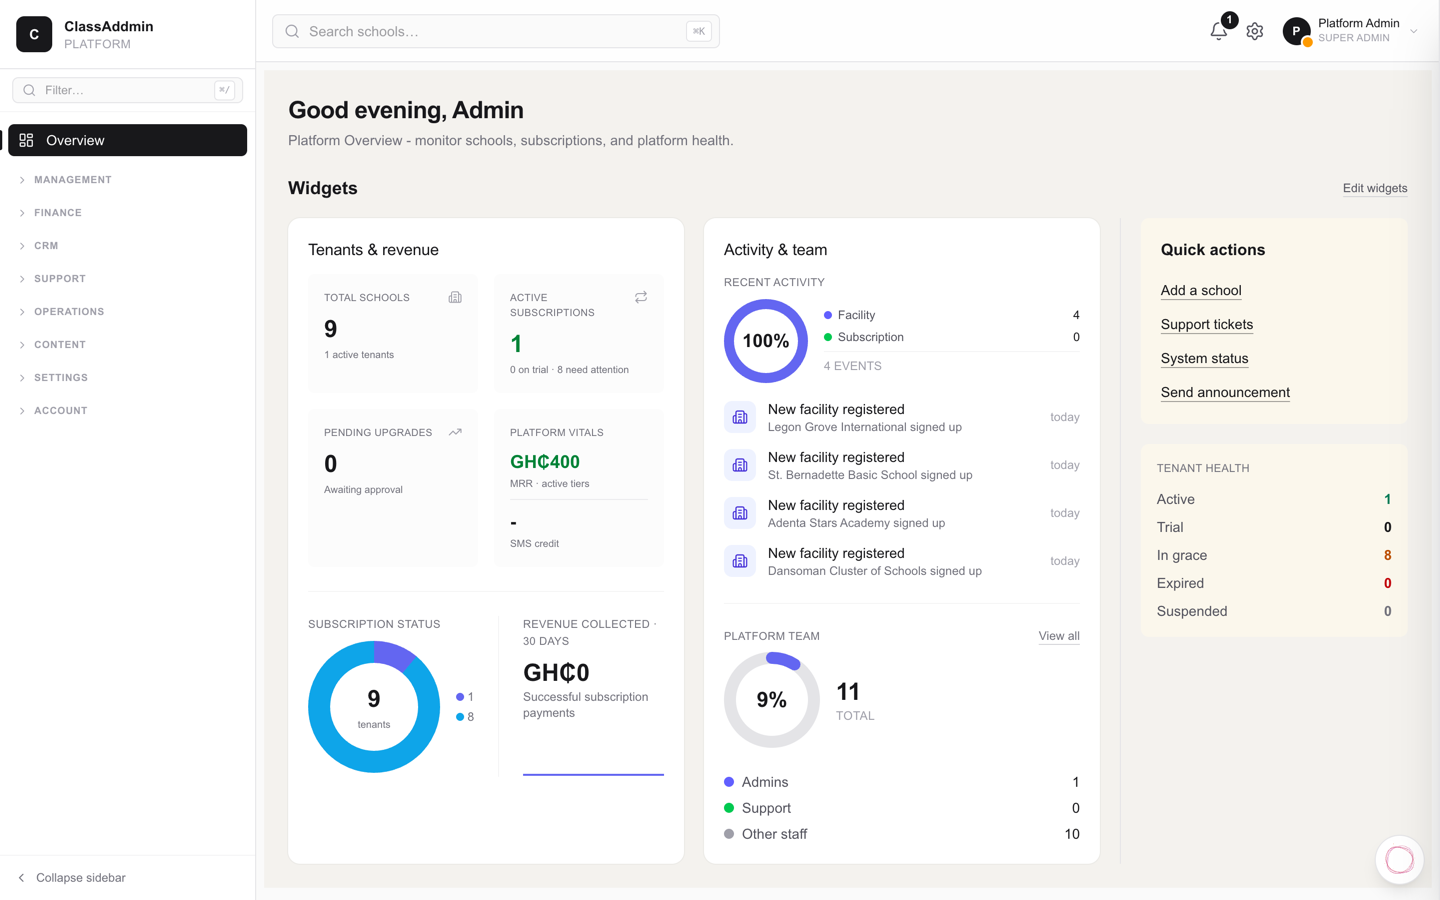
Welcome to the ClassAddmin console — screen

This is the platform console - your view across every school on ClassAddmin. From here you onboard new schools, run support, monitor cron health, manage subscriptions, and ship help content.

What's on the left

The sidebar groups jobs by team:

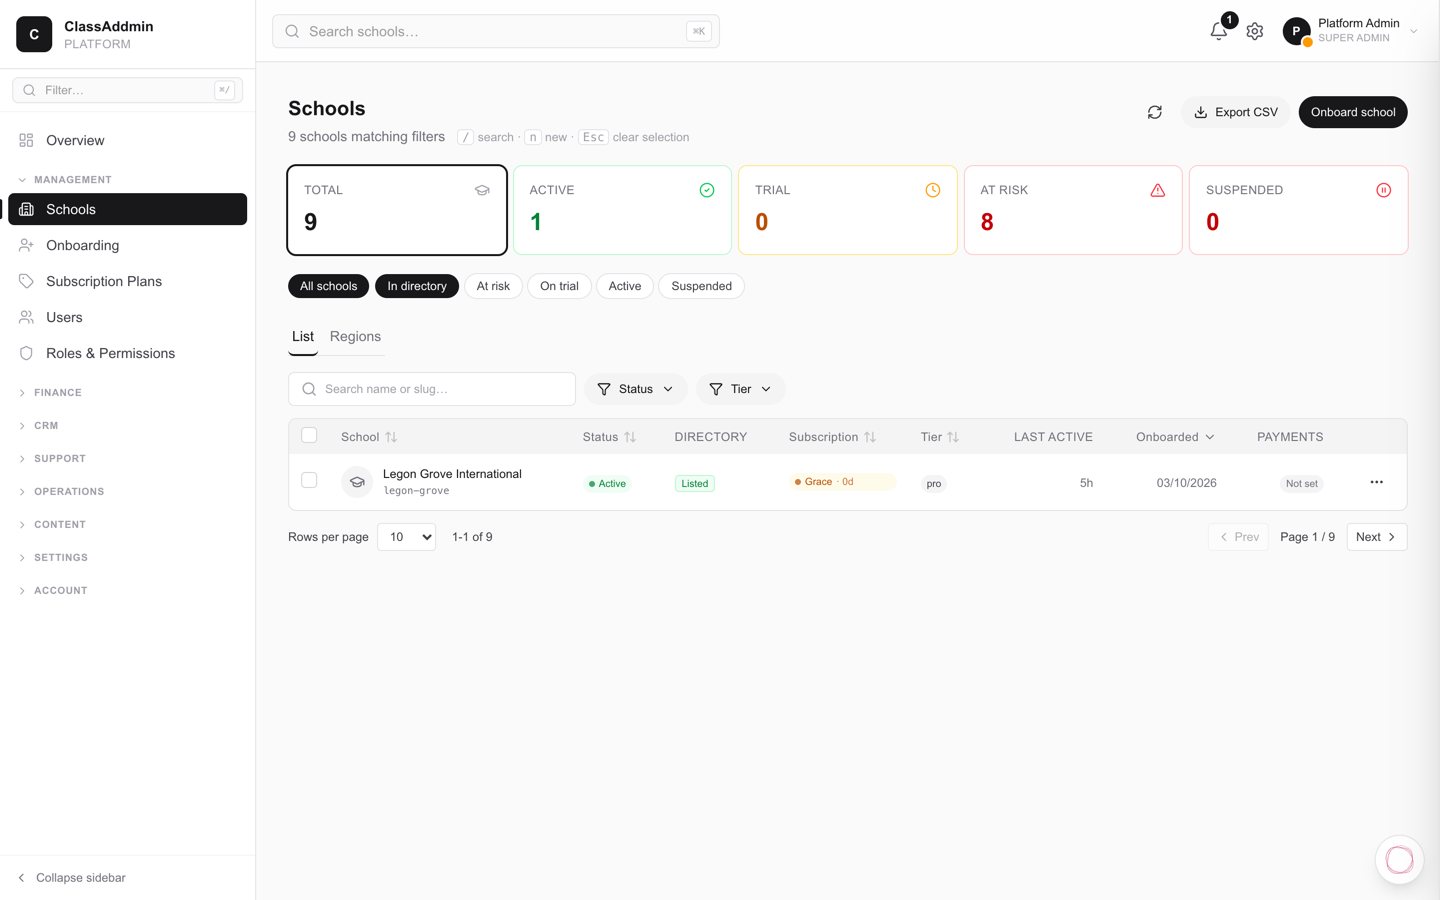
  • Schools - tenant directory, onboarding queue.
  • Plans, Users, Roles - your platform-wide knobs.
  • Finance - subscription revenue, MRR, churn.
  • Sales (CRM) - leads, pipeline, demos.
  • Support - incoming tickets, help-feedback triage.
  • Operations - incidents, cron runs, probes, messages.
  • Content - help articles, marketing copy, announcements.

You probably won't visit all of them. Pick your job - Onboarding, Support, or Ops - and the rest fades to background.

Daily rhythm

  • Bell icon (top-right) is the morning standup. It lists every unresolved signal: open incidents, cron failures, stuck payments, schools without MFA, unhelpful AI answers. Triage these first.
  • Schools is where new-tenant work lives. Trial-expiring schools need a follow-up call before they churn.
  • Support → Tickets is your queue. Set status to in_progress the moment you open a ticket; resolve when the school confirms.

Things to know

  • You can impersonate a school from a support ticket - see "Remote support" in the ticket page. The school approves, you enter, every action lands in their audit log.
  • Help feedback (Support → Help feedback) shows thumbs-down on the in-app AI assistant. Use it to drive article updates.
  • The console has its own help assistant too - click the orange ? button bottom-right and ask anything about the platform side.
Schools and customers

Onboarding a school, leads, and billing overrides.

2.Onboard a new school

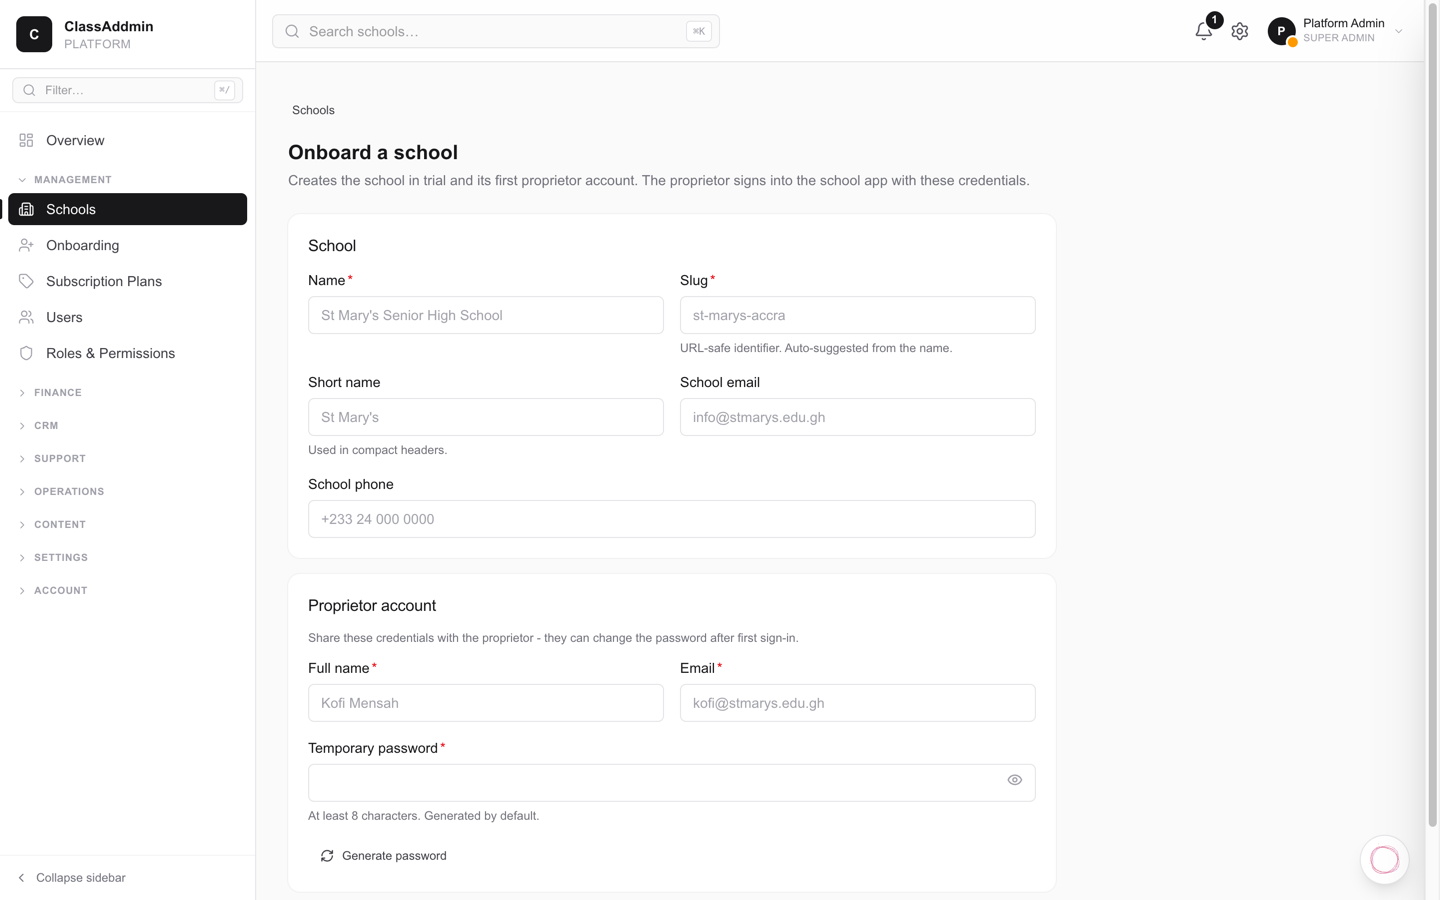
Onboard a new school — screen

When a new school signs up - either through the marketing site or via a sales call - you create their tenant from Schools → Add school.

What you need before you start

  • The school's legal name and a slug (short URL-safe handle, e.g. academy-basic → app.classaddmin.com/p/academy-basic for parent links).
  • The proprietor's email - this will be their first sign-in.
  • A temporary password (the system can also send a magic-link invite instead).
  • The school's billing tier (Free, Family, Plus). Default is Free with a 14-day trial.

Steps

  1. Schools → Add school (top right).
  2. Fill the school profile: name, slug, optional short name, contact email/phone.
  3. Add the proprietor - email + display name + password (or "Send invite email").
  4. Click Create.

The system will:

  • Create the schools row.
  • Create the auth.users row for the proprietor.
  • Link them via school_users with role proprietor.
  • Auto-seed the chart of accounts (the books module), role matrix, and default fee components.
  • Auto-send the welcome email if Resend is configured.

You'll land on the new school's profile page; share the proprietor's sign-in link or password with them.

After onboarding

  • Use Remote support → Enter session if they need help configuring fees or importing pupils.
  • Set the trial end under the school's Subscription tab if you negotiated a longer trial.
  • Mark the school's CRM lead as won so the funnel report stays clean.

Common gotchas

  • Slug must be unique - the marketing form usually catches this, but if a sales rep created a draft, double-check.
  • Don't share the proprietor's password in chat - use a secret-sharing tool (1Password, Bitwarden Send) or have them reset it.
  • Wrong tier? Edit the school → Subscription tab → switch tier; the next invoice run picks it up.

3.Move a lead through the CRM pipeline

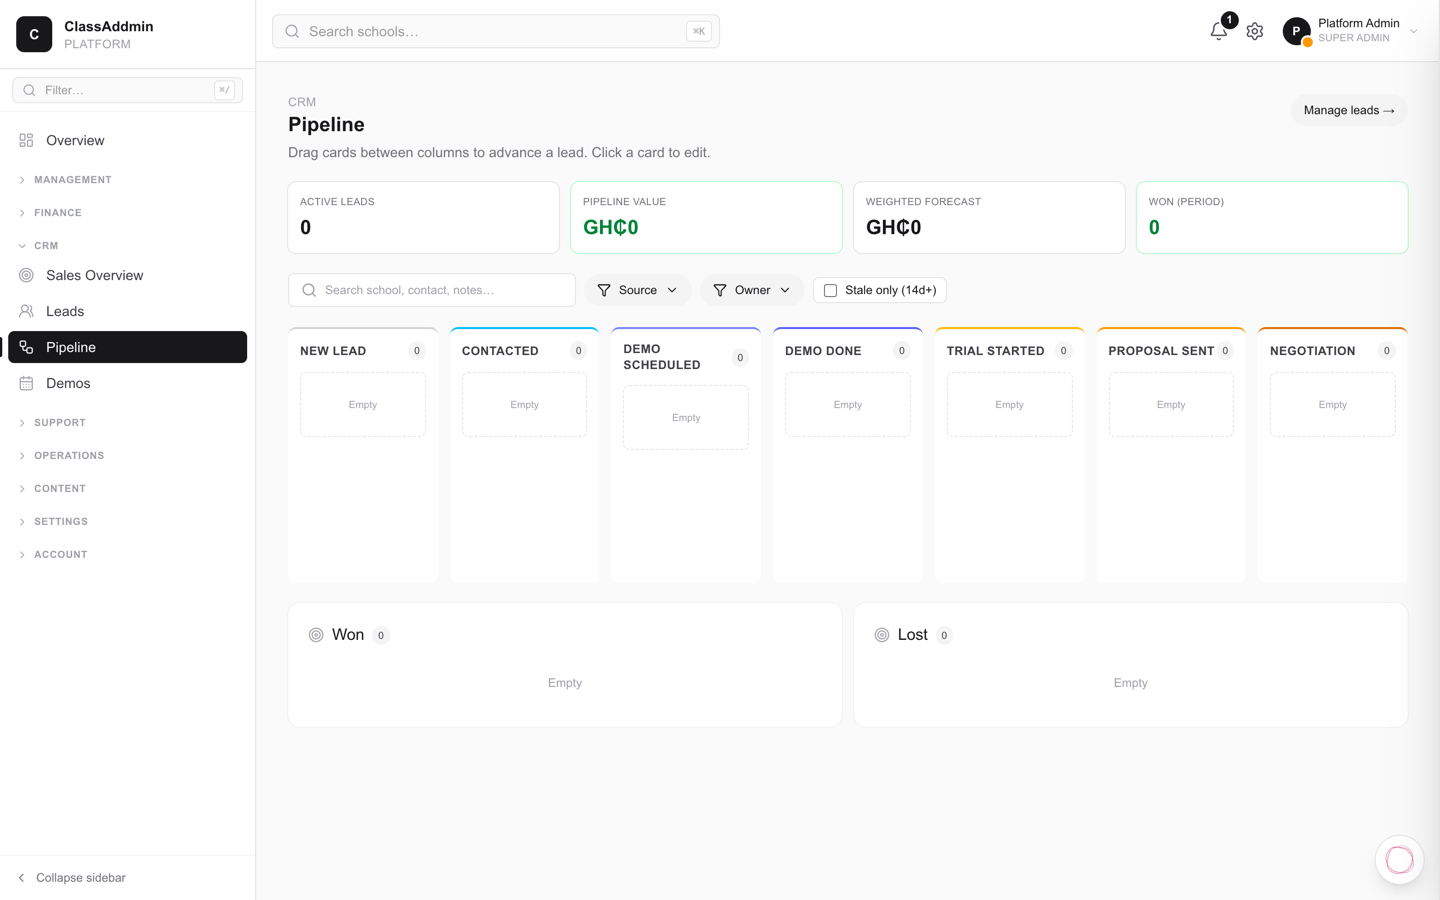
Move a lead through the CRM pipeline — screen

Leads come from the marketing site's contact form, demo bookings, referrals, and direct outreach. The CRM tracks each one through stages: new → contacted → demoed → negotiating → won (or lost). When a lead reaches won, you onboard them as a school.

See the pipeline

  1. CRM → Pipeline in the sidebar.
  2. Kanban view: columns for each stage, cards for each lead.
  3. Click a card to open the full lead detail.

The default view shows leads owned by you. Toggle to All at the top to see everyone's.

Add a new lead manually

  1. CRM → Leads → New lead.
  2. Fill:
    • School name (required).
    • Contact name / phone / email.
    • Source - where they came from (marketing site, referral, walk-in, etc.).
    • Owner - usually yourself.
    • Pipeline stage - start at new.
    • Estimated school size - pupils. Affects which tier they'll likely pay.
  3. Save.

The lead appears in the pipeline.

Move a lead through stages

Open the lead → Stage dropdown → pick the next stage:

  • new - just arrived, not yet contacted.
  • contacted - you've called/emailed and got a response.
  • demoed - you've shown them the product.
  • negotiating - they're considering pricing/terms.
  • won - they've committed. Time to onboard.
  • lost - they declined; record the reason.

Every stage change is timestamped in the Activity section of the lead, so you have an audit trail of progress.

Log activities

Open a lead → Add activity:

  • Call - "30 min call with proprietor, wants to start in September".
  • Email - paste the email body for the record.
  • Meeting - "Visited campus Tuesday".
  • Demo - "Walked through finance + gradebook".

Activities give context for follow-ups. Don't skip them; "called and left voicemail Tuesday, no response Thursday, sent follow-up email Friday" is much more useful 2 weeks later than "in progress".

Schedule a follow-up

Each activity has an optional Next follow-up date. Set it when you log the activity:

"Demo went well; head teacher wants to talk to the proprietor. Follow up Friday."

Next follow-ups land on your CRM → Tasks view, sorted by date. Don't let them pile up.

Convert a won lead to a school

  1. The lead's stage is won.
  2. Click Onboard school (top right on the lead detail).
  3. The Onboarding form opens, pre-filled with the lead's school name, contact email, etc.
  4. Complete the form (admin password, slug, tier, etc.).
  5. Click Create.

The lead is marked converted, the school is created (see Onboard a new school), and the onboarding email goes out.

Common gotchas

  • Lead lost track - make a habit of moving leads forward in the morning. Anything in new longer than 3 days is stale.
  • Wrong owner - open the lead → change owner. Useful when leads need handoff between sales reps.
  • Two leads for the same school - happens with duplicate form submissions. Merge by setting one as lost with reason "duplicate" and adding the activity history to the surviving one.

4.Override a school's subscription (trial extension, credit, manual tier)

Override a school's subscription (trial extension, credit, manual tier) — screen

Most subscriptions billed and managed automatically. But edge cases come up: a school's pilot got extended, you comped a school during onboarding, billing failed and you want to grant a grace period. These are subscription overrides.

Open the school's subscription

  1. Schools → search for the school → open it.
  2. Subscription tab.

You see the current tier, status, billing history, and an Override button.

Extend trial

When a school's 14-day trial is ending but they're not ready to commit:

  1. Click Extend trial.
  2. Pick a new trial end date (calendar picker - usually +14 to +30 days).
  3. Add a reason - "Sales asked for more time during pilot evaluation".
  4. Click Confirm.

The trial countdown resets. The school's existing data stays. Any read-only state from a previous trial expiry lifts.

Grant a credit

When you owe a school (botched onboarding, downtime, goodwill):

  1. Click Grant credit.
  2. Amount in GHS.
  3. Reason - "Compensation for 3-day outage on 12 March".
  4. Click Confirm.

The credit is applied to the next invoice. The school sees it on their Subscription page as "Credit applied: GHS X.XX".

Move tier manually

The school is on Free but their proprietor verbally agreed to Plus; the upgrade flow had a bug. Do it manually:

  1. Click Change tier.
  2. Pick the new tier.
  3. Charge now? - if you've already collected payment offline (bank transfer), tick yes-with-zero-amount. Otherwise charge as normal.
  4. Click Confirm.

The school's tier flips immediately. Features unlock. The next regular billing run picks up at the new tier.

Suspend an account

Required for non-payment after grace period, or for a school in violation of terms:

  1. Click Suspend.
  2. Pick a reason.
  3. Click Confirm.

The school's app becomes read-only immediately. Their proprietor sees a "Suspended - contact ClassAddmin support" banner.

Reverse by clicking Restore.

Hard-delete a tenant

Last resort. Only do this if a school has explicitly requested deletion (GDPR-style right-to-erasure), or it was a test/duplicate.

  1. Click Delete school at the very bottom of the Subscription tab. The button has a deliberately scary red colour.
  2. Type the school's slug to confirm.
  3. Click Permanently delete.

The school and all its data are removed. There is no undo. Backups exist for 30 days; recovery requires a manual database restore.

Every override is logged

Every override action is timestamped in the audit log with who did it and why. Quarterly billing reviews go through the log to spot patterns or revenue leakage.

Common gotchas

  • Trial extension didn't take - check the school's trial_ends_at directly in Schools → school → Subscription. If it's still old, refresh and re-do.
  • Credit applied but the school says they were still charged - check the timing. Credit applies to next invoice, not the most-recent one. To compensate for an already-charged invoice, refund via Paystack.
  • Wrong reason on the override - open Audit log → find the override row → edit the reason. Audit log entries are append-only but the reason field is editable.

Support

Tickets, consented remote sessions, and help feedback.

5.Triage a support ticket

Triage a support ticket — screen

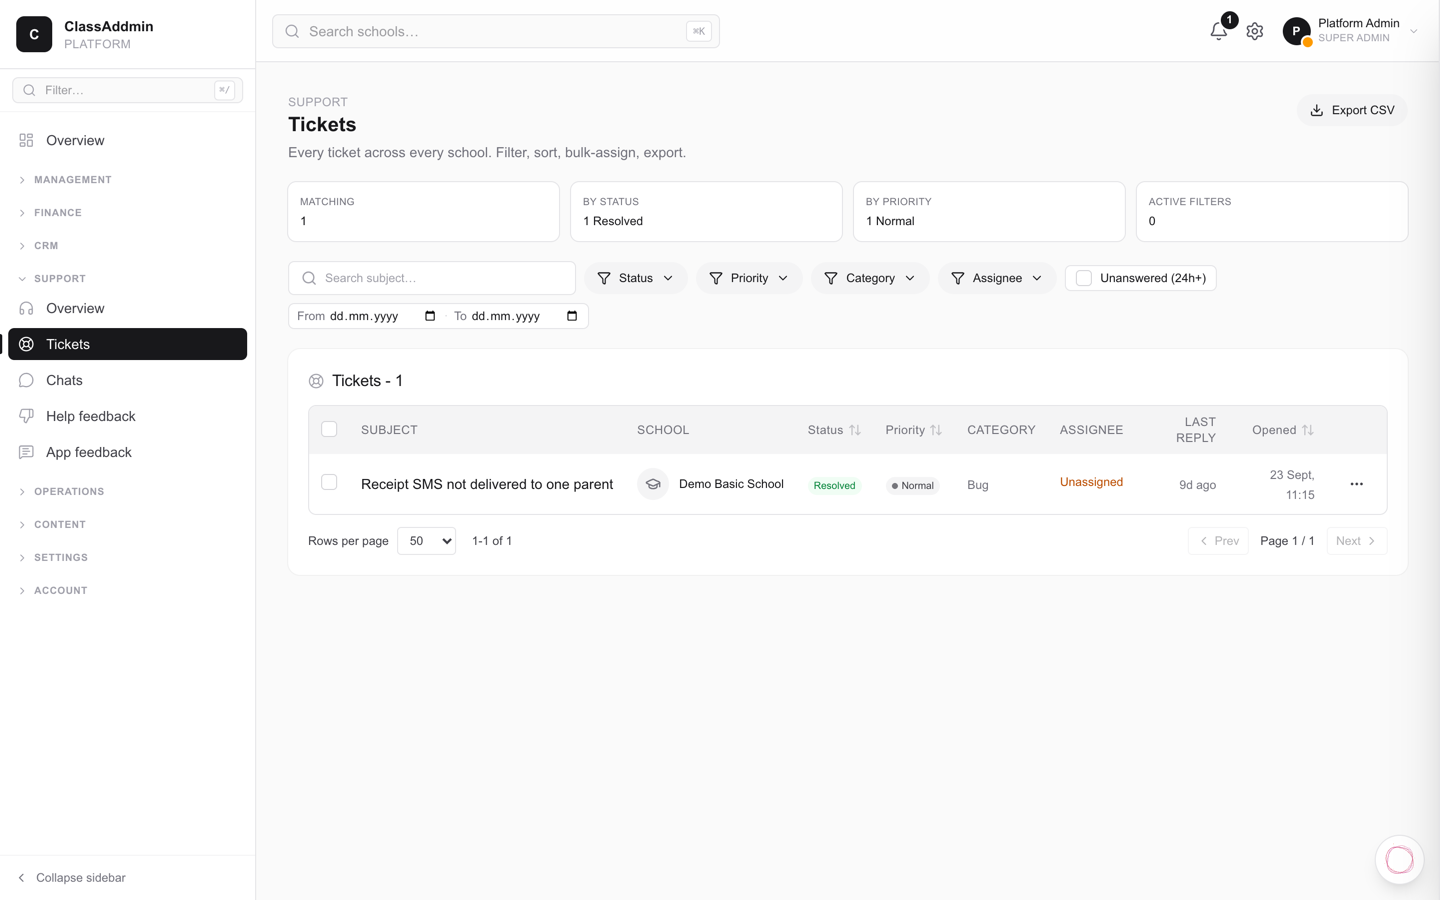
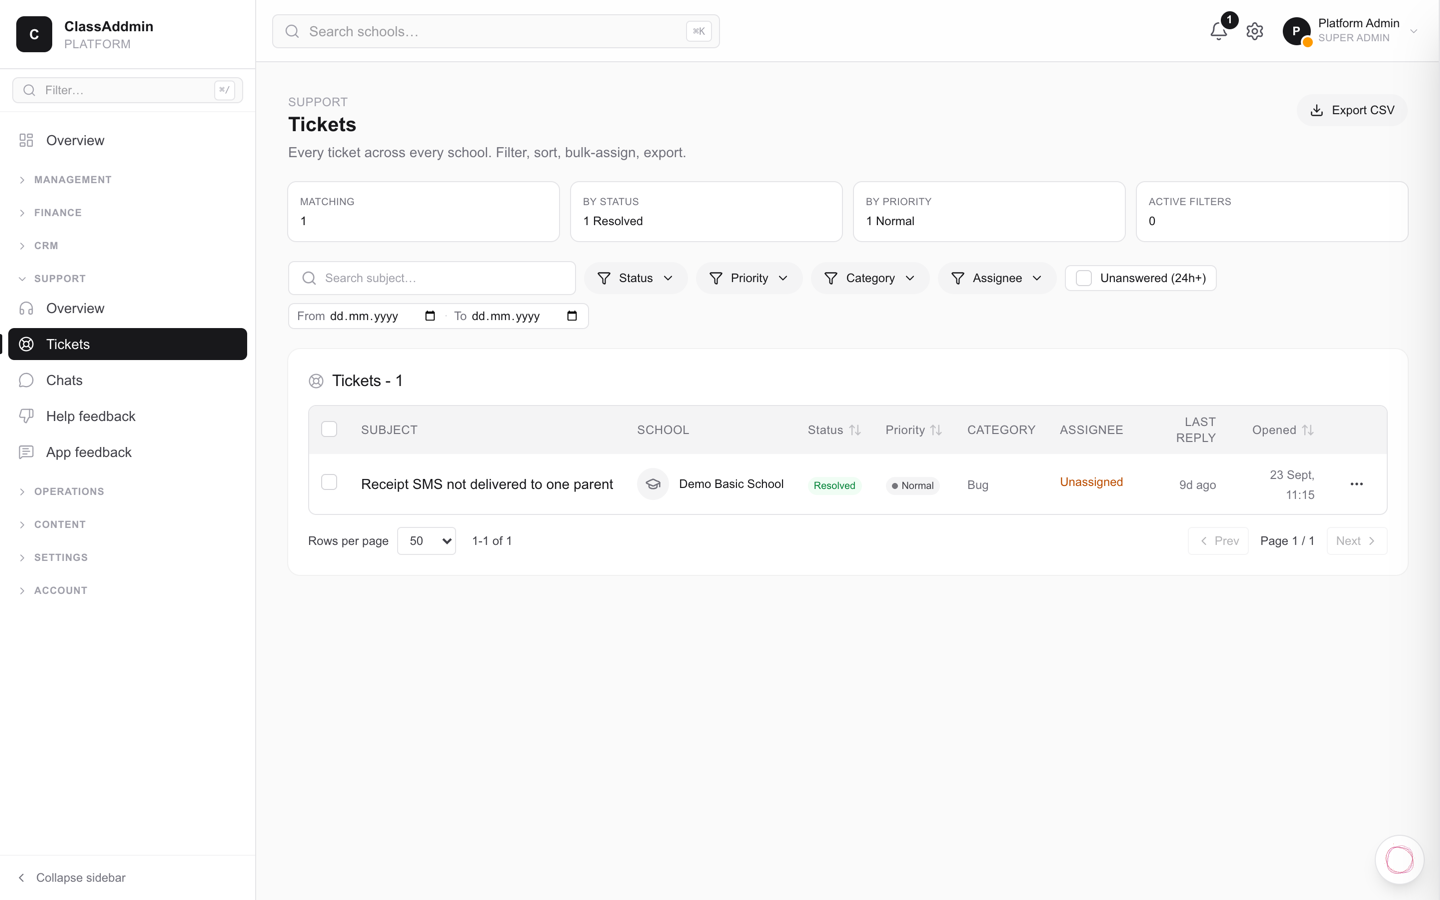
The support ticket queue is the centre of every support shift. Here's the routine that keeps schools happy and the queue at zero.

The queue

Support → Tickets lists every ticket across all schools. Filters at the top: status, priority, assignee, school, category. Sort defaults to oldest unanswered - work top-down.

Pick up a ticket

  1. Click the ticket subject to open it.
  2. Set Assignee to yourself if it isn't already.
  3. Set Status to in_progress so colleagues see you've got it.
  4. Read the school's last message + any prior context.

Reply

Type into the reply box at the bottom. Markdown works. Keep it short, kind, and concrete - point to the exact button or page in the school's app.

If you need to see what they see to diagnose, click Remote support → Request session in the right panel. The school approves; you enter their app in read-only mode (or write mode if they need you to fix something). See Remote support sessions.

Close out

When the school confirms it's resolved:

  1. Click Mark resolved on the ticket.
  2. The status flips to resolved. The ticket stays in the list under filter "resolved" for posterity.
  3. If the same issue reappears, the school can re-open from their side.

SLA shape

  • Urgent - reply within 1 hour during work hours.
  • High - same business day.
  • Normal - within 24 business hours.
  • Low - within 3 business days.

If you can't hit the SLA, drop a "We're on it; back to you by Tuesday morning" note so the school isn't left wondering.

What goes where

  • Schools ask how to do X → either answer inline OR convert to an article via Content → Help articles (see Author a help article).
  • Schools report a bug → file a Linear/GitHub issue, paste the link into the ticket, and tell the school you've logged it.
  • Schools want a feature → log under CRM → Feature requests, reply with "logged".
  • Schools want a refund → escalate to billing lead; don't promise anything.

6.Run a remote support session

Run a remote support session — screen

Remote support lets you sign in as a school user for a fixed window, so you can diagnose what they're seeing instead of guessing. Every action you take is recorded in their audit log with your platform identity attached.

Request a session

  1. Open the support ticket.
  2. In the Remote support panel on the right, click Request session.
  3. Pick the role to act as (default: head teacher).
  4. Pick read-only (safe - you can look but not edit) or write (you can change data).
  5. Pick the duration - 15, 30, 60, 120, or 240 minutes.
  6. Write a scope summary the school will see when they approve. Be specific: "Reproducing the report card PDF error reported in ticket".
  7. Click Request.

The school's proprietor or head teacher will see a yellow consent card on the same ticket on their side. They click Approve and the session flips to consented.

Enter the session

Once consent is granted, the Enter session button activates.

  1. Click it.
  2. The console mints a Supabase session as the chosen school user and redirects you to app.classaddmin.com/_support/enter.
  3. You land on the school's /overview page, signed in as that user, with a banner across the top showing time remaining + End session button.

Do what you need. Every mutation is audit-logged with support_session_id so the school can trace what changed.

End the session

Three ways:

  • You click End in the platform ticket page - preferred.
  • The school clicks End on their banner - they should do this if they're done with you mid-session.
  • The countdown hits zero - auto-end with reason expired.

Sessions also auto-end if the ticket is closed or if 15 minutes of inactivity passes.

Hard rules

  • Always pick read-only unless you genuinely need to write. Diagnose first, fix second.
  • Don't post messages, send emails, or charge cards during a session - even if you have write mode. Those are the school's actions to take.
  • Don't shadow more than 3 schools at once. The system enforces this - you'll get rejected at the 4th.
  • Tell the school when you start and end in the ticket. "Entering session now" + "Done - please confirm the report card now generates".

If a school's PII shows on screen, treat it the same way you'd treat patient data: see it, use it, never copy it out.

7.Triage AI assistant feedback

Triage AI assistant feedback — screen

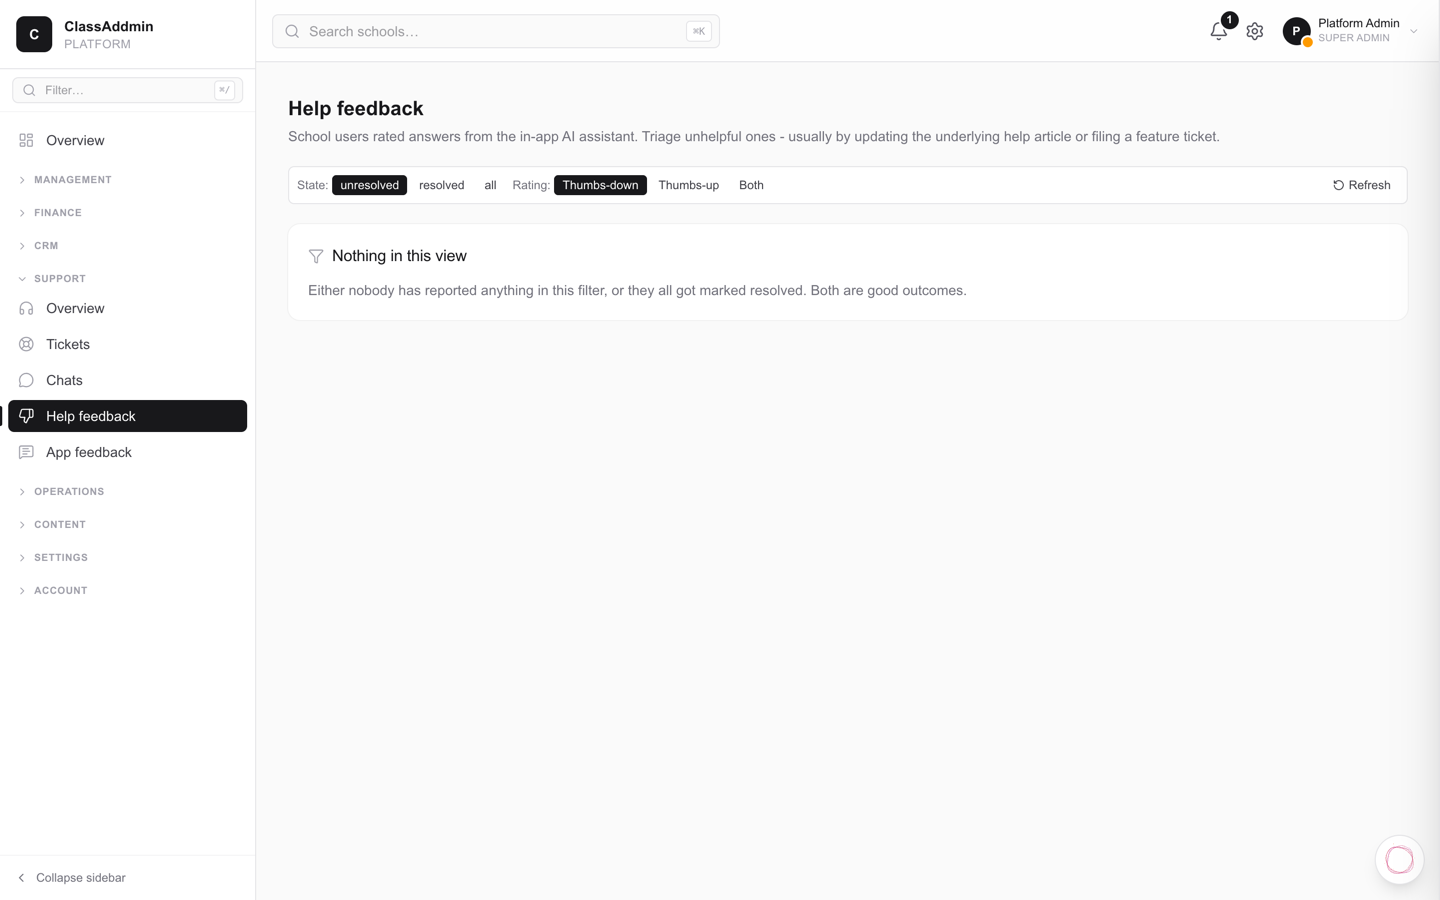
When a school user gives the in-app AI assistant a thumbs-down, it lands in Support → Help feedback. Your job is to figure out why the answer wasn't useful, and fix the root cause.

Open the queue

Sidebar → Support → Help feedback. The badge shows the unresolved count. The bell icon also surfaces an aggregate row when there are unresolved items.

Default filter: unresolved + thumbs-down. That's the work-list.

Triage each row

Each card shows:

  • The question the user asked.
  • The AI's answer rendered as markdown.
  • The articles cited (slugs) - useful for diagnosing why retrieval missed.
  • The user's comment (if they left one).
  • Confidence score the model assigned - low confidence often means retrieval failed.

Decide the cause

Common patterns:

  1. The article exists but the AI didn't cite it - retrieval miss. Add the missing question to that article's keywords frontmatter. Re-index.
  2. No article covers this - write a new one. See Author a help article.
  3. The article is wrong / outdated - fix it. The article slug is right there in the citations.
  4. The user misunderstood the answer - sometimes the answer was correct but unclear. Edit the article for clarity.
  5. The user wanted action, not info - the AI is read-only by design. Reply on the ticket with a direct walkthrough instead.

Resolve

When you've taken action (updated an article, opened a bug, replied to the user):

  1. Click Mark resolved.
  2. Optionally type a one-line resolution note - "Updated finance/books/read-balance-sheet to mention cash-basis caveat."
  3. Click Resolve. The badge drops, the bell row drops if this was the last one.

If you can't resolve right now, leave it. The queue is a working list, not a TODO.

Escalate to a support ticket

If the school user clearly needs human help, click Open support ticket on the card. A prefilled ticket draft opens with the question + context. Assign yourself, reply.

Why this matters

The AI assistant exists so schools don't have to message us for routine questions. Every thumbs-down is a chance to make next month's questions disappear. Aim for zero unresolved feedback older than 7 days.

Operations

Cron failures and incidents.

8.Investigate a failed cron run

Investigate a failed cron run — screen

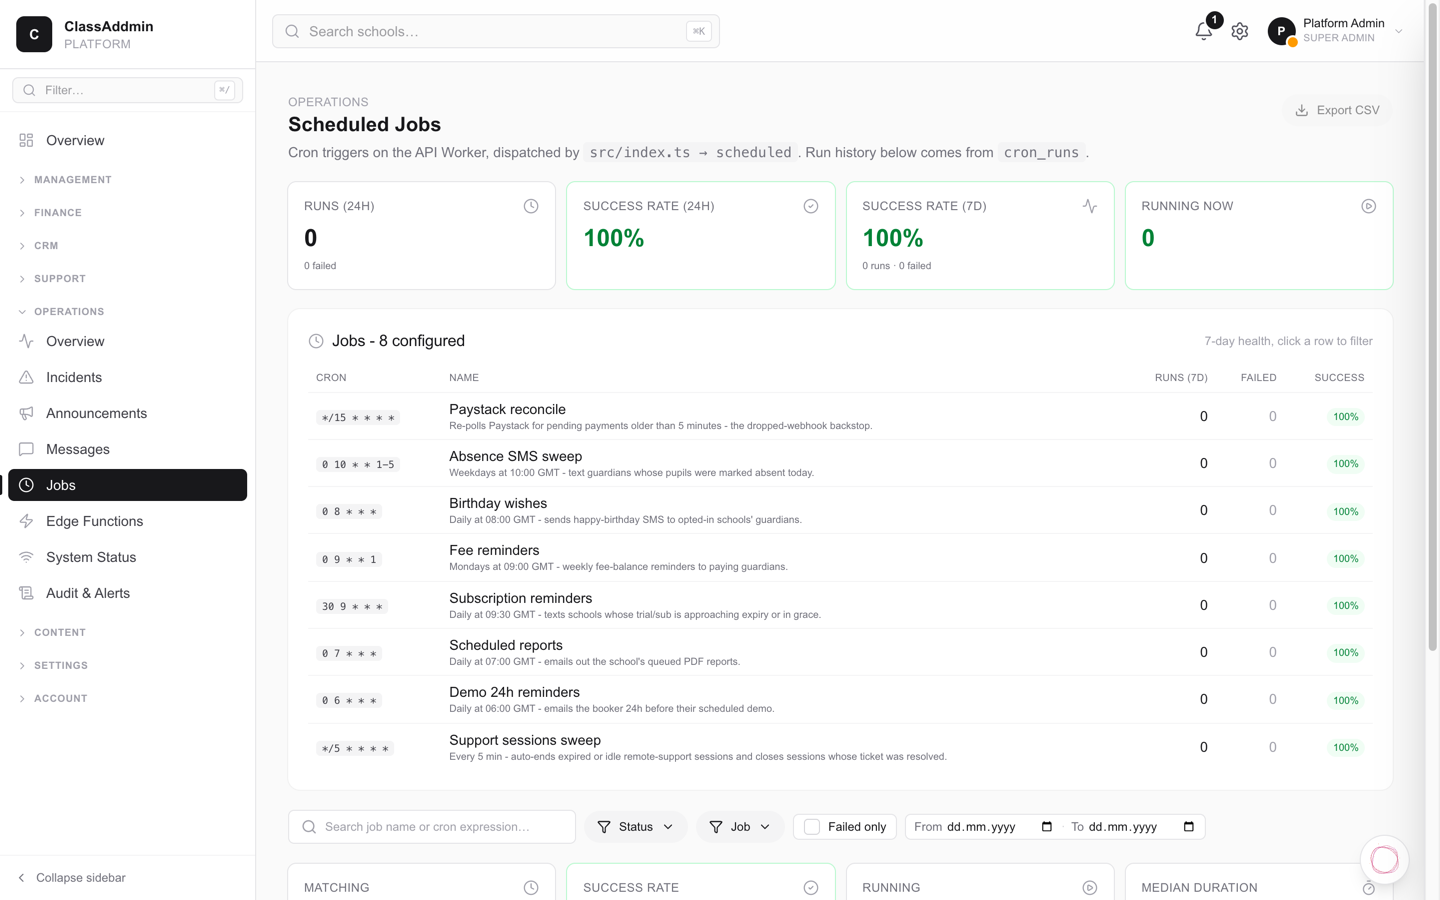
The platform runs ~10 cron jobs at various cadences: Paystack reconciliation, absence SMS, birthday wishes, fee reminders, subscription reminders, scheduled reports, demo reminders, support session sweep, push notification dispatch. When one fails, the bell row says so.

Find the failure

  1. Operations → Cron runs.
  2. Filter by status = failed, last 24 hours.
  3. Click into the run.

Each row shows:

  • Started at / Finished at / Duration.
  • Error message - the exception text from the worker.
  • Output - anything the job logged before failing.

Common root causes

Paystack reconcile failed

Usually a transient 5xx from Paystack. The job is idempotent - it'll catch up on the next run (every 15 min). If failures persist for >1 hour, check Paystack's status page.

Subscription reminder failed

Probably a missing RESEND_API_KEY env var or Resend rate-limit. Check Workers logs.

SMS sweep failed

Likely Arkesel-side: balance, sender ID, or API key. Verify in the school whose schools.sms_sender_id triggered the sweep.

Scheduled report failed

The Supabase edge function for PDF generation is the usual suspect. Look for pdf-report errors in Supabase logs.

Retry

Most jobs are idempotent - they'll pick up the missed work on the next scheduled run. Don't manually re-trigger unless you've fixed the root cause.

If you do need to re-fire:

  1. Operations → Cron runs → Trigger (top-right) - requires platform.ops.cron.
  2. Pick the cron expression.
  3. Click Run now. Output streams below.

Won't auto-recover

A few jobs are not idempotent:

  • Birthday wishes - if it ran twice on the same day, pupils get two SMS. The job has a sent_at guard, but a manual re-fire bypasses it.
  • Demo reminders - same story.

For these, only re-fire if you've verified the previous run posted no SMS.

Mark resolved

When you've confirmed the failure won't recur:

  1. Open the failed run.
  2. Click Acknowledge (top right).
  3. The row drops out of the unresolved count on the bell.

If the same cron fails 3+ runs in a row, that's an incident - file one under Operations → Incidents and page the on-call.

9.Open and resolve an incident

Open and resolve an incident — screen

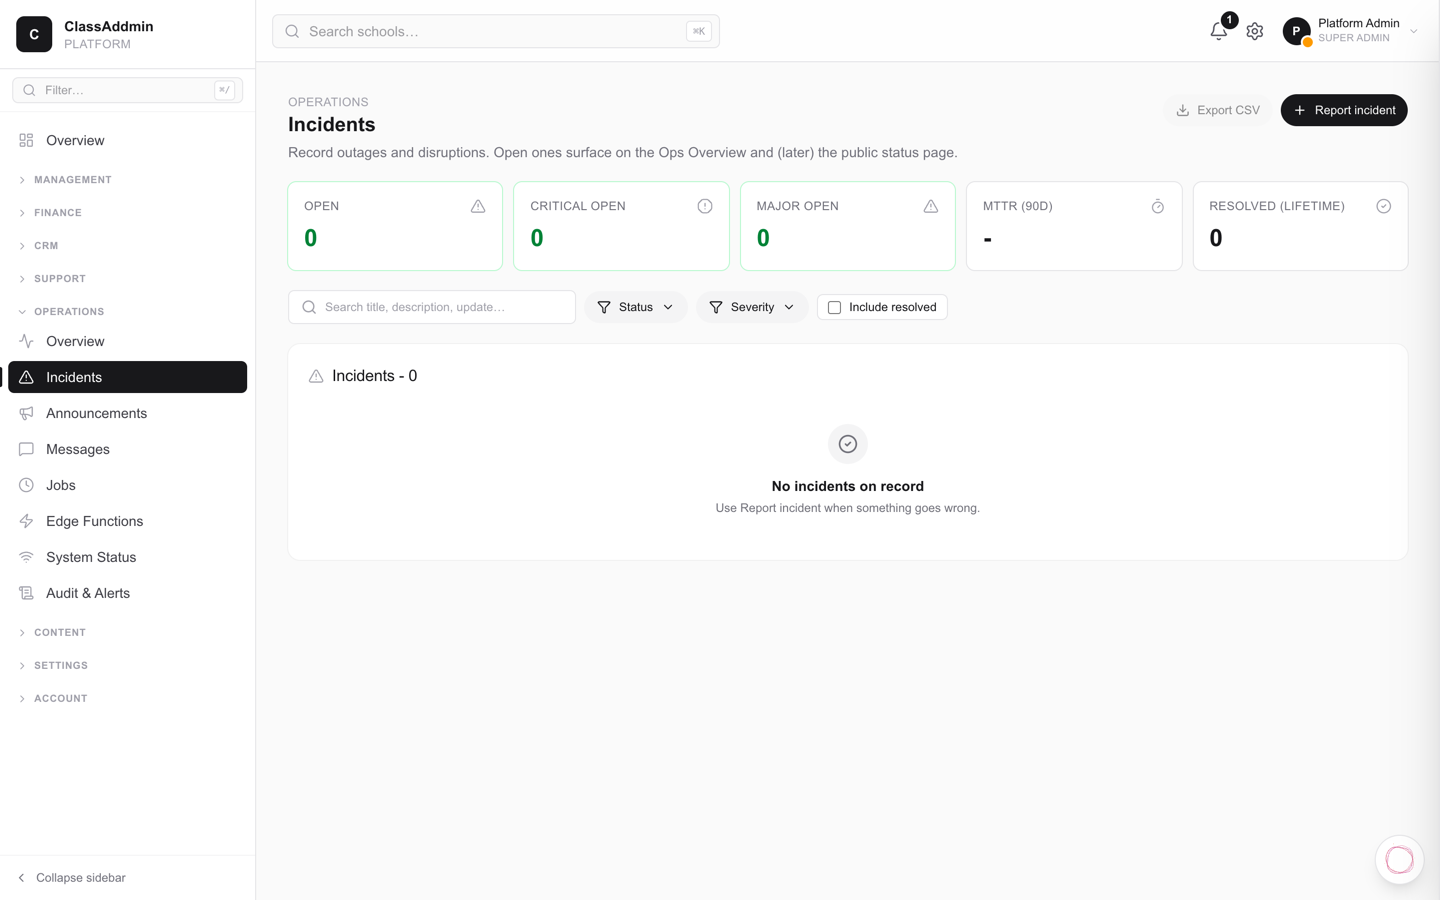
When something breaks at the platform level - Supabase outage, Paystack webhook lag, our wrangler crashing, a critical bug affecting multiple schools - that's an incident. Open one to coordinate response, communicate to schools, and document what happened.

When to open an incident

  • Sev 1 (critical) - something widespread and severe. Sign-in is down; payments aren't recording; data loss. Page the on-call.
  • Sev 2 (major) - something significant but isolated. One feature broken for many schools, or all features broken for one school.
  • Sev 3 (minor) - slow page loads, occasional 500s, cosmetic bugs that affect work.

Anything below sev 3 is a bug, not an incident - file under GitHub issues.

Open an incident

  1. Operations → Incidents → New incident (top right).
  2. Fill:
    • Title - short, specific. "Paystack webhook delayed", "Help feedback page returns 500".
    • Severity - sev 1 / 2 / 3.
    • Affected systems - pick from list (payments, SMS, auth, books, gradebook, etc.).
    • Status - investigating to start.
  3. Click Open.

The incident appears on the Incidents page with status investigating. It also lights up the platform bell so anyone signed into the console sees the alert.

Communicate

Open the incident → Updates section. Add an update every time the situation changes:

  • "Investigating - we believe Paystack's webhook delivery is backed up."
  • "Identified - Paystack confirmed delivery delay on their end."
  • "Monitoring - webhooks have caught up; watching for stragglers."
  • "Resolved - all payments from the affected window are now reconciled."

Updates are timestamped. They form the public record for affected schools and for the postmortem later.

Status transitions

  • investigating → starting the response.
  • identified → we know what caused it.
  • monitoring → we've shipped a fix and are watching to confirm.
  • resolved → fully back to normal.

Don't skip stages - going straight from investigating to resolved looks like nobody understood the root cause.

Notify schools

If schools should know:

  1. Open the incident → Notify schools.
  2. Pick which schools - usually "affected" (only those with impact) or "all".
  3. Write a short customer-facing note: "We're seeing a delay in Paystack payments reaching the dashboard. They are not lost. We'll update when resolved."
  4. Click Send.

The note is broadcast as a critical announcement in those schools' dashboards - fixed banner at the top.

Don't notify for sev 3 or for issues schools won't notice. The notification fatigue is real.

Resolve

When everything's back to normal:

  1. Add a final Resolved update.
  2. Set the status to resolved.
  3. (Optional) Notify schools - resolved. Same as the open notification but to clear the banner.

Postmortem

Within 48 hours of resolving a sev 1 or 2:

  1. Open the incident → Postmortem tab.
  2. Write up:
    • Timeline - when it started, was detected, escalated, mitigated, resolved.
    • Root cause - what broke and why.
    • Customer impact - how many schools affected, what they saw.
    • What went well / what went badly.
    • Action items - concrete things to prevent or detect this faster next time. Assign owners + dates.
  3. Save.

Postmortems are shared internally only. They're how we get better; treat them as blameless.

Common gotchas

  • Severity inflation - every minor bug as a sev 1 → on-call burns out, nobody trusts severity. Be honest.
  • No updates between open and resolve - looks like nobody worked on it. Update at least every 30 min even if just "still digging".
  • Action items never get done - book a follow-up review in 2 weeks. Re-open the incident if they slip.

Content

Writing the help articles these handbooks are built from.

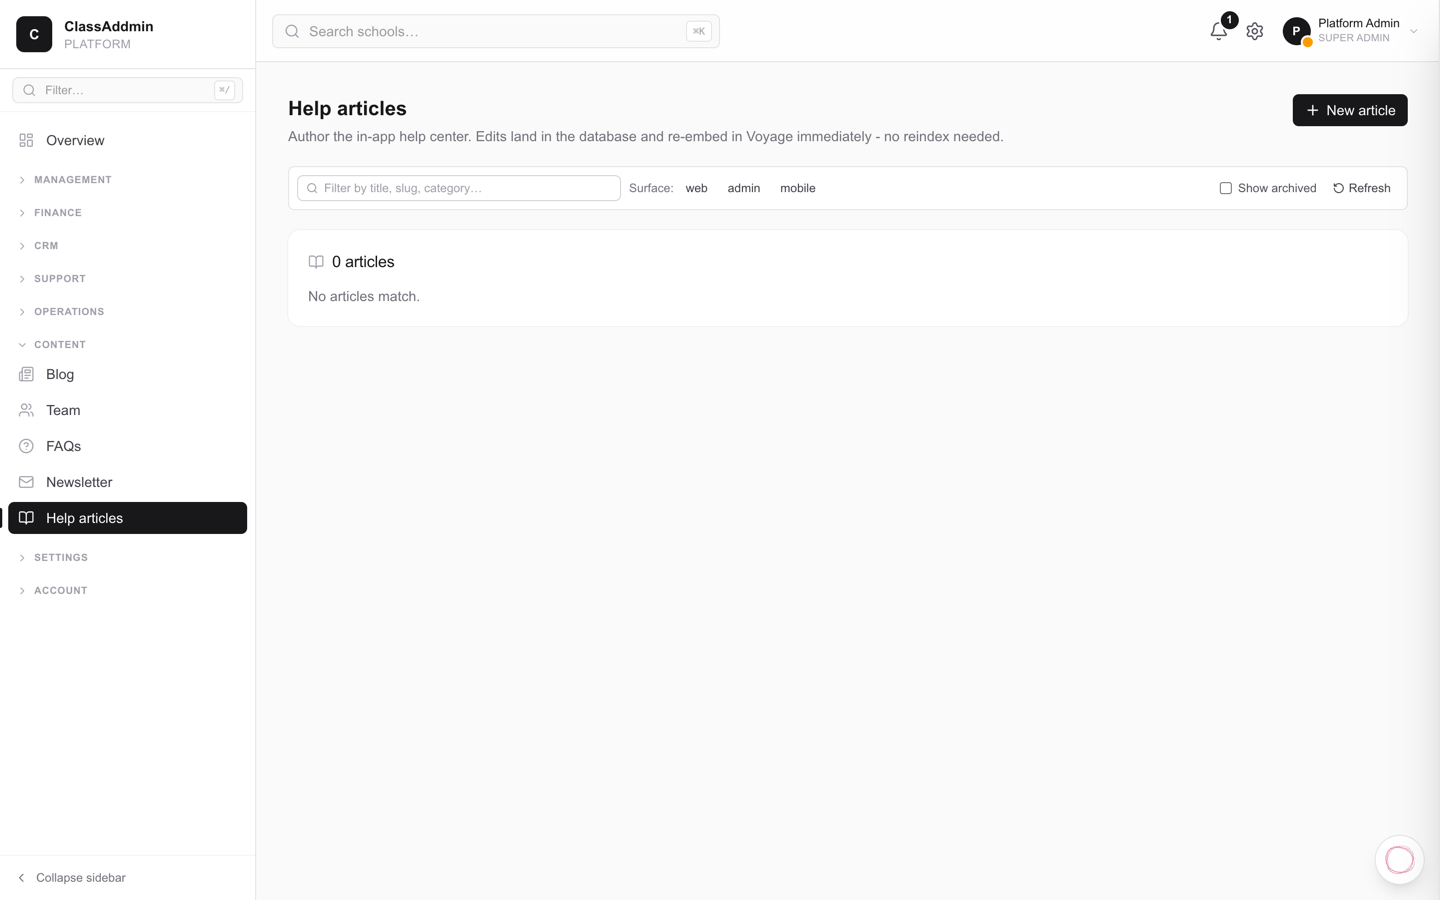
10.Write or edit a help article

Write or edit a help article — screen

Help articles live as MDX in the packages/help-content/articles/ directory in the monorepo. The in-app help panel (and the AI assistant) reads everything from there.

Where to put it

Pick a folder under articles/:

  • articles/getting-started/ - orientation for new school users.
  • articles/finance/ - invoicing, payments, expenses.
  • articles/finance/books/ - accounting.
  • articles/messages/ - SMS broadcasts and parent threads.
  • articles/platform/ - these console articles.
  • articles/platform/support/, platform/ops/, etc. - sub-categories.

Filename = the last part of the slug: articles/finance/books/close-month.mdx has slug finance/books/close-month.

File shape

Every article has YAML frontmatter at the top, then markdown:

---
slug: finance/books/close-month
title: Close a fiscal month
type: how_to
category: finance/books
surface: [web]
permissions: [accounting.close_period]
keywords: [close, month, period, lock]
related:
  - finance/books/post-manual-journal
---

The body - markdown with headings, lists, tables. MDX
also accepts JSX components, but plain markdown is
what we use today.

Field reference

  • slug - must match the file path, kebab-case, no spaces, only a-z 0-9 - /.
  • title - short, action-oriented. "Close a fiscal month", not "Closing fiscal months".
  • type - concept (explains a noun), how_to (numbered steps), or troubleshooting (symptom → cause → fix).
  • category - folder-style. Mirror the sidebar.
  • surface - array of web / admin / mobile. Articles only appear on tagged surfaces.
  • roles - optional. If set, only users in those roles see the article.
  • permissions - optional. If set, only users with at least one matching permission see it. Use for sensitive how-tos (payroll, books).
  • keywords - boost search ranking. Add aliases the user might type ("paye, ssnit, withholding").
  • related - slugs of "see also" articles.

Writing style

  • Talk to one person. "You" not "users".
  • Reference the exact UI label. "Click Books → Bank accounts", not "Navigate to the books section".
  • Lead with the action. Numbered steps. No preamble.
  • Cut everything else. A help article isn't a tutorial - it's a cheat sheet.
  • No emojis unless the user explicitly enables that style.

Index after editing

After every edit:

pnpm --filter @classaddmin/help-content reindex

That re-embeds changed articles via Voyage and updates help_articles + help_chunks. The panel picks up the change on the next page load.

The reindexer is idempotent - articles whose body hash hasn't changed only get metadata updates.

Test it

  1. Sign in to whichever app the surface tag points to.
  2. Open the help panel (orange ? button bottom-right, or Cmd-/).
  3. Browse - confirm the article shows in the right category.
  4. Search - type a few words from the title and from the keywords.
  5. Ask - ask a question the article should answer. If the AI cites the new article and answers correctly, you're done.