ClassAddmin
← All guides

Handbook

Proprietor Handbook

School owners and directors who oversee the whole school.

Download PDF34 topics across 11 chapters

Getting started

What ClassAddmin is, how to find your way around, and who can do what.

1.Welcome to ClassAddmin

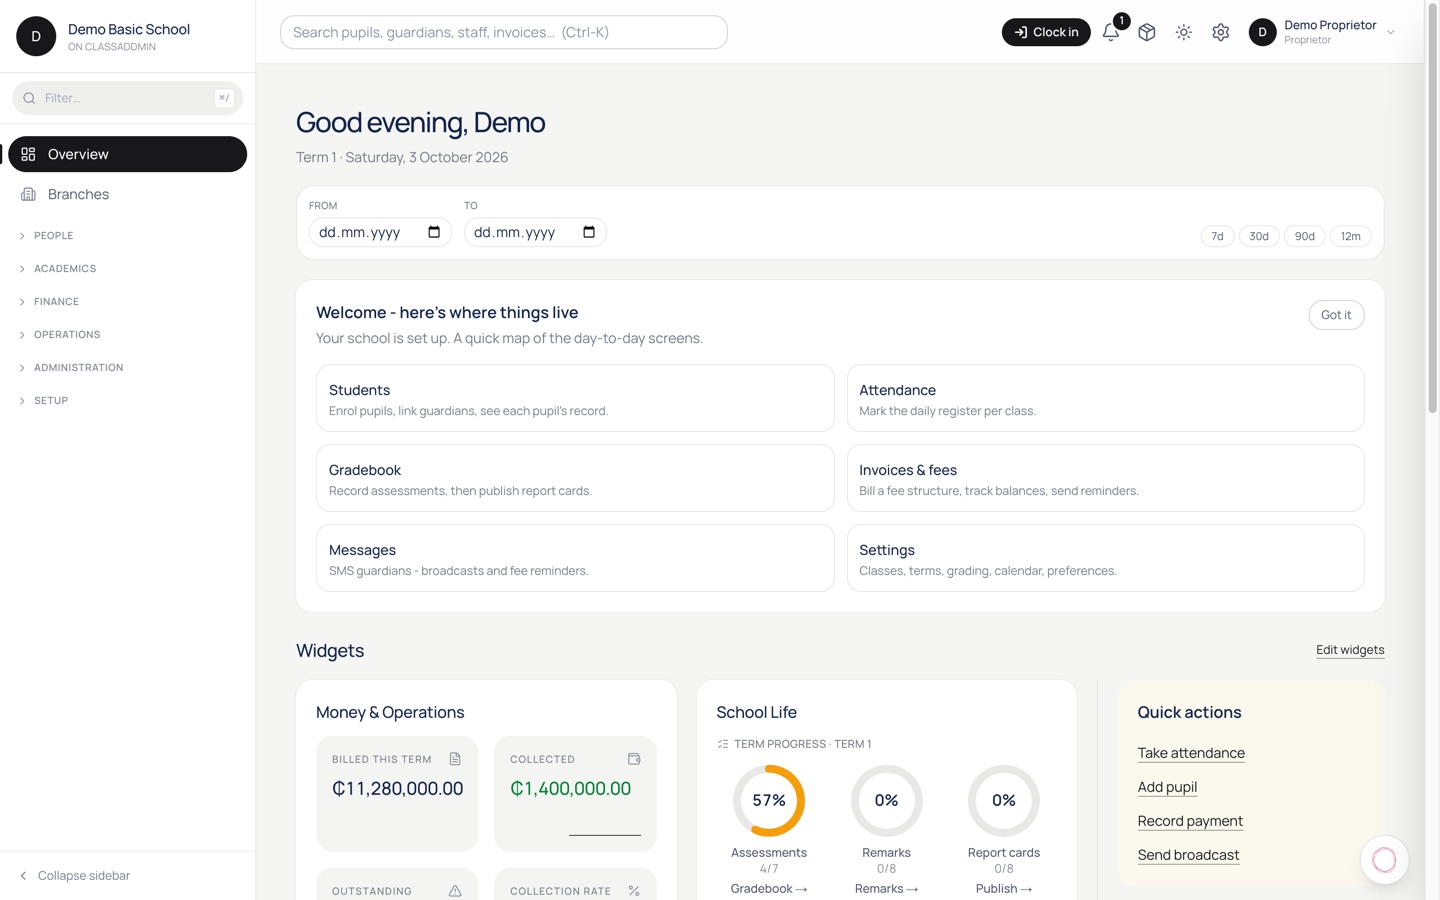
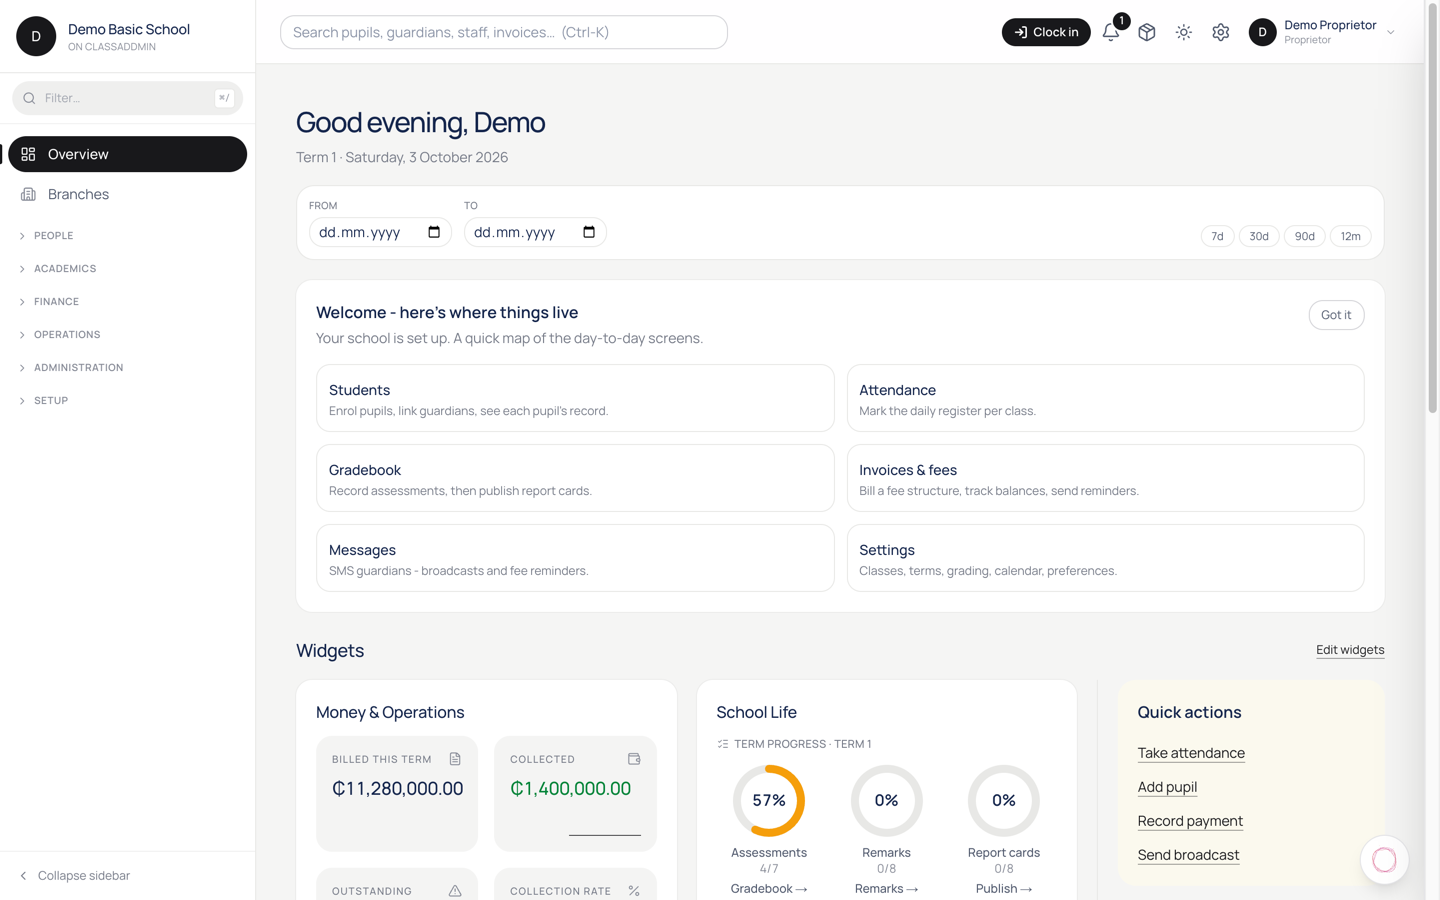
Welcome to ClassAddmin — screen

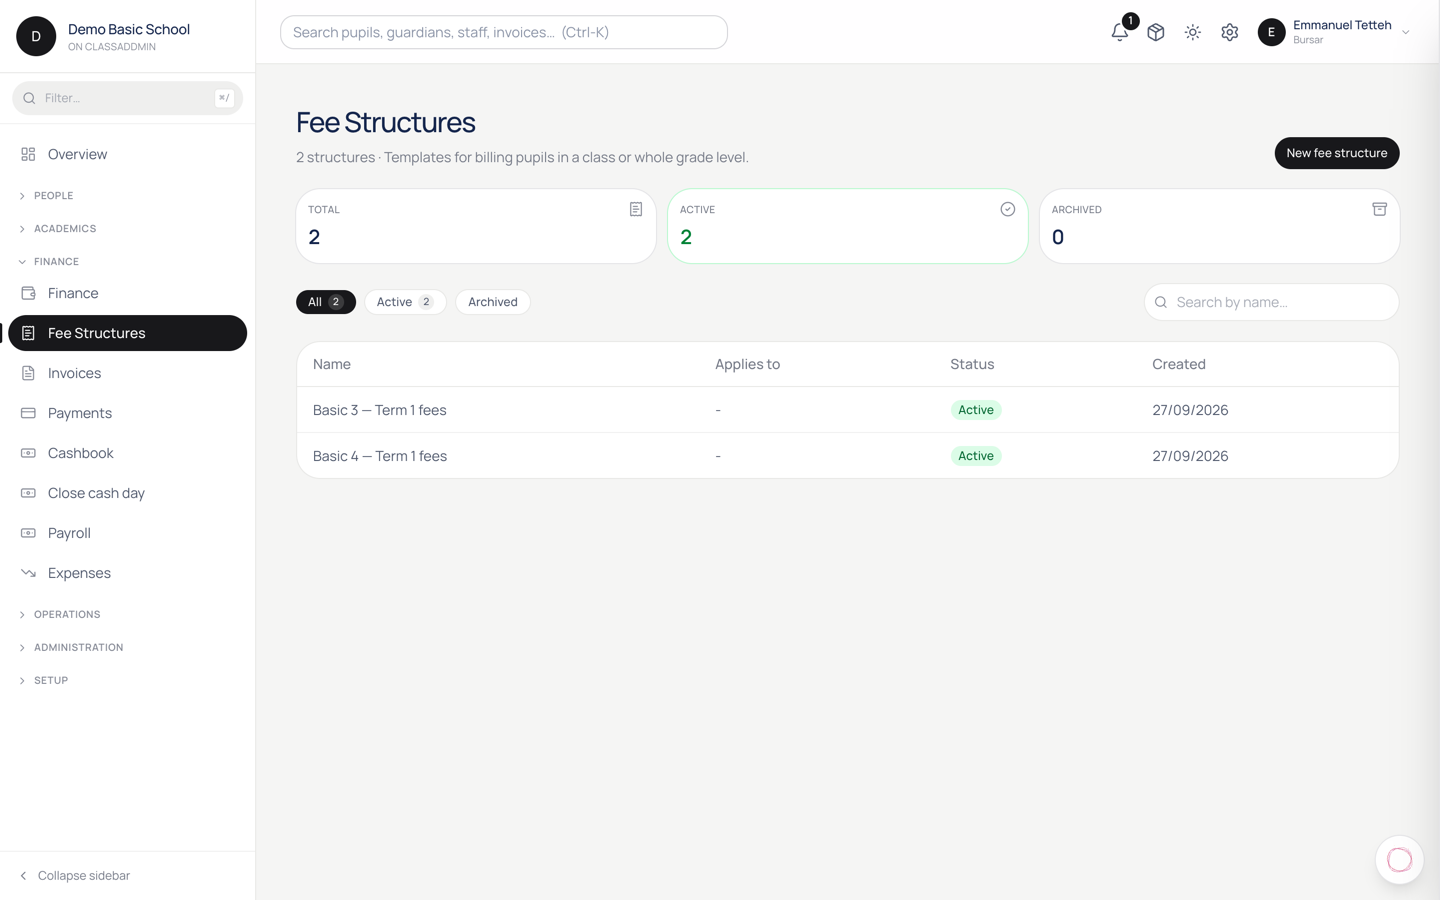
ClassAddmin is your school's day-to-day operations cockpit. From a single dashboard you'll track admissions, mark attendance, send invoices, collect MoMo payments, message parents, and run payroll.

The first time you sign in, head to Overview - that's the home screen. It shows today's collections, this week's absences, anything that needs your attention, and shortcuts to the things you'll touch every day.

You don't need to be a computer expert. Everything lives in the left sidebar: People, Academics, Finance, Operations, Administration. If you can find the right section, you can do the task - every page is built around one job.

Three things to do on day one

  1. Add your school's logo and contact details under Settings → School. They appear on invoices, receipts and report cards.
  2. Invite your team under Settings → Staff. Each person gets a sign-in link by email, SMS or shareable URL.
  3. Open the Help button (bottom-right corner of every page) any time you're stuck. It searches our guides and can answer questions in plain English.

That's it - explore the sidebar at your own pace. If you ever get lost, the back button works the same as in any browser, and clicking the ClassAddmin logo (top-left) takes you home.

2.A tour of the sidebar

A tour of the sidebar — screen

The sidebar on the left is split into six sections. You only see the items your role gives you access to - a class teacher's sidebar looks shorter than a proprietor's.

People

  • Admissions - applications from new pupils. Review, accept, reject.
  • Students - every enrolled pupil. Profile, fees, attendance history.
  • Guardians - parents and caregivers, with their pupils and contact details.

Academics

  • Attendance - mark today's register. One tap per pupil.
  • Gradebook - assessments, scores, comments, report cards.
  • Discipline - log incidents and follow-ups.
  • Timetable - period schedule per class.
  • My Teaching - for teachers: just your classes and lessons.

Finance

  • Finance - overview of money in and out.
  • Fee Structures - what fees each class pays per term.
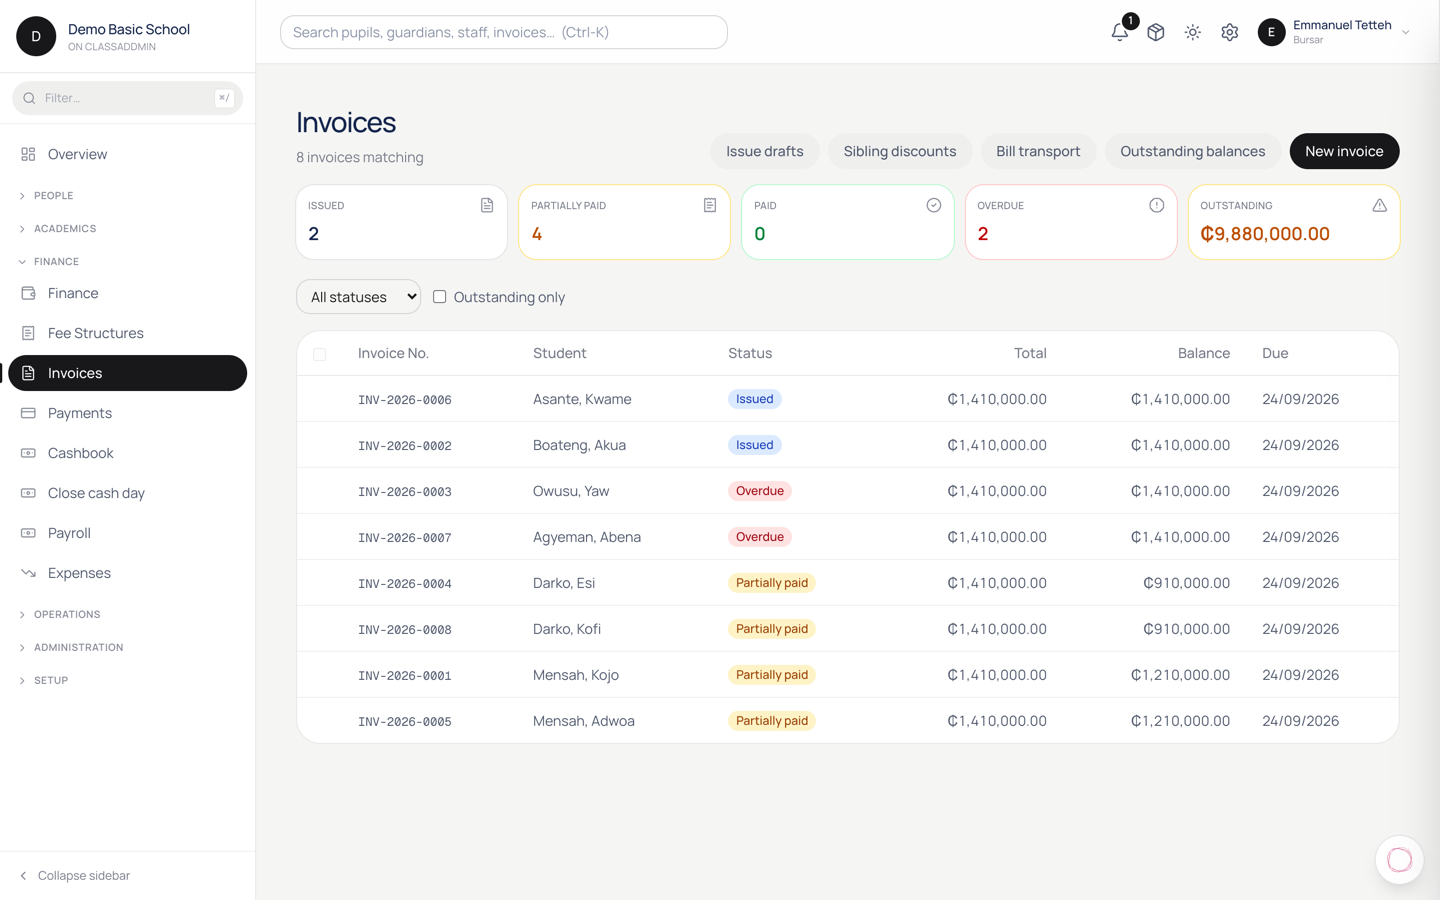
  • Invoices - what you've billed.
  • Payments - what's been collected (cash, MoMo, bank).
  • Payroll - staff salaries.
  • Books - accounting reports (proprietors and bursars only).
  • Expenses - what the school spends.

Operations

  • Transport - vehicles, routes, who rides which bus.
  • Messages - broadcast SMS to guardians.
  • Parent threads - two-way chat with each pupil's parents.

Administration

  • Reports - exportable PDFs and dashboards.
  • Staff - invite, edit, remove.
  • Promotion - end-of-year class promotion.
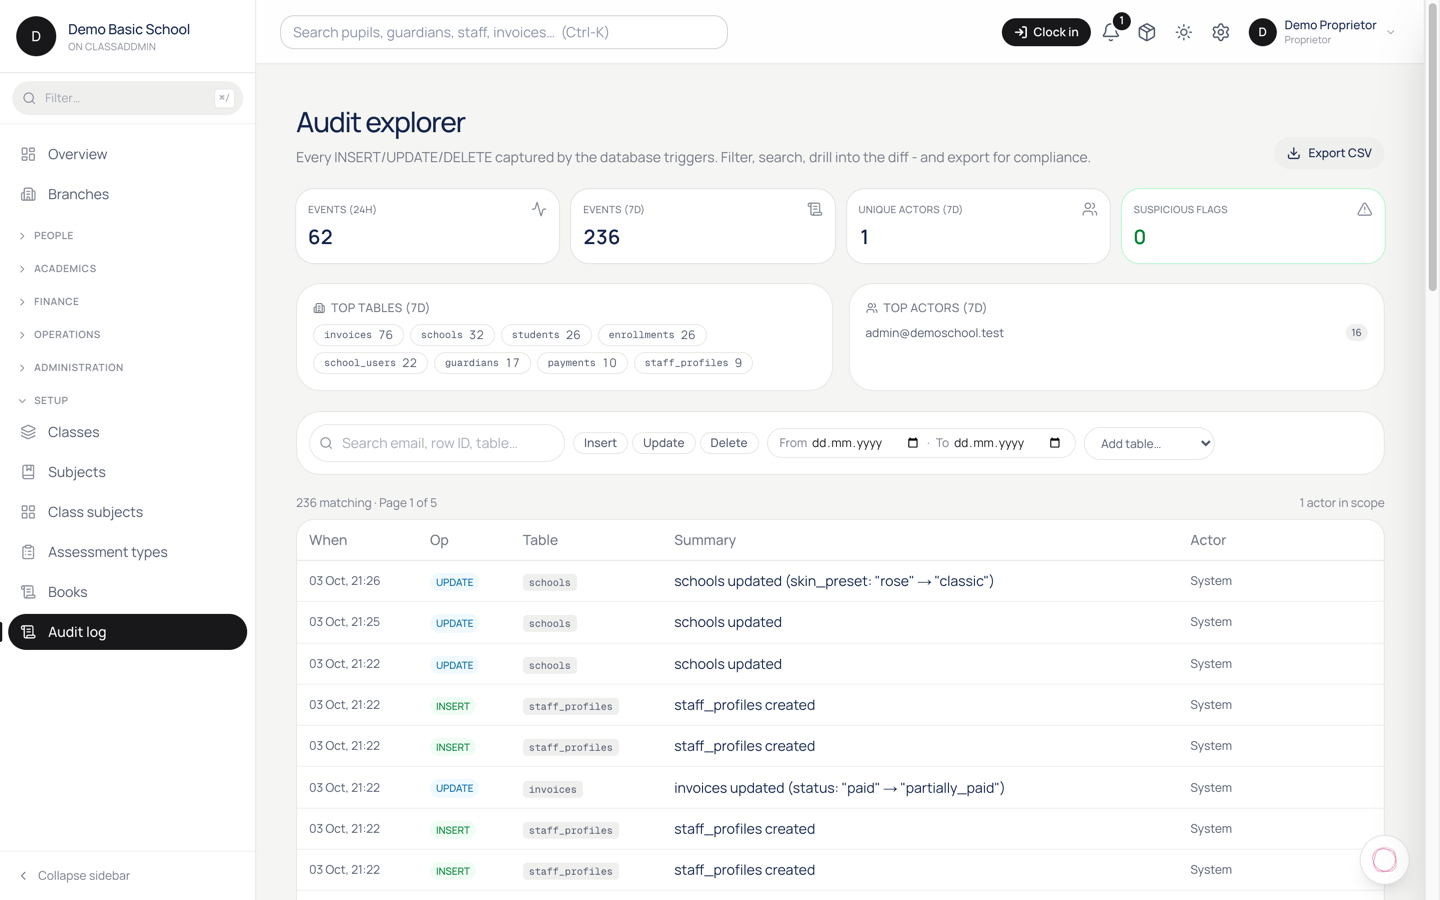
  • Audit log - who changed what.
  • Support - open a ticket with us.
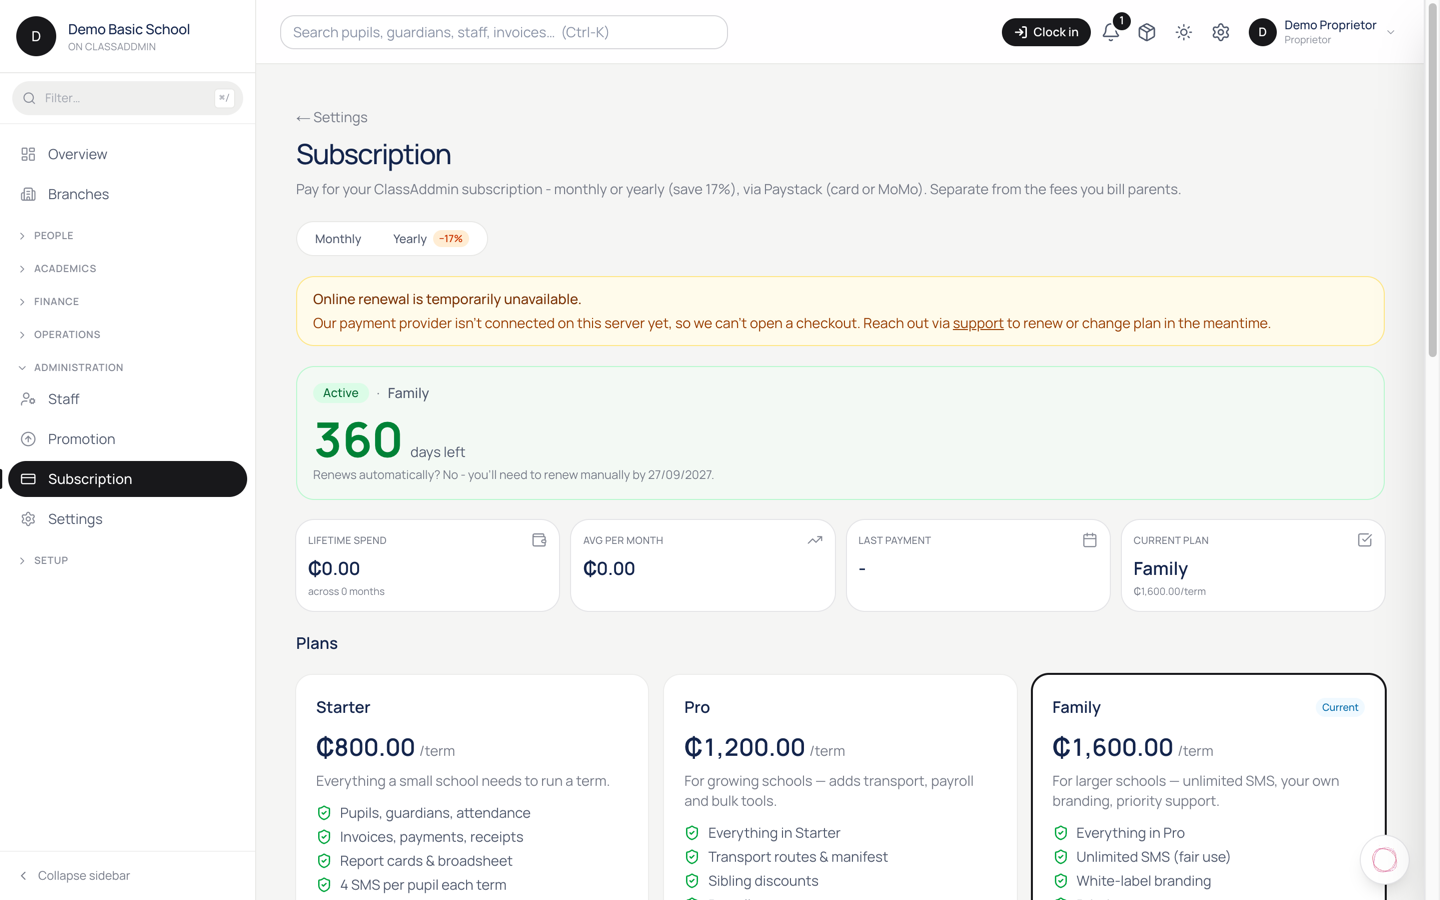
  • Subscription - your plan and billing.
  • Settings - everything else.

Search and help

The search bar at the top finds pupils, guardians, invoices and staff instantly. The bell icon shows alerts that need attention. The profile menu (top-right) is where you sign out.

3.Who can do what - roles explained

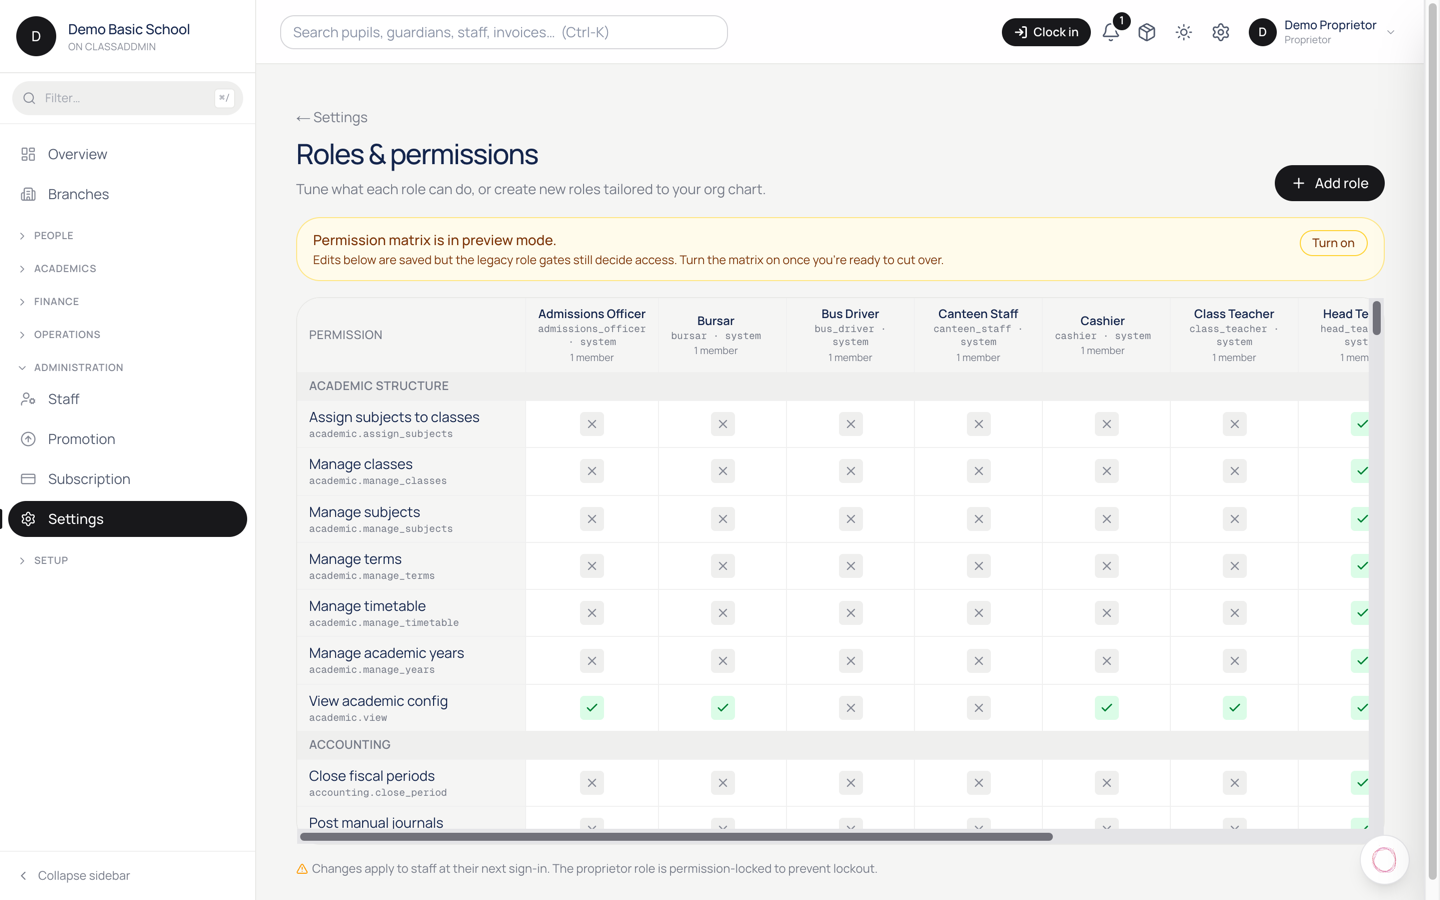
Who can do what - roles explained — screen

ClassAddmin ships with seven default roles. Each role's sidebar and buttons change to match what they're allowed to do. A proprietor doesn't have to see the gradebook composer; a class teacher doesn't have to see payroll.

Role Sees / does
Proprietor Everything - billing, books, role matrix, branding. The owner's view.
Head Teacher Almost everything except billing knobs (subscription, branding, deleting staff).
Bursar Finance - invoices, payments, payroll, expenses, books, reports.
Cashier Just receiving payments - record cash, MoMo, see today's totals.
Admissions Officer The admissions pipeline + adding new pupils.
Class Teacher Their class roster, attendance, gradebook, parent threads.
Subject Teacher Just the classes they teach and their scoresheets.

Custom roles and overrides

If the defaults don't fit, go to Settings → Roles. You can:

  • Tick or untick individual permissions for any role (the matrix).
  • Create a brand-new role (e.g. "Sports Coordinator").
  • Assign multiple permissions in one click.

A change takes effect the next time the affected user reloads the page - they don't need to sign out.

How to think about it

When you're deciding who should do a task, ask "what's the smallest grant that lets them do it?" Don't give a sports coach access to fees just because it's faster. Smaller grants mean fewer accidental edits and a cleaner audit log.

Setting the school up

The one-time setup that everything else depends on.

4.Set up classes for an academic year

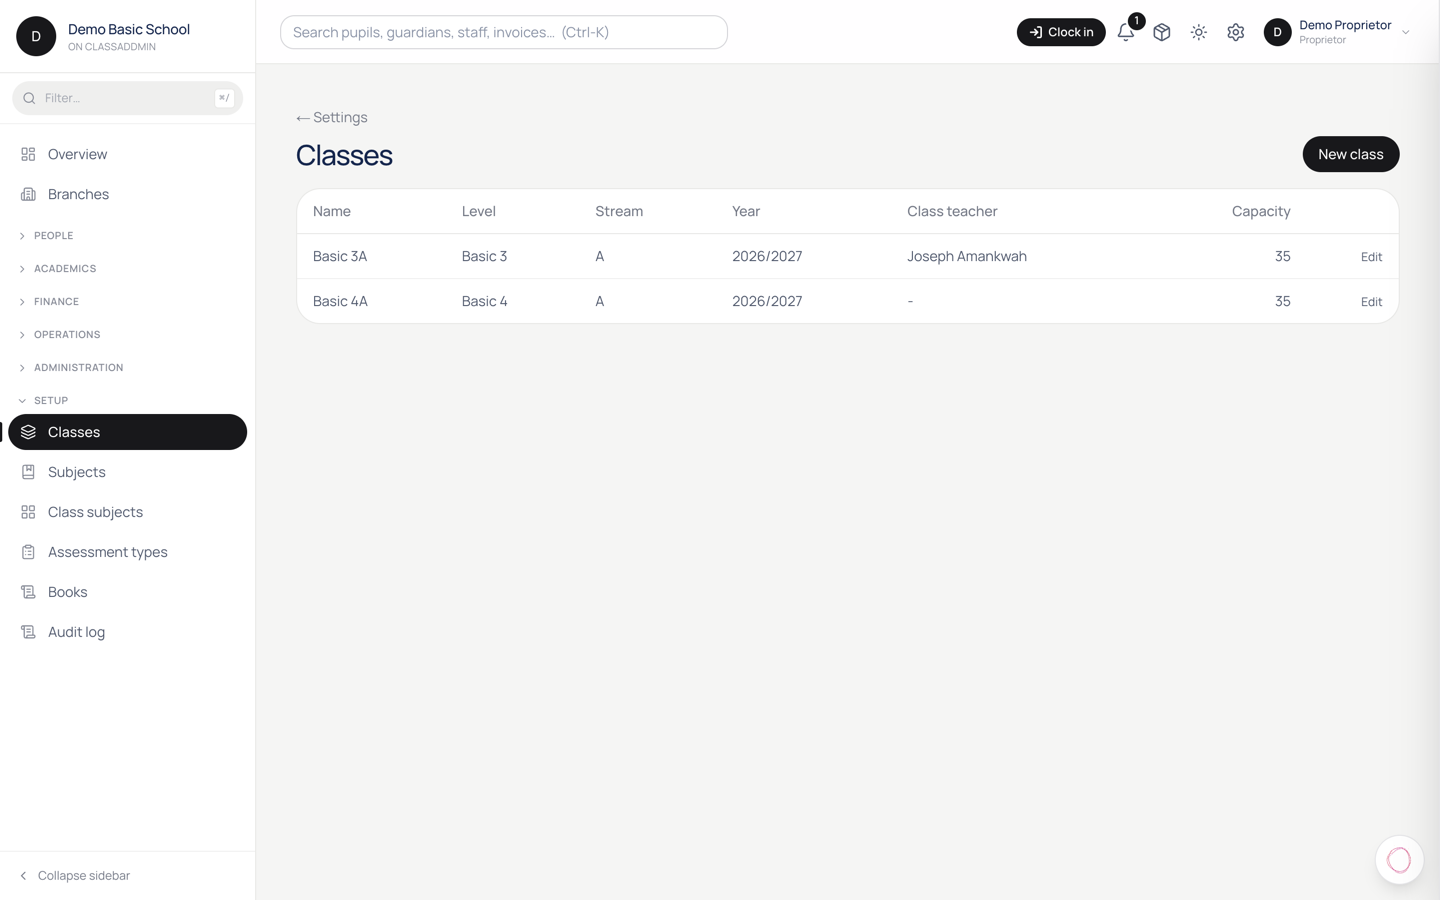
Set up classes for an academic year — screen

Before you can enrol pupils, mark attendance, or bill fees, you need the classes for the current academic year. ClassAddmin doesn't pre-create these - every school's structure is different.

Plan first

Decide:

  • Levels - KG, Lower Primary, Upper Primary, JHS, SHS - whatever your school uses.
  • Streams per level - single class, or A/B/C streams.
  • Naming convention - "Basic 3", "Class 3A", "P3 Blue". Pick one and stick to it; this is what teachers and parents see everywhere.

Write it on paper before you click anything. Renaming later is fine but it ripples through reports and parent communications.

Open the academic year

  1. Settings → Academic Years.
  2. If the current year doesn't exist, click Add academic year. Pick the start date (usually the first day of first term).
  3. The current year auto-becomes the "active" one once its start date passes.

Add classes

  1. Settings → Classes (under Academics).
  2. Click Add class (top right).
  3. Fill:
    • Display name - "Basic 3 A", "JHS 1 Blue". This is what shows in dropdowns.
    • Level - the broader grouping (e.g. "Basic 3"). Used for fee structure inheritance and reports.
    • Class teacher - pick a staff member with the Class Teacher role. They'll see this class on their My Teaching tab.
    • Capacity - optional. Caps how many pupils can be enrolled.
  4. Click Save.

Repeat for every class.

Class subjects

Each class needs a list of subjects taught. Either:

  • Inherit from level - set up subjects once on the level, and every class in that level inherits. Easiest.
  • Override per class - useful when one stream offers an extra subject.

Set up subjects under Settings → Subjects, then attach them to classes under Settings → Class Subjects.

Promotion at year-end

When the academic year ends, you don't manually move pupils between classes:

  1. Settings → Promotion (under Administration).
  2. Pick the next academic year.
  3. The system suggests promotions - "Basic 3 A → Basic 4 A", "JHS 3 → graduated".
  4. Override individual pupils if needed (held back, transferring out).
  5. Click Promote.

Enrolments flip overnight; the new year's classes go live on the first day of first term.

Common gotchas

  • "Class display name already exists" - same string somewhere else this year. Make it unique even if just by stream letter.
  • Teacher dropdown is empty - the staff member doesn't have the Class Teacher role. Settings → Staff → edit role.
  • Capacity blocks an enrolment - set capacity higher, or admit the pupil into a different stream.

5.Set up subjects taught at the school

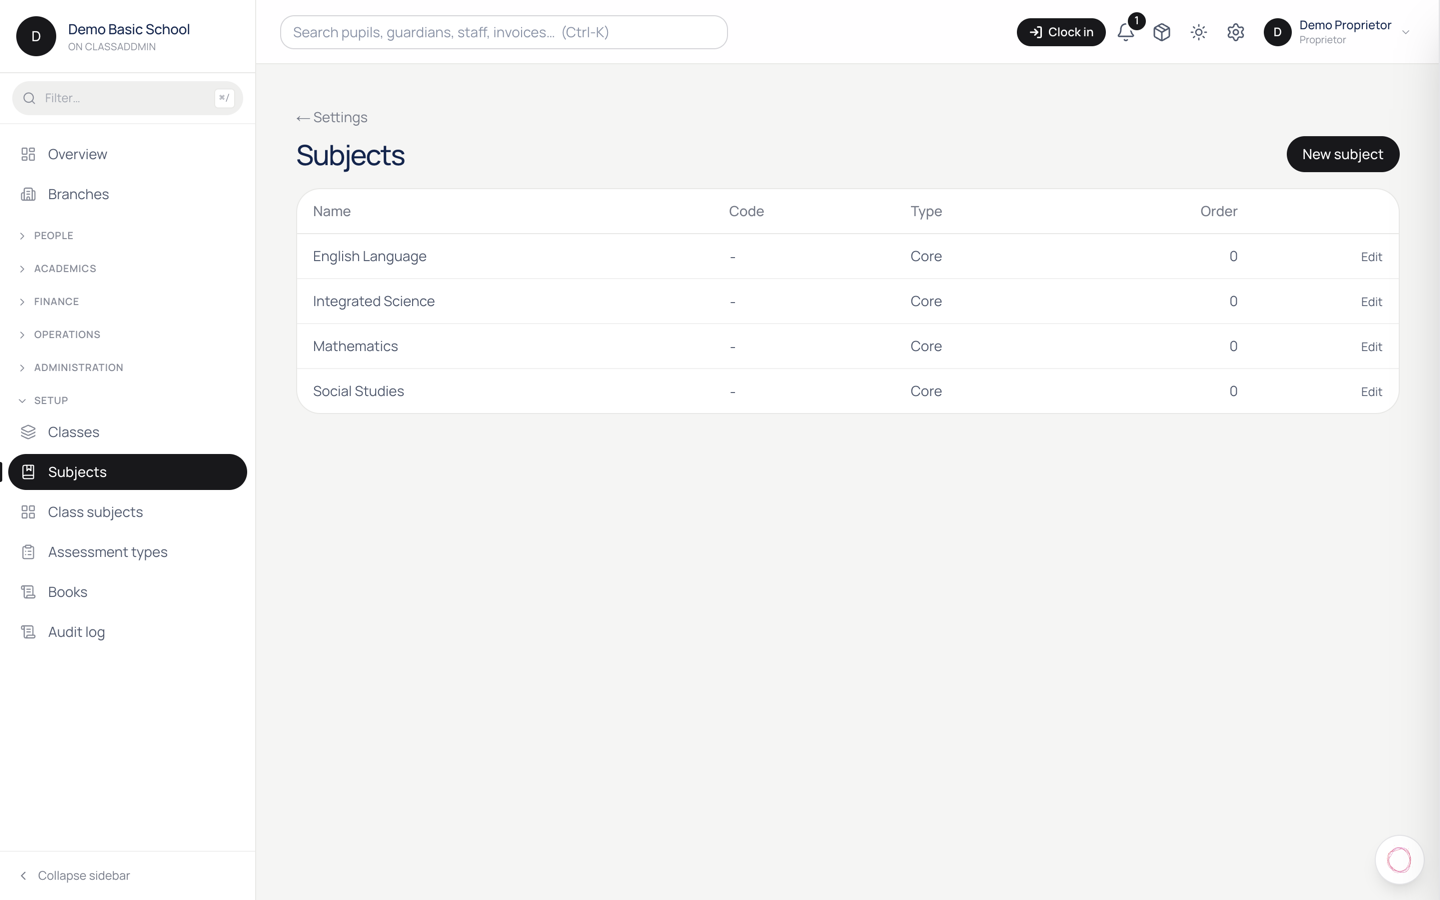
Set up subjects taught at the school — screen

Subjects are the master list of what your school teaches. You create each subject once; later you attach them to classes and assign teachers per class.

If you follow Ghana's NaCCA framework, the standard subjects are pre-suggested in the wizard - accept what applies, skip the rest.

Add a subject

  1. Settings → Subjects (under Academics).
  2. Click New subject.
  3. Fill:
    • Name - what teachers and parents see. "Mathematics", "Religious & Moral Education", "Our World, Our People".
    • Short code - abbreviation, max 6 chars. "MATH", "RME", "OWOP". Used in compact tables and gradebook headers.
    • Level - basic / JHS / SHS / cross-cutting. Drives which classes can pick this subject.
    • NaCCA strand (optional) - the official curriculum strand if applicable.
  4. Click Save.

Repeat for each subject the school teaches.

Attach subjects to classes

After subjects exist, you assign them to classes:

  1. Settings → Class Subjects.
  2. Pick a class.
  3. Tick the subjects taught in that class.
  4. For each tick, pick the subject teacher (a staff member with the Subject Teacher role).
  5. Save.

The class teacher's gradebook now shows score sheets for the assigned subjects; the subject teacher's My Teaching tab shows the class.

Inherit from level

Setting up Basic 1 through Basic 6 with the same subjects? Don't tick them six times:

  1. Settings → Subjects → Level templates.
  2. Pick "Basic" level → tick the subjects every basic class teaches.
  3. Save.
  4. When you set up a new class, it inherits the level template automatically. You can override per class (untick a subject, add an extra).

Reorder subjects on the report card

Report cards show subjects in a specific order:

  1. Settings → Subjects → drag-handle to reorder.
  2. The order applies to every report card published from now on. Previously published cards keep their order.

Convention is core subjects first (Maths, English, Science, RME), then content-rich subjects (Social Studies, Computing), then arts/PE/extras.

Common gotchas

  • Subject doesn't appear on a class's gradebook - it's not attached to that class. Settings → Class Subjects → tick it.
  • "Short code already exists" - short codes are unique per school. Pick a different abbreviation.
  • Wrong NaCCA strand - strand metadata only affects report card grouping (some schools group by strand). If you don't group, the strand is just a label.

6.Set your school's branding

Set your school's branding — screen

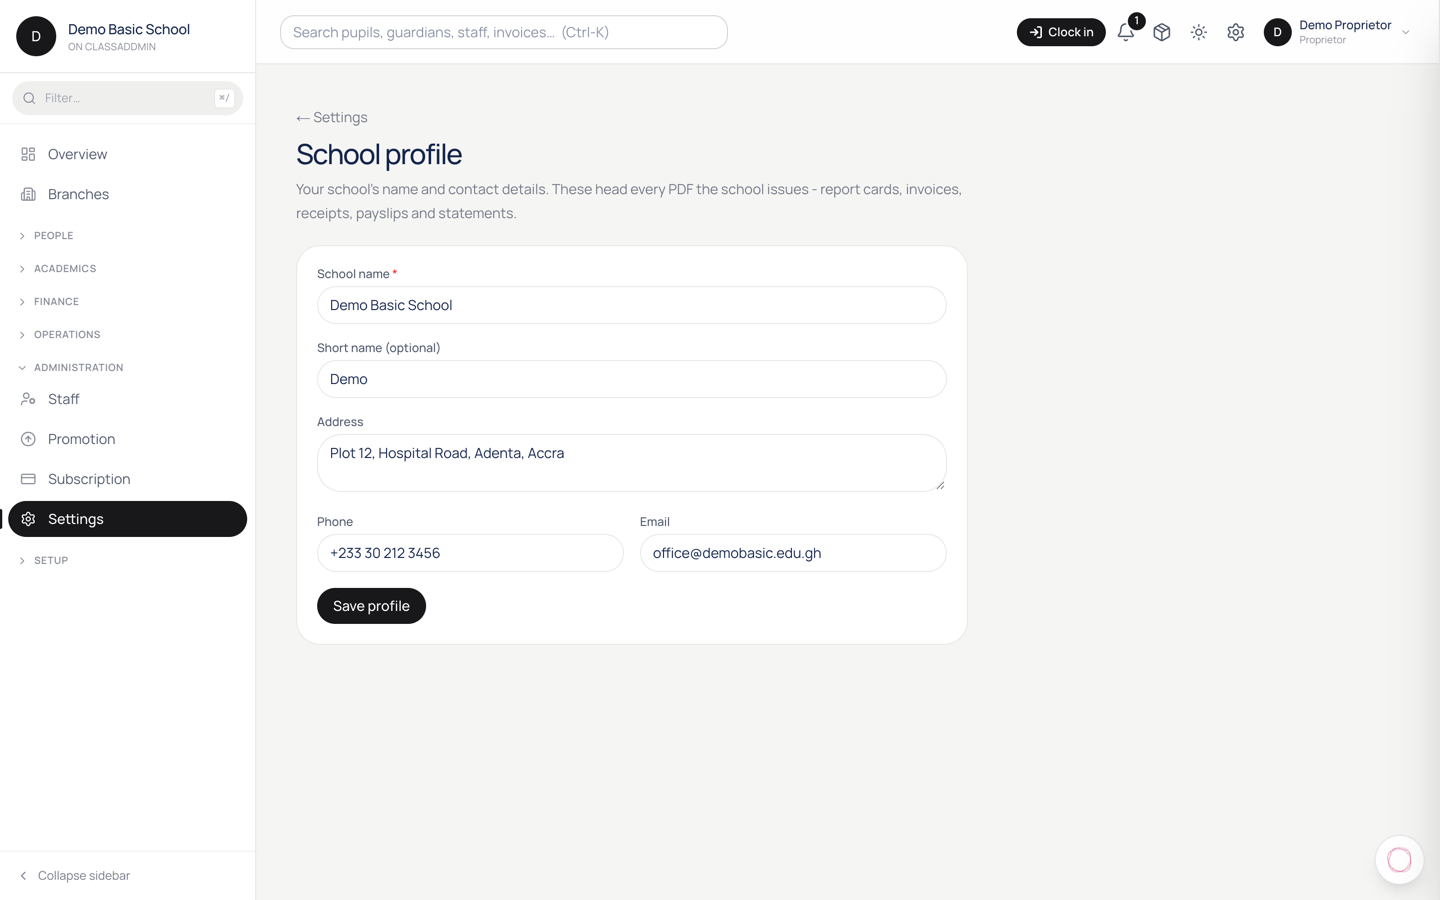
Your school's name, logo and short SMS sender ID appear on invoices, receipts, report cards, parent portal pages, and SMS broadcasts. Setting them up takes 5 minutes and dramatically lifts how professional everything feels.

Where the settings live

  1. Settings → School (under Administration).

You'll see tabs:

  • Profile - name, short name, slug, email, phone.
  • Branding - logo, header image.
  • Communications - SMS sender ID, email-from name.
  • Parent portal (Plus tier only) - custom subdomain.

Profile

  1. Name - the school's full legal name. Prints on invoices and report cards.
  2. Short name - used when space is tight, e.g. SMS sender. "Greenhill" not "Greenhill International School".
  3. Slug - the URL-safe handle. greenhill → app.classaddmin.com/p/greenhill (parent portal). Change with caution - old shared links break.
  4. Email - school's official email; goes on letterheads.
  5. Phone - school's official phone; also on letterheads.

Logo

  1. Branding → Logo.
  2. Click Upload.
  3. Pick a PNG with a transparent background, ideally 500×500 pixels.
  4. The system auto-resizes and stores the original.

The logo appears on:

  • The sidebar (top-left).
  • Invoices and receipts (top-right corner).
  • Report cards (header).
  • The parent portal page.
  • Outgoing emails (header).

SMS sender ID

  1. Communications → SMS sender ID.

By default every school's SMS goes out as CLASSADDMIN. On the Plus tier (or with approval on Family), you can change this to your school's short name (max 11 characters, letters/digits only - no spaces).

  1. Type your preferred sender ID - Greenhill, GHBASIC, etc.
  2. Click Save.
  3. The system queues a verification with Arkesel (our SMS gateway). It takes 1-3 business days.

Until verified, SMS go out as CLASSADDMIN still.

Parent portal subdomain (Plus tier)

  1. Parent portal → Custom subdomain.
  2. Type your handle - parents.greenhill.edu.gh or greenhill.classaddmin.com.
  3. For a school-owned domain (greenhill.edu.gh), you'll need to add a DNS CNAME to your domain registrar. The system shows the exact CNAME target.
  4. Click Verify.

Once verified, parents see your domain in their portal URL - looks much more professional.

Common gotchas

  • Logo looks blurry on report cards - uploaded too small. Re-upload at 500×500 or larger.
  • SMS sender ID stuck on CLASSADDMIN - Arkesel hasn't verified yet. Allow 3 days; if still pending, message us through Support.
  • Slug change broke old parent links - the old slug stops resolving immediately. Email parents the new portal link, or set up a redirect via the marketing site.

7.Invite a staff member

Invite a staff member — screen

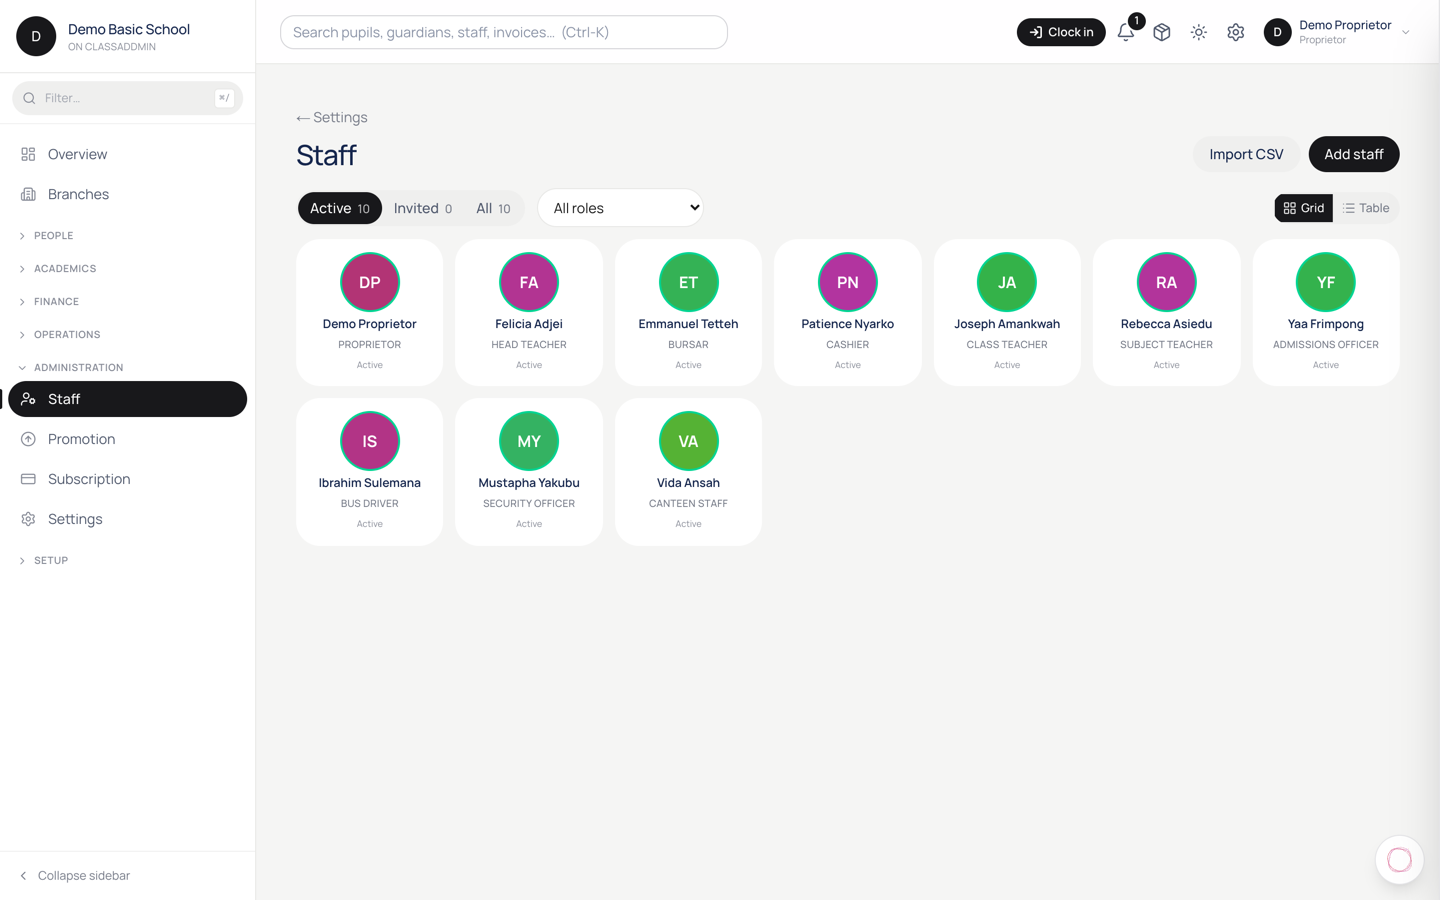
When a new teacher or bursar joins your school, you invite them - they get a sign-in link or a temporary password, and choose their first password on first sign-in.

Steps

  1. Settings → Staff (under Administration).
  2. Click Invite staff (top right).
  3. Fill:
    • Display name - how they'll appear to other staff and to parents.
    • Role - pick from the dropdown. See Who can do what for what each role can do.
    • Email OR Phone (or both - at least one is required).
  4. Pick how they get their sign-in details:
    • Email magic link (recommended) - the system emails them a link they click to set a password. Works only if you've filled their email.
    • SMS magic link - the system SMSes them a link. Works only if you've filled their phone.
    • Set a password now - type a password you'll share with them in person. They can change it on first sign-in.
  5. Click Send invite (or Create, for the password option).

What the new staff member does

If you sent a magic link:

  1. They click it on their phone/laptop.
  2. They land on the sign-in page with their email/phone pre-filled.
  3. They set a password (8+ characters).
  4. They're in.

If you set a password and shared it:

  1. They go to app.classaddmin.com.
  2. They sign in with email + the password you gave them.
  3. They go to Profile → Change password and set their own.

Class teacher assignment

If you invited a class teacher, you'll still need to assign them to a class:

  1. Settings → Classes → click the class.
  2. Set Class teacher to the new staff member.
  3. Save.

The class then appears on their My Teaching tab the next time they sign in.

Subject teacher assignment

If you invited a subject teacher, assign them subjects:

  1. Settings → Class Subjects.
  2. For each class+subject they teach, set them as the teacher.

This is what makes the gradebook score sheet appear on their My Teaching tab.

Revoke access

When a staff member leaves the school:

  1. Settings → Staff → click the row.
  2. Status → Inactive. Their sign-in stops working immediately.
  3. Don't delete them - keeping the row preserves the audit log for anything they ever did. Inactive is enough.

Common gotchas

  • Email never arrived - check spam, and check Settings → Communications that Resend is configured. SMS link is a good fallback.
  • "This email already has an account" - that person has a parent or platform account elsewhere. The system can still link them as staff at this school. Pick the link existing user option.
  • Wrong role assigned - open the staff member's profile → Edit role. The change is immediate.

8.Add many staff at once from a spreadsheet

Add many staff at once from a spreadsheet — screen

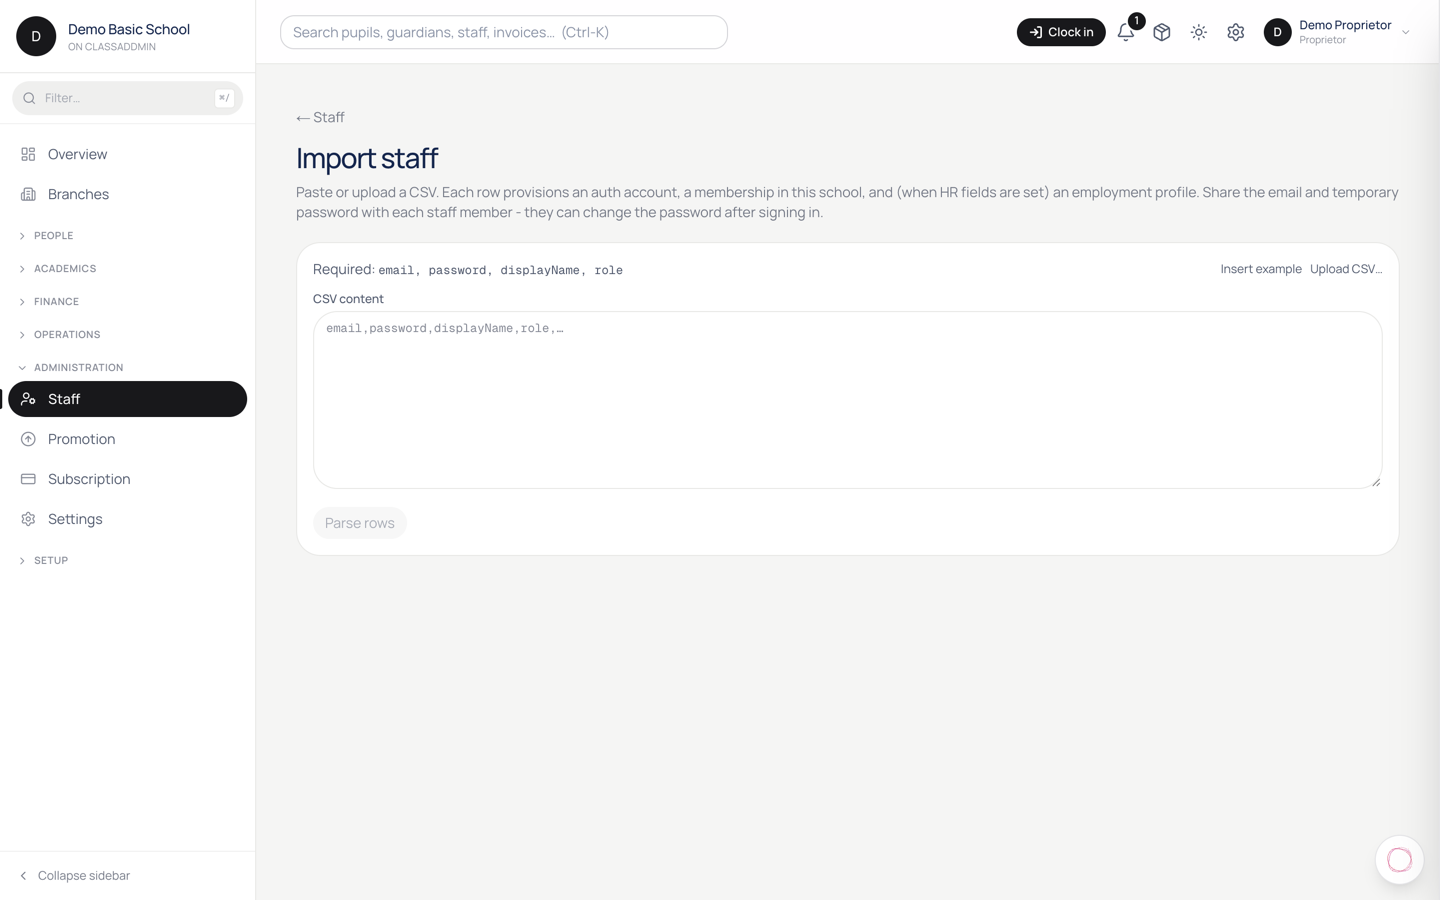
Setting up a whole staff room one account at a time is tedious. The importer takes a spreadsheet and creates them in one go — useful when you first move onto ClassAddmin, or at the start of a year with several new teachers.

Find it at Settings → Staff → Import.

The columns

The first row of your spreadsheet must be the header row. These four are required:

Column Notes
email Their sign-in, and must be unique
password At least 8 characters
displayName The name shown around the app
role Must match a role your school has

These are optional, and worth filling in if you run payroll:

phone, jobTitle, employmentType, monthlySalary, hiredOn, ssnitNumber, bankName, bankAccountNumber

Steps

  1. Settings → Staff → Import.
  2. Build your spreadsheet with the header row, one member of staff per row.
  3. Paste the CSV content into the box.
  4. Check what it reports back before committing — it validates as it reads.
  5. Import.

Read the errors before you fix the file

Each row is checked, and problems are reported per row, so a single bad entry doesn't cost you the whole import. The two that come up most:

  • password must be at least 8 characters — a short password on one row.
  • Missing required columns: … — the header row is wrong or absent. This stops the whole import, because without a header nothing can be matched to a column.

About those passwords

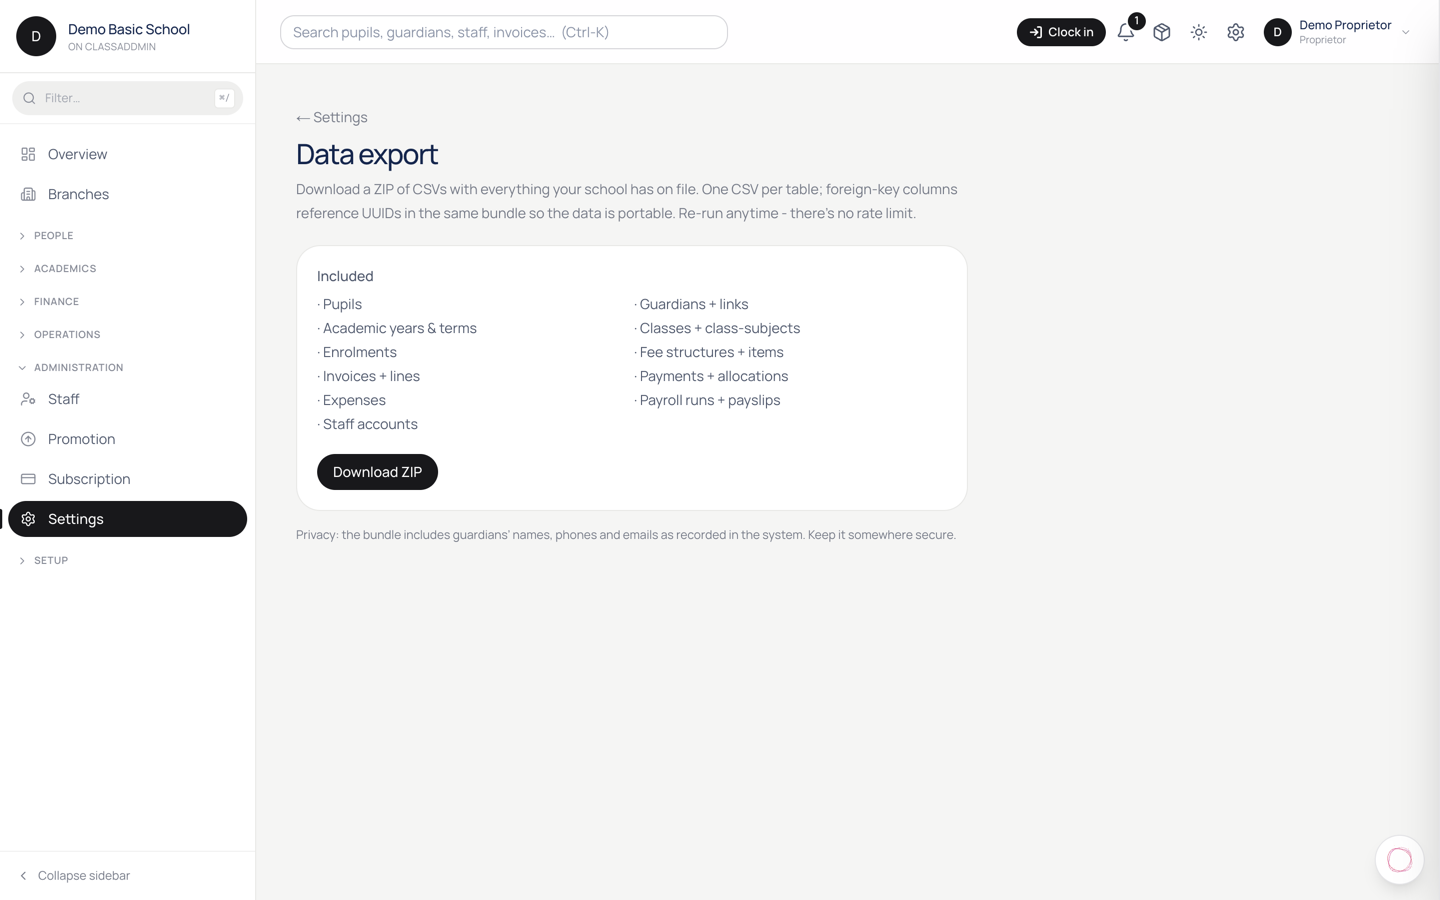
You are setting each person's initial password, which means you know it. Tell each person to change it the first time they sign in, and don't keep the spreadsheet afterwards — it's a list of working sign-ins for your school.

If that makes you uncomfortable, use invitations instead: each person sets their own password and you never see it. The importer is for bulk setup; invitations are better for one or two.

Common gotchas

  • Excel mangled the file. Save as CSV, not as a workbook. Watch out for phone numbers losing a leading 0.
  • role isn't accepted. It must match a role that exists in your school. Check Settings → Roles for the exact spelling.
  • A duplicate email. That person already has an account. Remove the row, or fix the existing account.
  • Everything imported but nobody can sign in. Check you gave them the right email — the address in the file is the sign-in.
  • You pasted the template header and nothing else. A header with no rows reports that it needs at least one member of staff.

9.Customise what each role can do

Customise what each role can do — screen

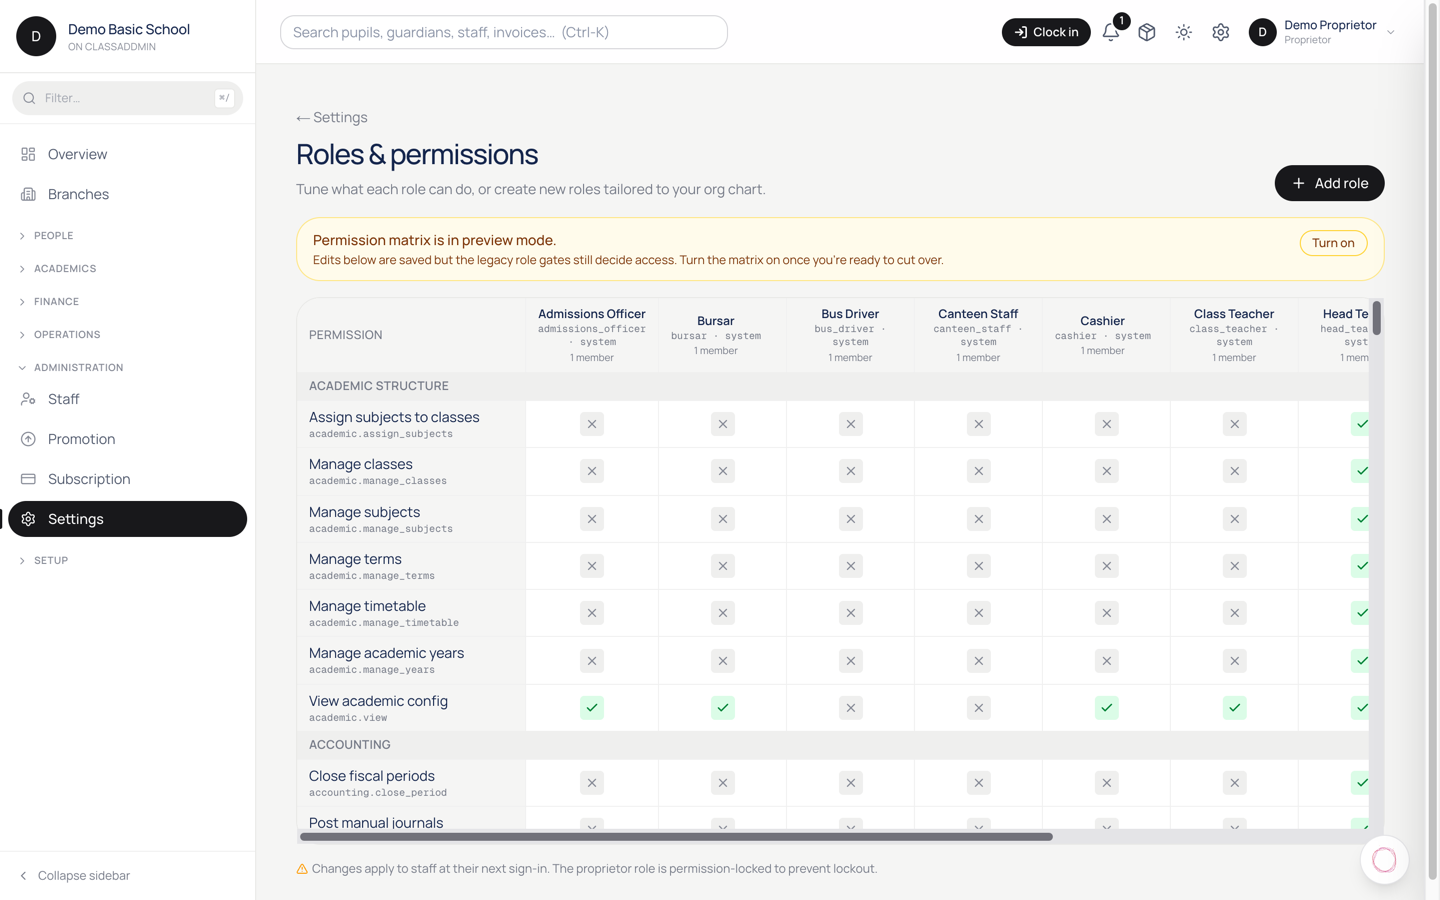
ClassAddmin ships with sensible defaults (proprietor sees everything, bursar handles money, class teacher handles their class). But every school is different - maybe your sports coordinator needs to mark attendance, or your bursar shouldn't see staff salaries. The role matrix is where you draw those lines.

See the matrix

  1. Settings → Roles (under Administration).
  2. The matrix shows roles down the left, permissions across the top, ticks where a role currently has a permission.

Each permission is a slug like students.view, payroll.run, accounting.manage_coa. The label is human-readable; the slug is what the API checks.

Tick or untick a permission

  1. Find the role row and the permission column.
  2. Click the cell.
  3. The tick appears or disappears.
  4. No save button - the change is immediate.

That's it. Every signed-in staff member with that role sees the new state the next time they reload the page (no sign-out needed).

Common adjustments

  • Bursar shouldn't see staff salaries - untick payroll.view for bursar.
  • Class teachers should manage attendance edits beyond today - tick attendance.edit_past for class teacher.
  • Cashier shouldn't see fee structures - untick fee_structures.view for cashier (they only need to record payments).

Create a new role

If the seven defaults don't fit:

  1. Settings → Roles → New role.
  2. Pick a slug (e.g. sports_coordinator) and a display name.
  3. Tick the permissions they need. Easiest is to pick a similar existing role from the dropdown and copy permissions from, then adjust.
  4. Click Save.

Now you can assign that role to staff under Settings → Staff.

Don't break yourself out

You can't remove permissions from the proprietor role - the system protects against locking yourself out of the books or the role matrix. Other roles can be edited freely.

If you accidentally remove roles.manage from your own role, you'll lose access to this page. The fix: sign in as proprietor and restore it.

What a permission means

The slug suggests it:

  • *.view - read access to that area.
  • *.create / *.update / *.delete - write access.
  • *.export - download as CSV.
  • *.manage - full control.

Some slugs are coarser (e.g. payroll.run means create + finalise runs); some are finer (e.g. attendance.edit_past only matters for past-date edits, not today's). The label next to the slug explains.

Audit log

Every grant/revoke is logged. Settings → Audit log → filter by table school_role_permissions. Useful when a teacher complains "I could do this last week".

Money

Fees, invoicing, and the books you report from.

10.Set up a fee structure for a class

Set up a fee structure for a class — screen

A fee structure says "every pupil in this class pays these amounts this term". Once set up, you generate invoices in one click (see Issue a term's invoices).

Plan first

Decide what your school charges per term:

  • Tuition
  • Exam fee
  • Lunch
  • Books / stationery
  • Activity fee (sports, ICT, etc.)
  • Boarding (if applicable)
  • Transport (if applicable)

Each of these is a component. You set the amount per component, and the system sums them into the invoice total.

Steps

  1. Fee Structures in the sidebar.
  2. Click New fee structure.
  3. Pick the class and the term this applies to. (You can copy from a previous term - see below.)
  4. Add each component:
    • Name - "Tuition", "Lunch", "Books".
    • Amount in GHS.
    • Component code - pick from the catalogue (Tuition, Exam, Lunch, Books, Activity, Boarding, Transport, Other). The code is what links to the chart of accounts (so tuition revenue posts to Tuition Fees, not Other Income - see Books auto-posting).
  5. Click Save.

The fee structure is now active. The next time someone clicks Generate term invoices for this class+term, the system uses these amounts.

Copy from last term

End-of-term and starting a new one with same fees? Don't re-type:

  1. Fee Structures → pick the existing structure.
  2. Click Duplicate.
  3. Pick the destination term.
  4. The new structure is created with the same components and amounts. Edit anything that changed (usually just tuition going up 5%).

Differential fees

Some schools charge different rates for some pupils - siblings get a discount, scholarship pupils pay less, boarding pupils have extra components.

Two approaches:

  • Per-pupil overrides - open the pupil → Fees tab → Custom fee structure for this term. Sticks just to that pupil.
  • Multiple class structures - uncommon, but you can create two structures for the same class+term tagged differently (boarding vs day). Assign pupils manually.

Most schools use overrides for the edge cases and a single structure for the bulk.

Common gotchas

  • "Class already has a structure for this term" - exactly one structure per class+term. Edit the existing one, or duplicate it.
  • Amount must be ≥ 0 - set zero for free components rather than negative (negative components are treated as discounts; use them only when you want to actually reduce the total).
  • Components don't show on the invoice - they show as line items. If you only see the total, look at the invoice's Lines tab in the invoice detail view.

11.Issue a term's invoices in one click

Issue a term's invoices in one click — screen

When a new term starts, every pupil needs an invoice for their term's fees. You don't make them one at a time - Fee Structures + the bulk-issue button do it for you.

Before you start

You need:

  • A Fee Structure for each class (Settings → Fee Structures). It defines what every pupil in the class pays for the term - tuition, exam fees, lunch, books.
  • The current academic year and term set under Settings → Terms.
  • Active enrolments for each pupil in the class.

Steps

  1. Open Invoices in the sidebar.
  2. Click Generate term invoices in the top-right.
  3. Pick the term (defaults to the current one).
  4. Pick the classes you want - leave them all ticked to bill the whole school.
  5. Click Preview. The dialog shows how many invoices will be created and their total value.
  6. Click Generate. The invoices land in Draft status.
  7. Click Issue all drafts. They flip to Issued - parents can now see and pay them via their portal link.

What if a pupil shouldn't be billed?

Three options:

  • Mark them inactive under Students. Inactive pupils are skipped automatically.
  • Generate, then delete the single invoice from the Invoices list (only works on Drafts).
  • Use a per-pupil scholarship - record a scholarship payment for the full amount, which zeroes their balance.

Re-running the generate

The generate step is idempotent - running it twice won't create duplicate invoices for the same pupil + term. If you add new pupils mid-term, generate again to bill just the new ones.

12.Chase fee defaulters

Chase fee defaulters — screen

A defaulter is a pupil whose invoice is past its due date and still has a balance. ClassAddmin gives you three tools to chase them, from gentle nudge to public list.

See who owes what

  1. Invoices → filter status to overdue.
  2. Sort by balance descending - the biggest owing first.
  3. Each row shows pupil, class, invoice number, balance, days overdue.

You can also use Finance → Biggest balances for a per-pupil view (one row per pupil rather than per invoice).

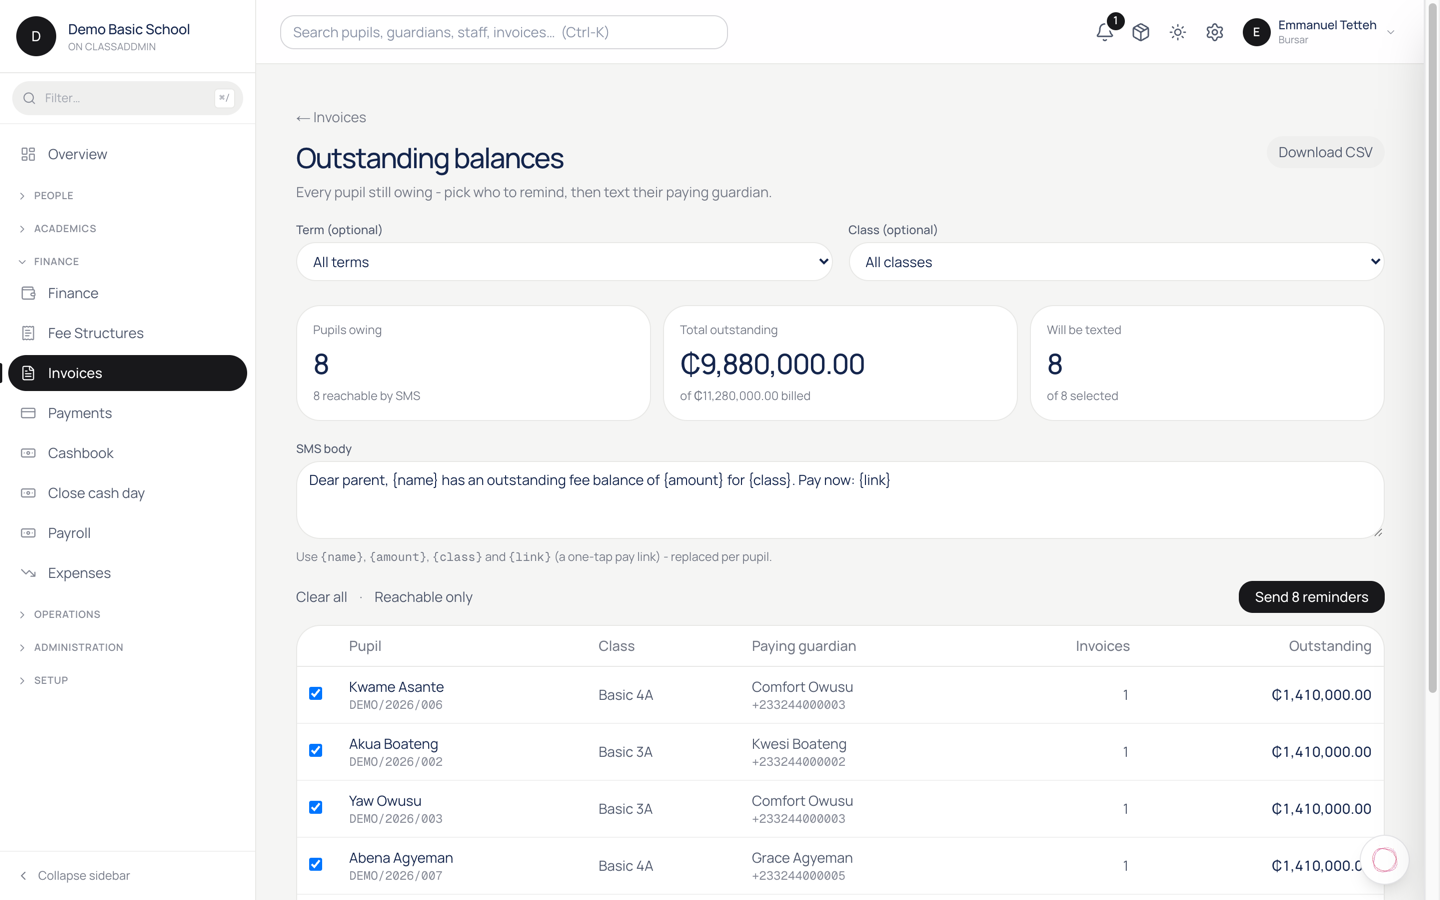
Tool 1 - Bulk SMS reminder

Use this when more than a handful of parents are overdue.

  1. Messages → Send to: Fee defaulters.

  2. The system pre-fills the recipient count - every guardian flagged pays_fees whose pupil has an overdue invoice.

  3. Type the message. Keep it under 160 characters to stay in one SMS:

    Dear Parent, Adwoa's Term 2 fees of GHS 1,200 are now overdue. Pay via the portal: app.classaddmin.com/p/abc - Greenhill School.

    Wait - that's actually a poor template. Don't include the pupil's name in a broadcast (it goes to every parent, so it'd be wrong for everyone). Use generic wording:

    Dear Parent, your child's Term 2 fees are overdue. Pay via the portal link sent earlier or visit the office. Thank you - Greenhill School.

  4. Click Send SMS.

Each recipient is a separate credit. A 50-pupil defaulter list costs 50 credits.

Tool 2 - Individual SMS

When you want a personalised message (with the actual pupil name and amount):

  1. Invoices → click an overdue invoice.
  2. Click Notify guardian in the right rail.
  3. The system sends an SMS like "Adwoa's Term 2 fees of GHS 1,200 are overdue. Pay via the portal: [link]" - pupil name, amount, link auto-filled.

This uses one credit per pupil, but it's the most effective format.

Tool 3 - Set up a payment plan

If the parent can't pay all at once, don't keep chasing - offer them an installment plan. See Offer parents an installment payment plan.

A plan is psychologically easier than "your whole term's fees are overdue", and the system handles the reminders for each step automatically.

Tool 4 - Auto-reminder cron (weekly)

If your school has the weekly fee reminder cron on (Settings → Communications → Fee reminders), the system automatically SMSes every defaulting parent every Monday morning. You don't need to do anything.

You can turn this off if you find it annoying. Some schools prefer to chase manually.

How NOT to chase

  • Don't paste pupil names in WhatsApp groups. Privacy nightmare.
  • Don't refuse to admit a pupil to class without telling the parent first. Make it a phone call, not a surprise.
  • Don't threaten on the SMS broadcast. Keep the tone professional; if a parent is in real difficulty, escalate to a head-teacher phone call.

13.What is "Books" and do I need it?

What is "Books" and do I need it? — screen

Books is your school's accounting layer. Every payment received, expense recorded, and payroll finalised in ClassAddmin posts a balanced journal entry behind the scenes - and Books lets you read the results: Income Statement, Balance Sheet, Trial Balance, Cash Flow.

If you've used Xero or QuickBooks before, this is the same idea - but already filled with your data, with no setup needed.

Why bother?

Three reasons:

  1. You stop guessing. "Did we make money this month?" is one click on the Income Statement, not an evening with a calculator.
  2. You match the bank. Bank reconciliation marks every Stanbic / Ecobank / MoMo transaction as either matched-to-the-ledger or not, so you spot missing entries early.
  3. Year-end accounts are ready. When your accountant asks for trial balance and P&L for 2025, you don't go digging - you download them.

What "auto-posting" means

Every time the bursar records a cash payment, ClassAddmin also writes a journal entry: debit Cash, credit Tuition Fees. Same for expenses (debit Salaries, credit Cash), payroll runs, and opening balances. You don't do double-entry yourself - it happens automatically. Your job is to read the reports and reconcile.

What you still do by hand

Just three things:

  • Add accounts you want that aren't in the default chart (e.g. "Stationery donations").
  • Post manual journals for adjustments - depreciation, bad-debt write-offs, owner's draw.
  • Reconcile bank statements monthly - confirm every line on your bank statement matches a journal in ClassAddmin.

Everything else is automatic.

Who can use it

By default: proprietors see everything (chart of accounts, manual journals, periods), bursars see the reports and can post manual journals and reconcile the bank. Other roles don't see Books at all. You can change this under Settings → Roles → "accounting.*".

14.How to read the income statement (P&L)

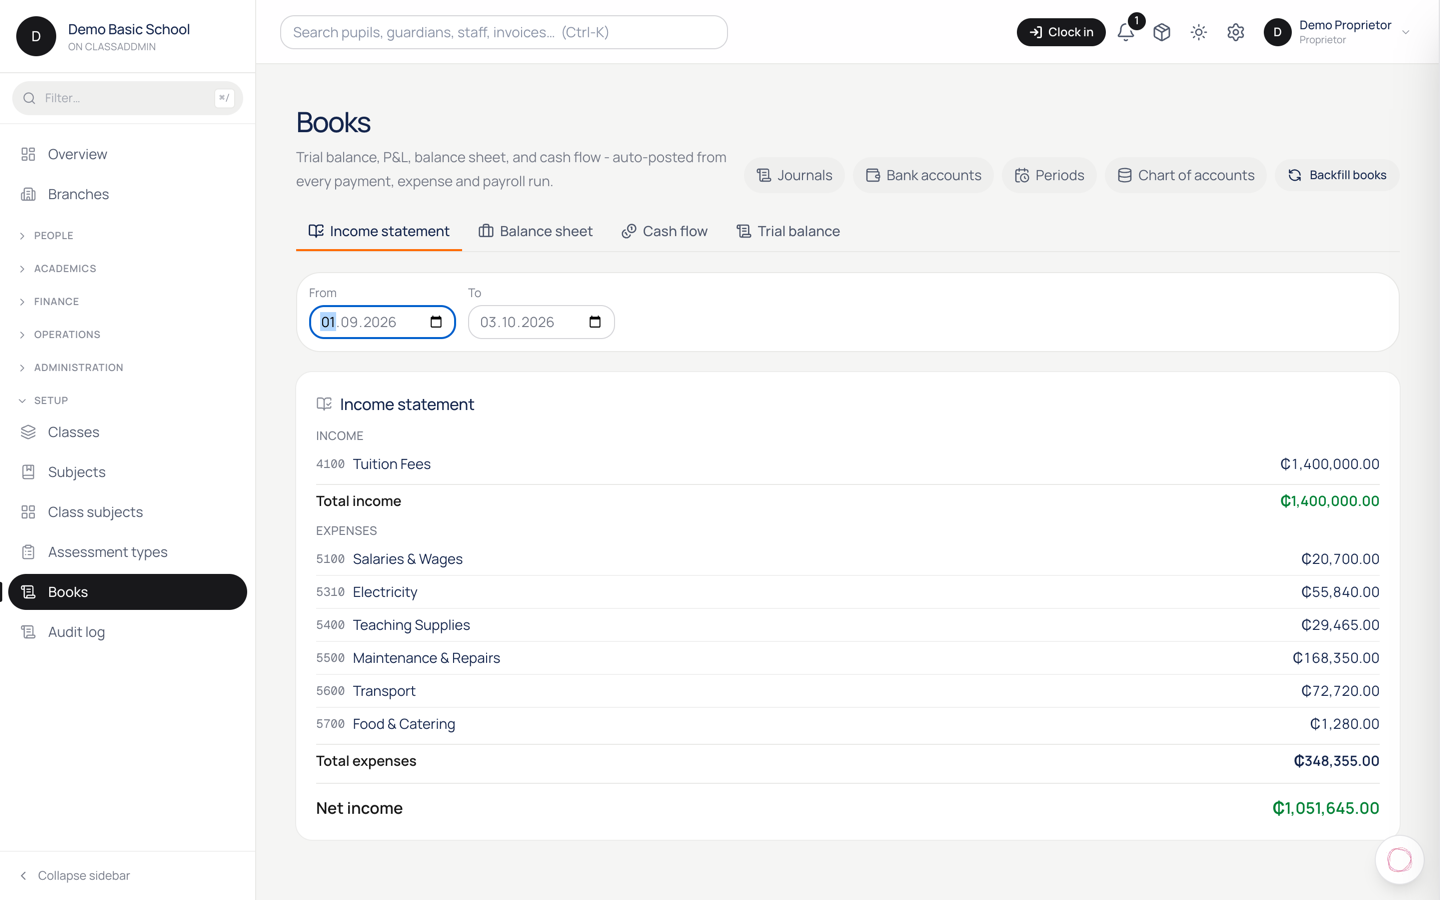
How to read the income statement (P&L) — screen

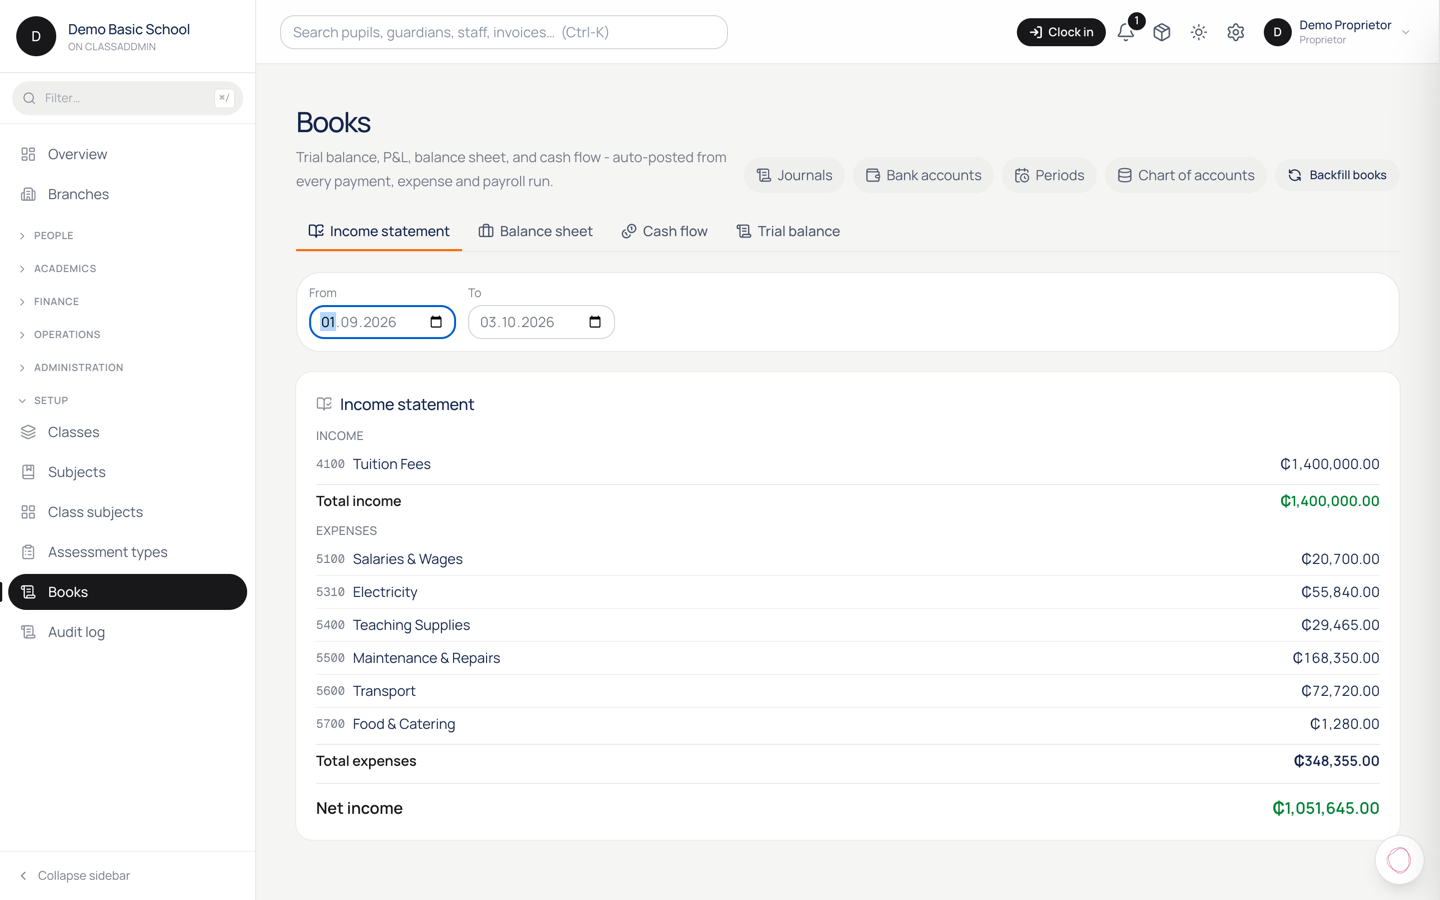
The Income Statement - also called the P&L (Profit & Loss) - shows whether the school made or lost money over a date range you choose.

Structure

  • Income - all the money the school earned: tuition fees, registration fees, exam fees, activity fees, transport fees, other income.
  • Expenses - all the money the school spent: salaries, rent, utilities, supplies, maintenance, transport, food, events.
  • Net Income - Income minus Expenses. Green if positive, red if negative.

Picking a period

Use the From and To date pickers. Common ones:

  • This month - first day of the current month to today.
  • Last term - start of the term to its end.
  • Year-to-date - January 1 of this year to today.
  • Quarter - first day of the quarter to its end.

The numbers refresh as soon as you change a date.

What to look for

  1. Is the net income positive? That's the headline. If yes, the school made money in this period.
  2. Which expense is biggest? Salaries almost always lead. Compare against last month - a 30 % jump usually means a new hire or a bonus run.
  3. Is income smooth or lumpy? Schools typically collect most fees in the first month of each term. If May income is tiny, that's normal - don't read it as a crisis.

Drill in

Click any row to see which journal entries made up that total. That's how you investigate "why are Utilities up 50 %?" - you'll see each individual electricity bill.

Important caveat

The P&L uses cash-basis by default. That means:

  • A payment received in May counts as May income, even if it covers next term's fees.
  • An expense recorded in May counts as May expense, even if you bought the supplies for next term.

If you want to match income to the period it was earned (accrual basis), you'll need to post manual journals to move it. Most Ghanaian schools run cash-basis happily.

15.How to read the balance sheet

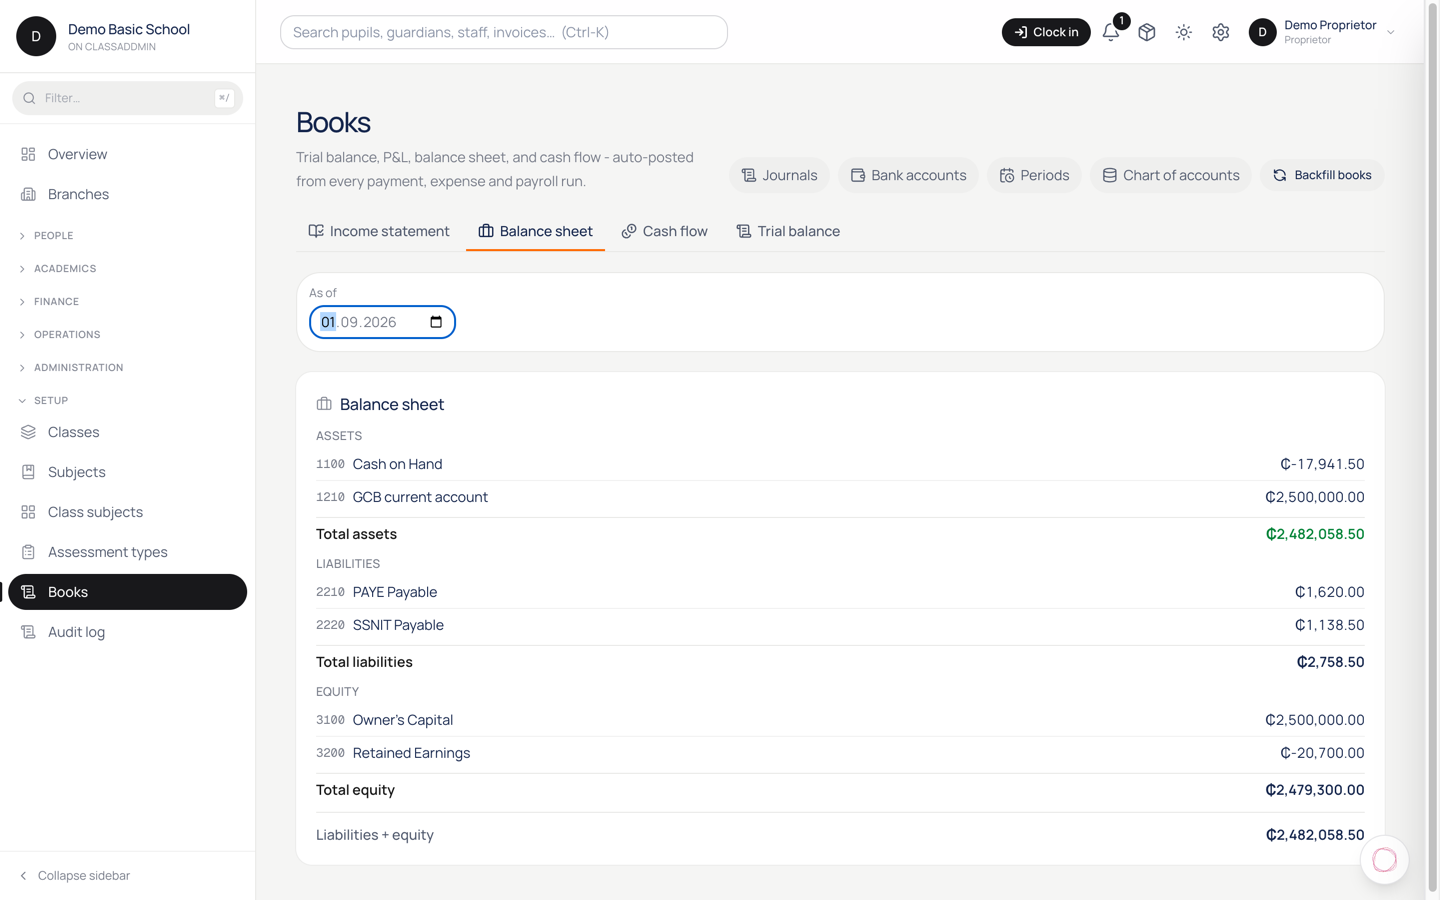
How to read the balance sheet — screen

The Balance Sheet is a snapshot of what your school owns, owes, and is worth on a specific date.

Three sections

  • Assets - what the school owns: cash in bank accounts, money parents owe (Accounts Receivable), buildings, vehicles, equipment.
  • Liabilities - what the school owes: unpaid bills (Accounts Payable), tax withheld but not yet paid (PAYE, SSNIT), loans.
  • Equity - the school's net worth: opening capital plus everything you've ever earned and not paid out.

The rule that always holds

Assets = Liabilities + Equity. If they don't match, ClassAddmin shows a yellow warning at the bottom - that means a journal has been edited or imported badly. Don't panic; open Trial Balance to find the offending entry.

Reading it day to day

  • Total Assets - sum of all your bank balances plus what parents still owe. If this is dropping month-to-month, you're spending faster than you're collecting.
  • Total Liabilities - keep this small. Big numbers here usually mean unpaid PAYE/SSNIT (we made that easy to forget - see Paying PAYE and SSNIT).
  • Retained Earnings - the cumulative profit of the school since you started using ClassAddmin. Goes up when you make a profit, down when you don't. (Owner draws also reduce it.)

What "as of" means

The date picker at the top sets the as-of date - the snapshot moment. "As of yesterday" includes every transaction posted up to and including yesterday; today's transactions don't appear until the date moves forward.

If you want a quarterly view, just pick the last day of the quarter. Year-end? Pick December 31.

Common questions

Why is Cash on Hand bigger than what's in the safe? Probably because some payments were recorded as cash that actually landed in the bank. Use bank reconciliation to find them and re-classify.

Why are Accounts Receivable not going down even though parents are paying? ClassAddmin defaults to cash-basis accounting - payments credit Income directly, not AR. So AR only moves if you use the accrual flow (issuing invoices to set up the AR). If you don't bill in advance, AR will stay near zero.

16.Close a fiscal month

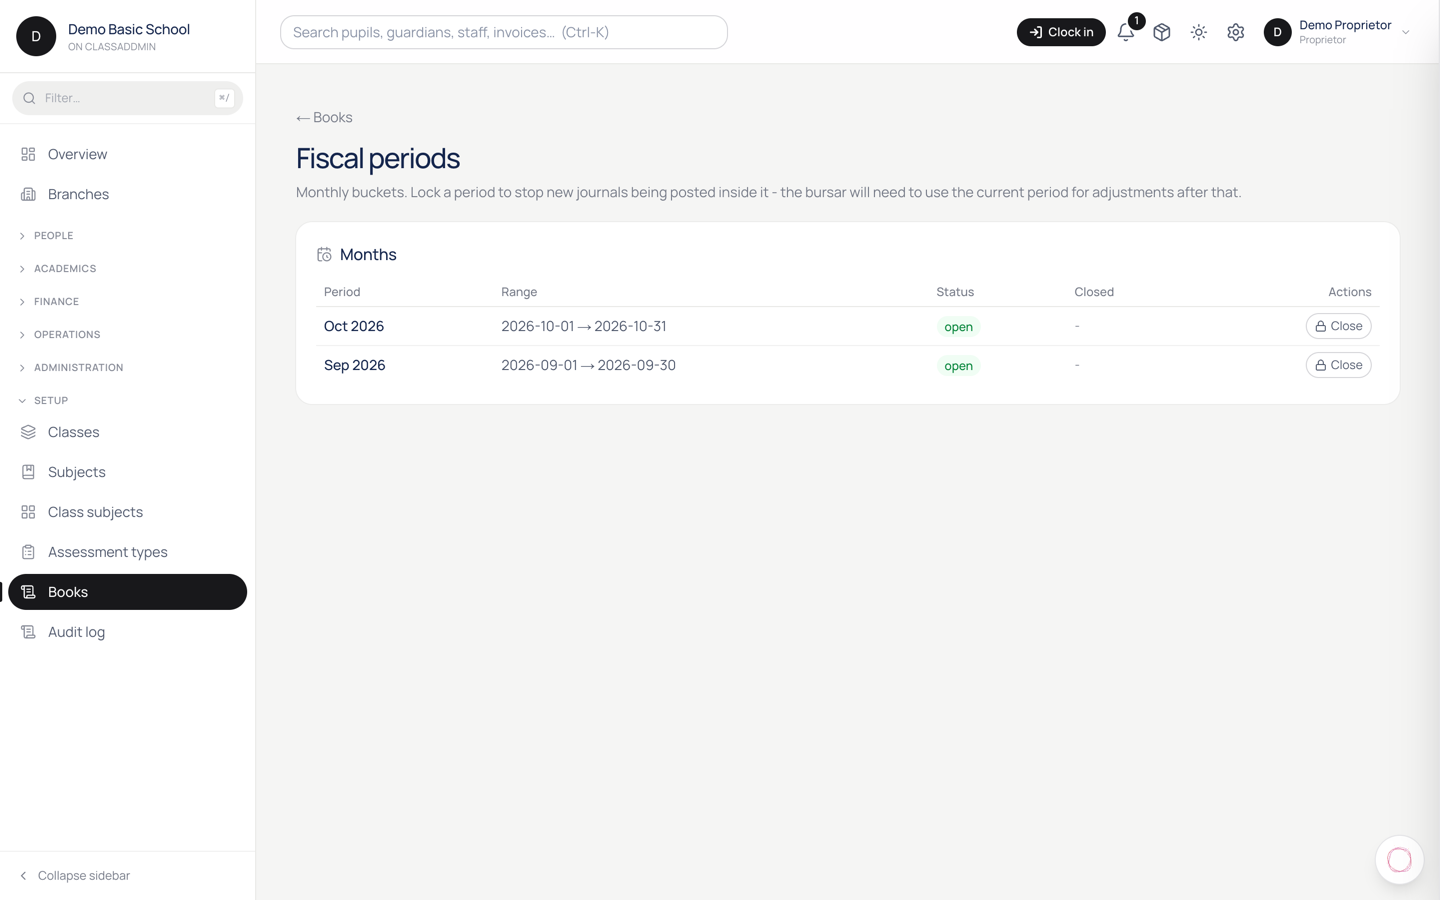
Close a fiscal month — screen

Closing a month locks it so no new journals can be dated inside it. That's how you keep last month's numbers from quietly changing while you're working on this month.

When to close

Close a month after:

  1. Every cash and MoMo payment for the month is recorded.
  2. Every expense is recorded.
  3. Payroll is finalised.
  4. Each bank account is reconciled to zero pending.

If something is still messy, fix it first - closing then immediately reopening is more work.

Steps

  1. Open Books → Periods.
  2. Find the month - they're listed newest first.
  3. Click Close on the row. Confirm.
  4. The status flips to locked. Any attempt to post a journal dated inside it (manual or auto) is rejected.

What "locked" means

  • Auto-posting still works for new payments dated today - they go into the current open period as expected.
  • Manual journals dated within the locked period are blocked with an error message ("Cannot post a journal dated 2026-04-15 - that period is locked").
  • Reports still work - you can still look at last month's P&L and Balance Sheet for any date.

Reopening

If you discover a missing entry after closing, click Reopen. Status goes back to open, you post the fix, then close again.

You can reopen any locked period. Closed (year-end) periods are one-way - see below.

Year-end close

There's no special button for year-end. When December's reconciliation is done, close December. Your Retained Earnings automatically include the year's net income (it's computed on the fly from income/expense balances).

Later, you can mark the period as closed (vs locked) - that's the one-way step. Don't do it until you're truly done with the year, and your accountant has signed off if you use one. After that, the only way to correct an error from that period is to post an adjusting journal in the current period.

The school year

Academic years, terms, periods, the calendar, and promoting pupils up a year.

17.Set up the academic year, terms and periods

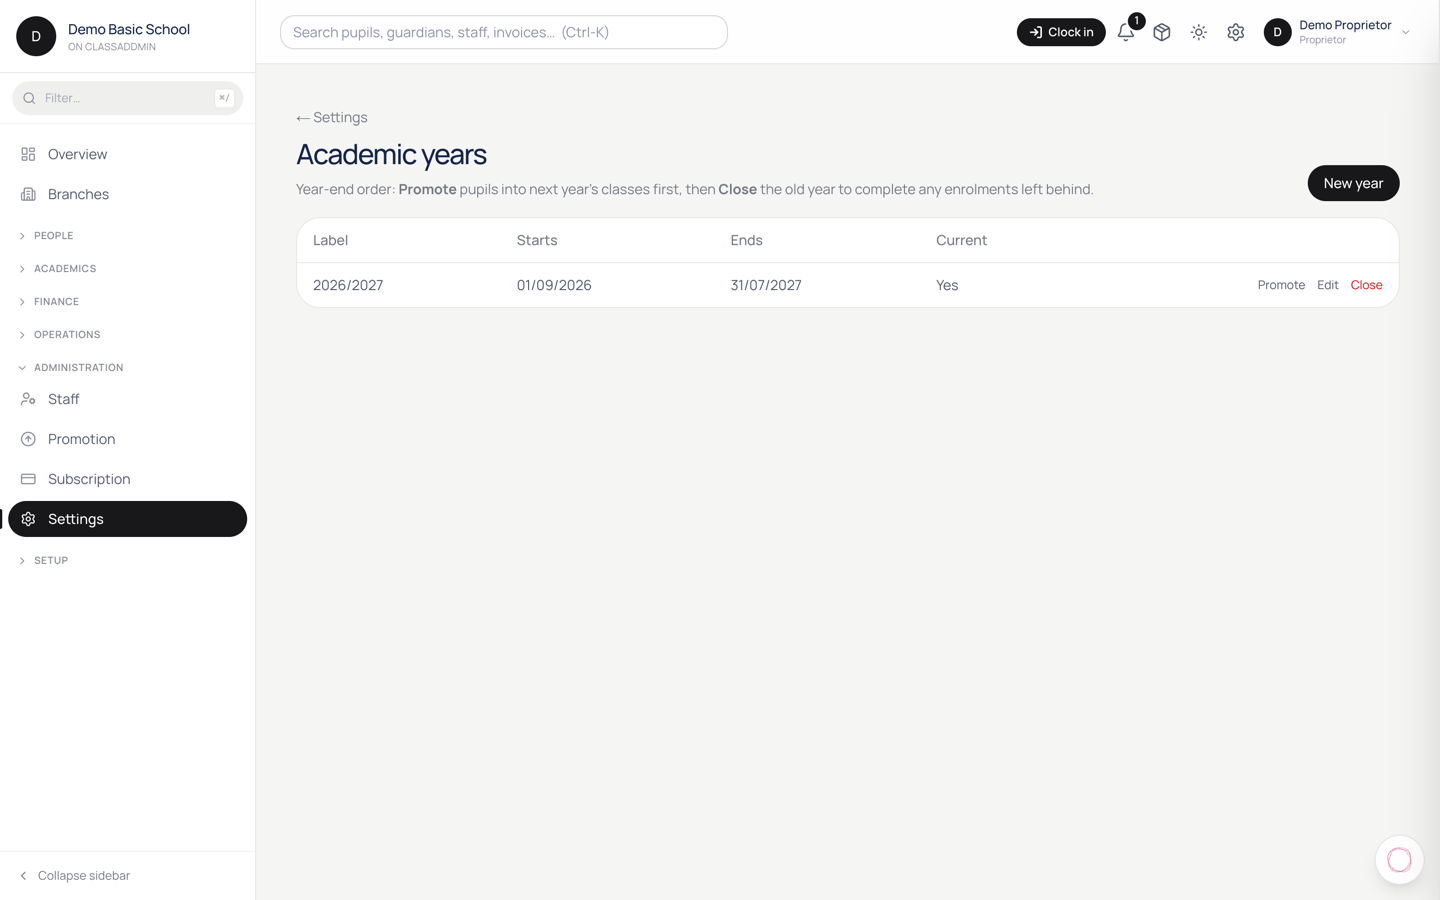
Set up the academic year, terms and periods — screen

Three settings underpin nearly everything else: the academic year, the terms inside it, and the periods that make up a school day. Attendance, report cards, invoices and the timetable all hang off them, so it's worth doing carefully once a year.

1. The academic year

Settings → Academic years

  1. Label — how you refer to it, for example 2026/2027.
  2. Starts on and Ends on.
  3. Save.

2. The terms

Settings → Terms

For each term:

  1. Academic year — which year it belongs to.
  2. Term number — 1, 2 or 3.
  3. Label — for example Term 1.
  4. Starts on and Ends on.

The current term matters more than you'd think

One term is marked as current, and a great deal reads from it without asking you: which term new invoices belong to, which term marks are entered against, which term a report card covers, and the window attendance percentages are calculated over.

If the current term is wrong, everything downstream is quietly wrong too — and it usually shows up as a confusing symptom ("attendance looks far too low") rather than an obvious one. When a term ends, move it on.

3. Periods

Settings → Periods

Periods are the slots in a school day. For each: a Name (for example Period 1), a Starts time and an Ends time.

Add them in the order the day runs, including breaks if you want them on the timetable.

Periods are what the timetable places lessons into, and what per-period attendance registers attach to. A school taking attendance only once a day can keep this simple; a secondary school marking every lesson needs the full day laid out.

Order matters

Do these in order — year, then terms, then periods — because each references the one before. A term needs a year to belong to.

Common gotchas

  • "No current term." Attendance rates, report cards and new invoices all need one. Mark the right term current.
  • Terms that overlap or leave gaps. A date falling in two terms, or none, makes rolled-up figures unpredictable. Check the end of one is the day before the start of the next.
  • Changing a term's dates mid-term. Anything already calculated over the old window shifts. Adjust between terms if you possibly can.
  • A timetable slot won't save. The period doesn't exist yet. Add periods before building the timetable.
  • Dates in the wrong year. With 2026/2027 on screen it's easy to type a term that starts in 2025. Check the year on each date.

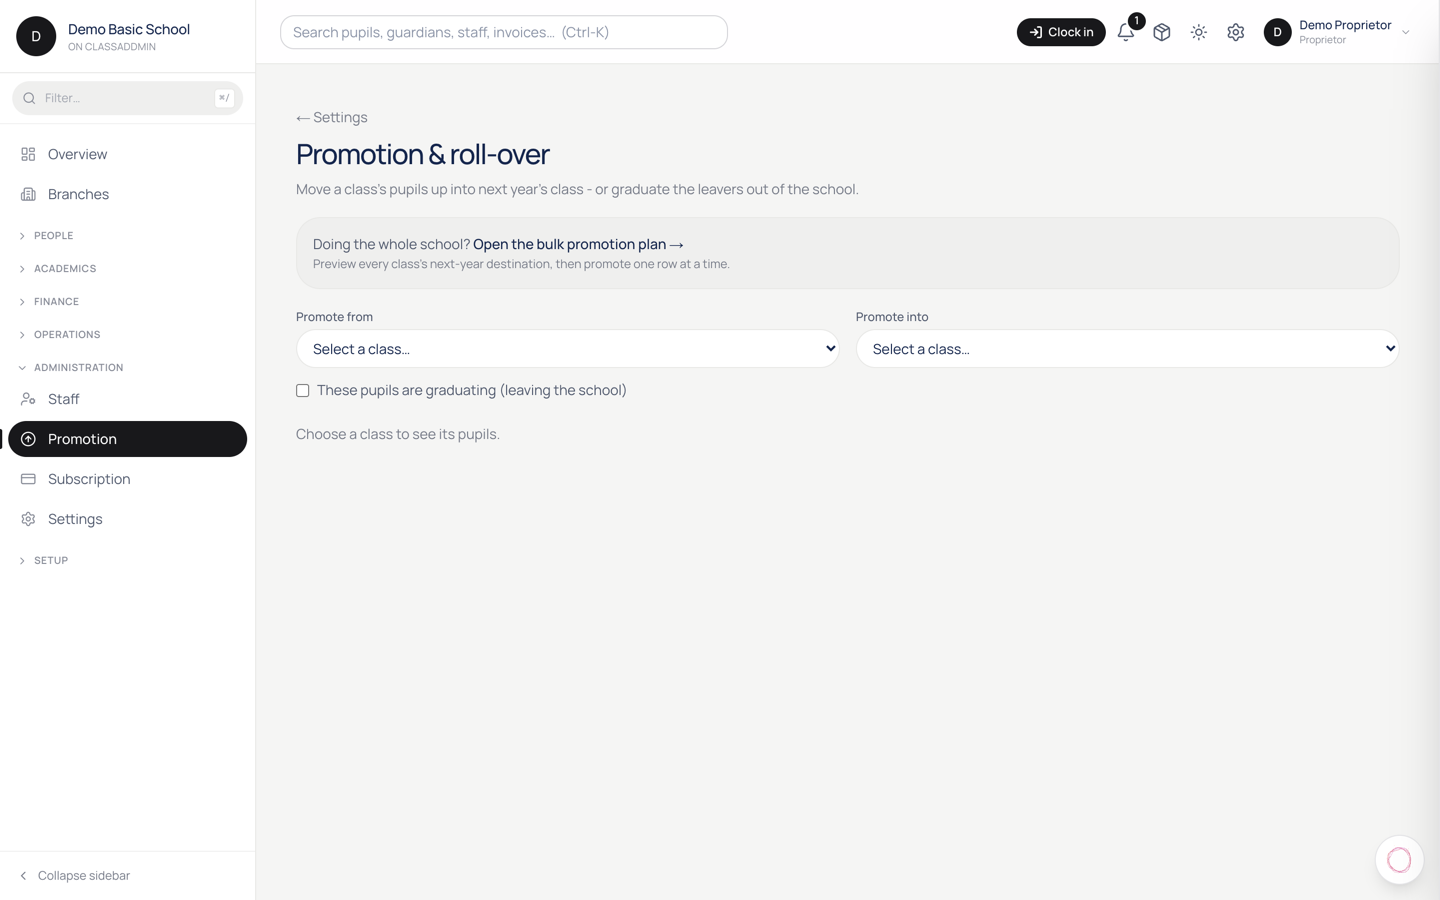
18.Promote pupils into next year's classes

Promote pupils into next year's classes — screen

At the end of the year, pupils move up a class and the final year leaves. Promotion does both without re-enrolling anyone by hand.

Find it at Settings → Promotion.

Before you start

Set up next year first — the academic year, its terms, and the classes pupils will move into. You can't promote into a class that doesn't exist yet.

Promote one class

  1. Settings → Promotion.
  2. Promote from — this year's class.
  3. Promote into — next year's class.
  4. Confirm.

Graduate the leavers

For the final year, tick graduate instead of choosing a destination. Those pupils leave the school rather than moving up — the right outcome for pupils finishing, and the reason there's no "Class 7" to promote Class 6 into.

Doing the whole school at once

Open the bulk promotion plan → shows every class with its proposed destination for next year, so you can check the whole roll-over before anything happens, then apply class by class.

Use this. Reading twelve rows on one screen catches the mistake that's invisible when you promote one class at a time — a class pointing at the wrong destination, or a stream that's been forgotten.

What promotion does

It moves pupils' enrolment to the new class. It doesn't touch their marks, their attendance history, their invoices or their guardians — that history stays attached to the pupil, and remains visible on their record.

Get it right the first time

Promotion moves whole classes of pupils at once. Reversing it means promoting them back, class by class, and any work recorded in between sits against the new enrolment.

So: check the plan screen first, do it once, and do it when the year has genuinely finished — not in the last week while marks are still being entered.

Common gotchas

  • The destination class isn't in the list. It doesn't exist for next year yet. Create classes for the new year first.
  • A pupil didn't move. They weren't actively enrolled in the class you promoted from — a pupil already withdrawn or transferred stays put.
  • You promoted too early. Marks entered after the move attach to the new class. Finish the term first.
  • A repeating pupil. Promote the class as normal, then move that pupil back individually from their own record.
  • Graduated someone by mistake. They've left the school. Re-admit them through admissions; it's not an undo.

Branches

Running more than one campus under one school.

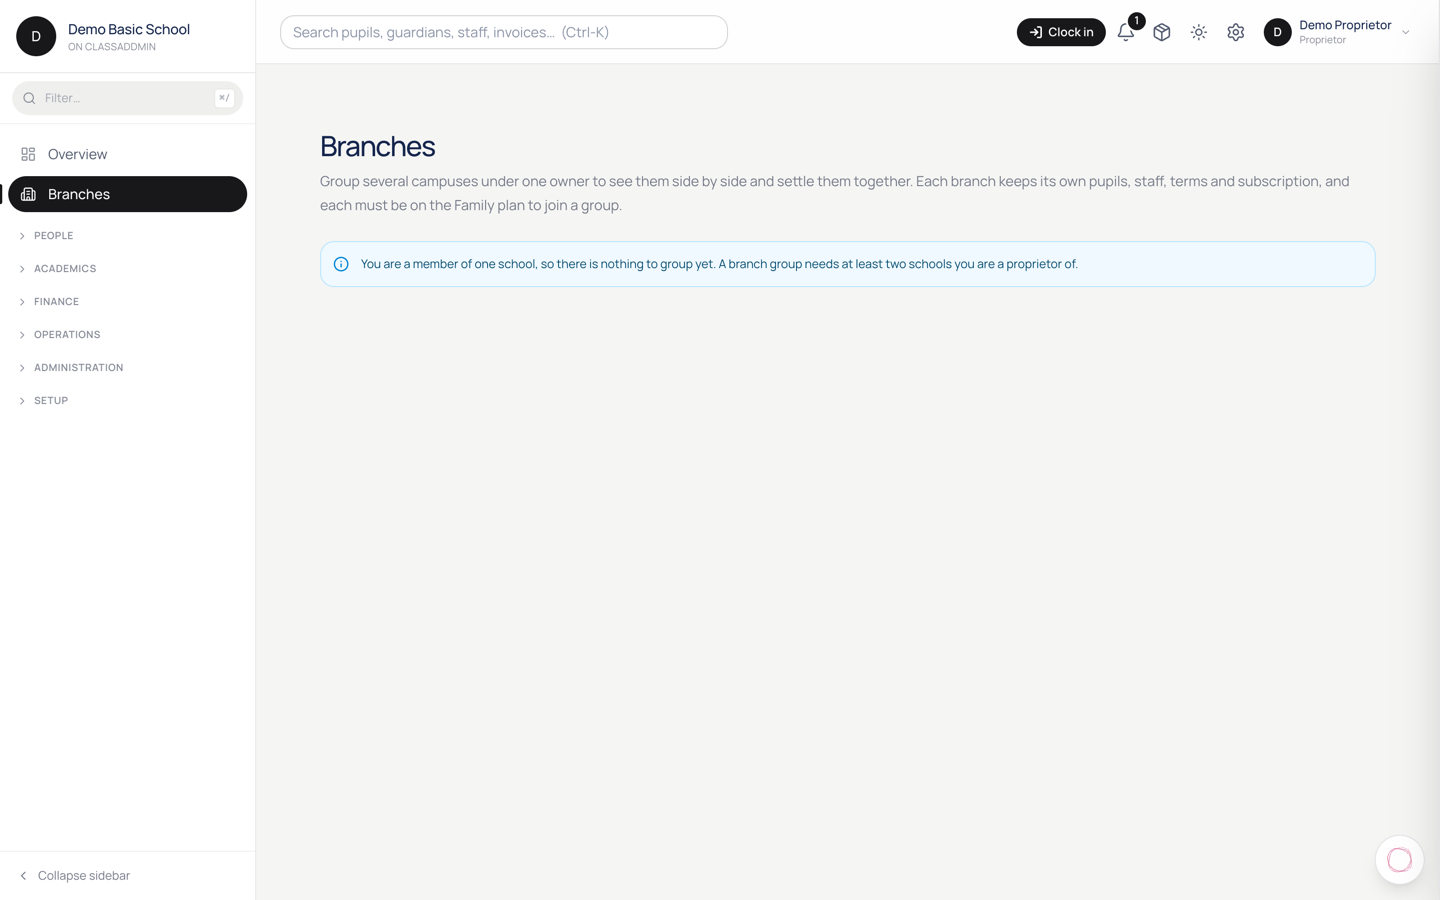
19.Run several campuses as a branch group

Run several campuses as a branch group — screen

If you own more than one school, a branch group puts them under one roof for reporting — without merging them into a single school.

Find it at Branches.

What a branch is

Each branch is a complete school in its own right. It keeps its own:

  • pupils and staff
  • classes, terms and academic years
  • fees, invoices and payments
  • subscription

The group sits above them as a reporting and settlement layer. It does not blend them.

This is deliberate, and it's the thing to understand before you set one up. Two campuses genuinely run differently — different terms, different fees, different staff — and pretending otherwise causes more trouble than it saves. The group gives you the one thing you actually want across campuses: the numbers side by side.

Creating a group

  1. Branches.
  2. Give the group a name — for example Accra Schools.
  3. Add each school as a branch.

What you see

The group page shows each branch's figures, and the totals. Because branches are separate schools, each figure is read from its own branch and added up here — nothing is queried across campuses.

The practical consequence: a pupil belongs to one branch. There's no "all pupils" list spanning campuses, and a class at one branch can't contain a pupil from another. If a family moves between campuses, that's a transfer, handled at the school level.

Who can see it

Only the group's owner. Staff at a branch who don't own the group see the group's name and nothing more — no figures, and no list of the other campuses.

That's enforced on the server, not just hidden in the page: someone who isn't the owner is only ever told about branches they're a member of, so the page can't be used to find out what other schools you run.

Common gotchas

  • A branch's numbers look out of date. Each branch keeps its own terms. If one campus hasn't started its term, its figures reflect that.
  • You can't find a pupil. You're looking at the wrong branch. Pupils belong to one campus.
  • Each branch is billed separately. A group is not a single subscription — each branch carries its own plan.
  • A head teacher wants the group view. Only the owner gets it. Add them as a branch member if they need one campus; the group stays with the owner.

Transport

Routes, stops, assigning pupils to a bus, and watching a run live.

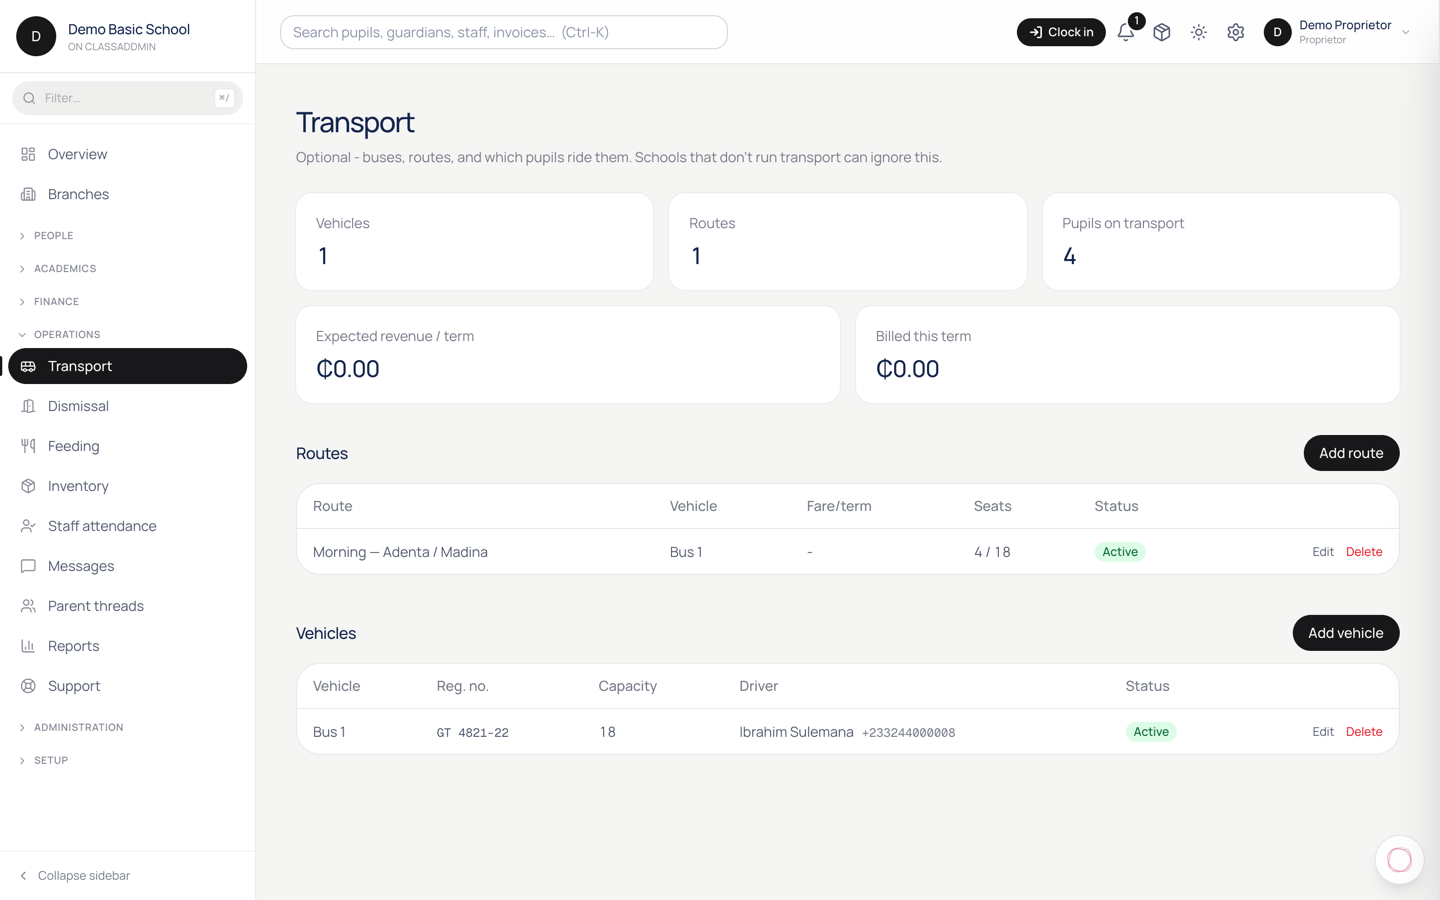
20.Set up school buses and routes

Set up school buses and routes — screen

If your school runs buses, the transport module tracks vehicles, routes, drivers, and which pupils ride which bus. Transport fees feed into the regular fee structure.

The setup order

You configure three things, in this order:

  1. Vehicles - your buses (and vans, if you run them).
  2. Routes - the morning/afternoon paths each bus runs.
  3. Pupil assignments - which pupil rides which route.

Step 1 - Add a vehicle

  1. Transport in the sidebar → Vehicles tab.
  2. Click Add vehicle.
  3. Fill:
    • Plate number - official registration.
    • Display name - what staff and parents see. "Bus 1", "Yellow van", "Toyota Hiace".
    • Capacity - how many pupils can ride safely. The system warns when you exceed this.
    • Driver - pick a staff member with the Driver role, or leave blank for now.
    • Status - active (in use) or inactive (off the road for repairs).
  4. Save.

Step 2 - Add a route

  1. Transport → Routes → Add route.
  2. Fill:
    • Name - "Madina Loop", "East Legon → School", "North Industrial Area Run".
    • Vehicle - which bus runs this route.
    • Direction - pickup (morning), drop (afternoon), or both.
    • Time - approximate first pickup and last drop.
  3. (Optional) Add stops - named pickup points along the route. Useful when parents ask "where does my child board?".
  4. Save.

Step 3 - Assign pupils

For each pupil who rides:

  1. Students → pupil → Transport tab.
  2. Click Assign route.
  3. Pick the route(s) the pupil takes:
    • Morning route - picks them up from home.
    • Afternoon route - drops them home.
  4. (Optional) Pick the stop if you've defined stops.
  5. (Optional) Add the fare per term - if it's not part of the class's fee structure.
  6. Save.

The pupil now appears on the route's roster. The driver sees the list on their phone via the transport app (if used) or as a printable PDF you give them weekly.

See who's on which bus

  1. Transport → Routes → click a route.
  2. The pupil list shows up - name, class, stop, contact.
  3. Click Print roster for the driver's clipboard.

Per-route changes

When a parent calls saying "Adwoa is going to her aunt's tomorrow":

  1. Students → Adwoa → Transport tab.
  2. One-day override - set a different route + stop for tomorrow.
  3. Save.

The driver's roster for tomorrow reflects the override; the day after, Adwoa is back on her usual route.

Transport fees

Two ways to charge:

  • Per-class fee structure - every pupil in a class who takes transport pays the same. Add a Transport component to the class's fee structure (Set up a fee structure).
  • Per-pupil - set the fare on each pupil's Transport tab. Useful when different families pay different rates (subsidised, sibling discount).

Common gotchas

  • Driver dropdown is empty - no staff member has the Driver role. Settings → Roles → assign one.
  • Capacity warning blocks assignment - bump capacity if the bus has a few extra seats, or reassign a pupil to a different route.
  • Pupil's parent says the bus didn't come - check the route's status (active?), and confirm the vehicle isn't inactive due to a repair.

21.Start and end a bus run

A run is one trip along your route. Starting it tells the school and waiting parents that the bus is moving; ending it stops that.

Start the run

  1. Open the driver app. The Route tab shows your route name and vehicle.
  2. Tap Start run.
  3. Allow location access if you're asked. The app needs it while the app is in the background — your phone will be in your pocket or on a mount, not open in front of you.

Once started, the button turns green and reads End run, and three counters appear:

  • Waiting — still to be dropped
  • Delivered — dropped off
  • No-show — weren't there

What the school and parents see

While a run is active, your position goes to the school every few moments. Parents of children on your route see a live card in their app — the bus on a map, and roughly how long until it reaches their child's stop.

That's the whole point of starting the run, and the reason to start it as you pull away rather than halfway along.

End the run

  1. Tap End run.
  2. Confirm.

Ending stops the tracking. Do it every time. A run left open keeps reporting your location after you've finished — including after you've gone home.

Common gotchas

  • The Start button is blocked. Location permission was refused, or there's a location error. Open your phone's settings for the app and allow location Always, not just "while using".
  • "No active route." Your account isn't assigned to a route for today. That's set by the school in Transport, not in the driver app.
  • Parents say the bus isn't moving on the map. The app needs to keep running in the background. Don't force-close it mid-run, and if your phone has aggressive battery saving, exempt the app.
  • You forgot to end yesterday's run. End it now. The school can see run history, and an overlapping run makes today's tracking confusing.
  • No signal along part of the route. Positions during a dead patch may not arrive. The bus will appear to jump when signal returns.

22.Work your manifest — dropping off and no-shows

The manifest is who's on your bus today and where each child gets off. It's the screen you work from during a run.

How the list is arranged

It sorts itself so the next thing to do is always at the top:

  • Waiting pupils sit at the top, each with two big buttons.
  • Delivered rows sink to the bottom, showing the time and stop. No buttons — that child is done.
  • No-show rows show the reason you gave.

Each row shows the stop the child boards or leaves at, so you're reading the list in the order you'll drive it.

Dropping a child off

At the stop, tap Delivered on that child's row.

That does two things: it records the drop against that stop and time, and it texts the parent. Which is why it's worth tapping at the stop rather than catching up on five children at the next junction — the message should arrive when the child actually got off.

Marking a no-show

If a child isn't there, tap No-show and pick a reason:

Reason When
Not at stop Nobody was waiting
Reported sick The family told you they're ill
Parent collecting A parent is taking them instead
Other Anything else

The reason matters beyond the bus. Parent collecting in particular tells the school that the child is expected to leave by the gate instead — without it, the gate may refuse to release a child who's assigned to a bus.

Common gotchas

  • You tapped Delivered for the wrong child. Tell the school straight away. The parent has already been texted, and a delivered row has no buttons to undo it from the bus.
  • A child is on the bus but not on the manifest. Don't guess. The manifest comes from the school's transport assignments; a child who isn't on it hasn't been assigned to your route. Call the school.
  • A parent says they got no message. The text goes to the pupil's primary contact. If that number is wrong or missing, nothing sends — that's a record to fix at the school, not on the bus.
  • The list is empty. No run is active, or no pupils are assigned for today. Check the Route tab first.
  • Do it while stopped. The buttons are big for a reason, but no drop-off is worth tapping at while moving.

Feeding

Meal plans, the weekly menu, prepaid balances and the serving register.

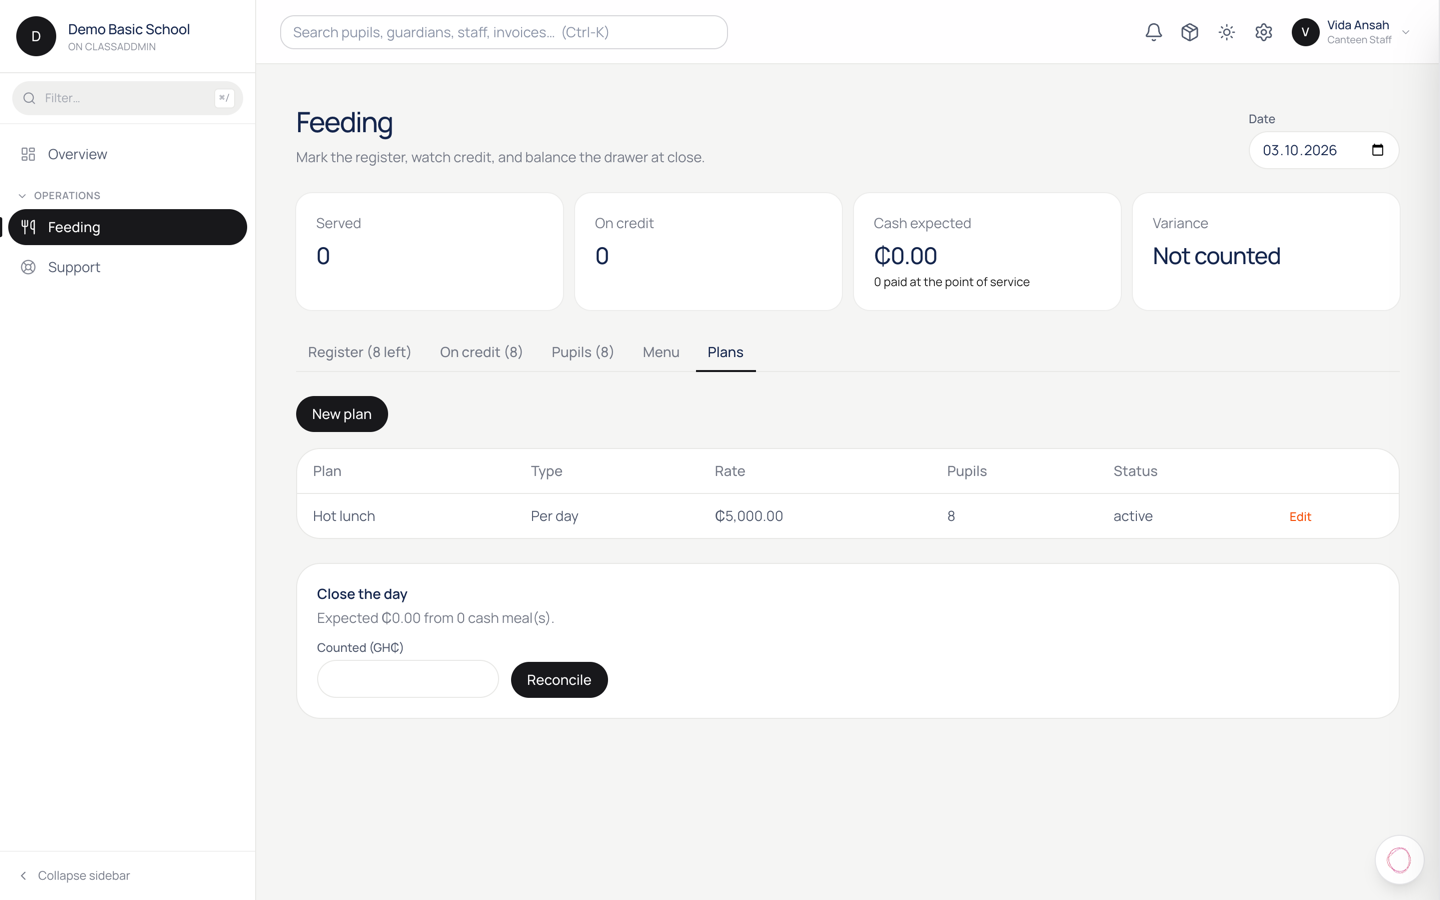
23.Set up feeding plans and publish the weekly menu

Set up feeding plans and publish the weekly menu — screen

Before anyone can be served, feeding needs two things: plans, which say what a meal costs and how it's paid for, and a menu, which tells parents what's being cooked.

Find both at Feeding, on the tabs across the top.

1. Create your plans

A plan is how a pupil pays for meals. Most schools need one or two.

  1. Go to Feeding → Plans.
  2. Give the plan a Name parents will recognise — for example Standard lunch.
  3. Choose how it's Charged:
    • Daily — the pupil has a prepaid balance measured in days. Each meal served takes one day off it.
    • Termly — feeding is billed on the termly invoice like any other fee. There's no balance to top up.
  4. Set the Rate in cedis. On a daily plan this is the price of one meal.
  5. Save.

Which to choose

Termly is simpler: it rides on the invoice you already send, and nobody handles cash at the kitchen. Daily suits schools where families pay as they go, and it's the only one that gives you the prepaid balance and low-balance reminders.

You can run both at once — some families on termly, others daily.

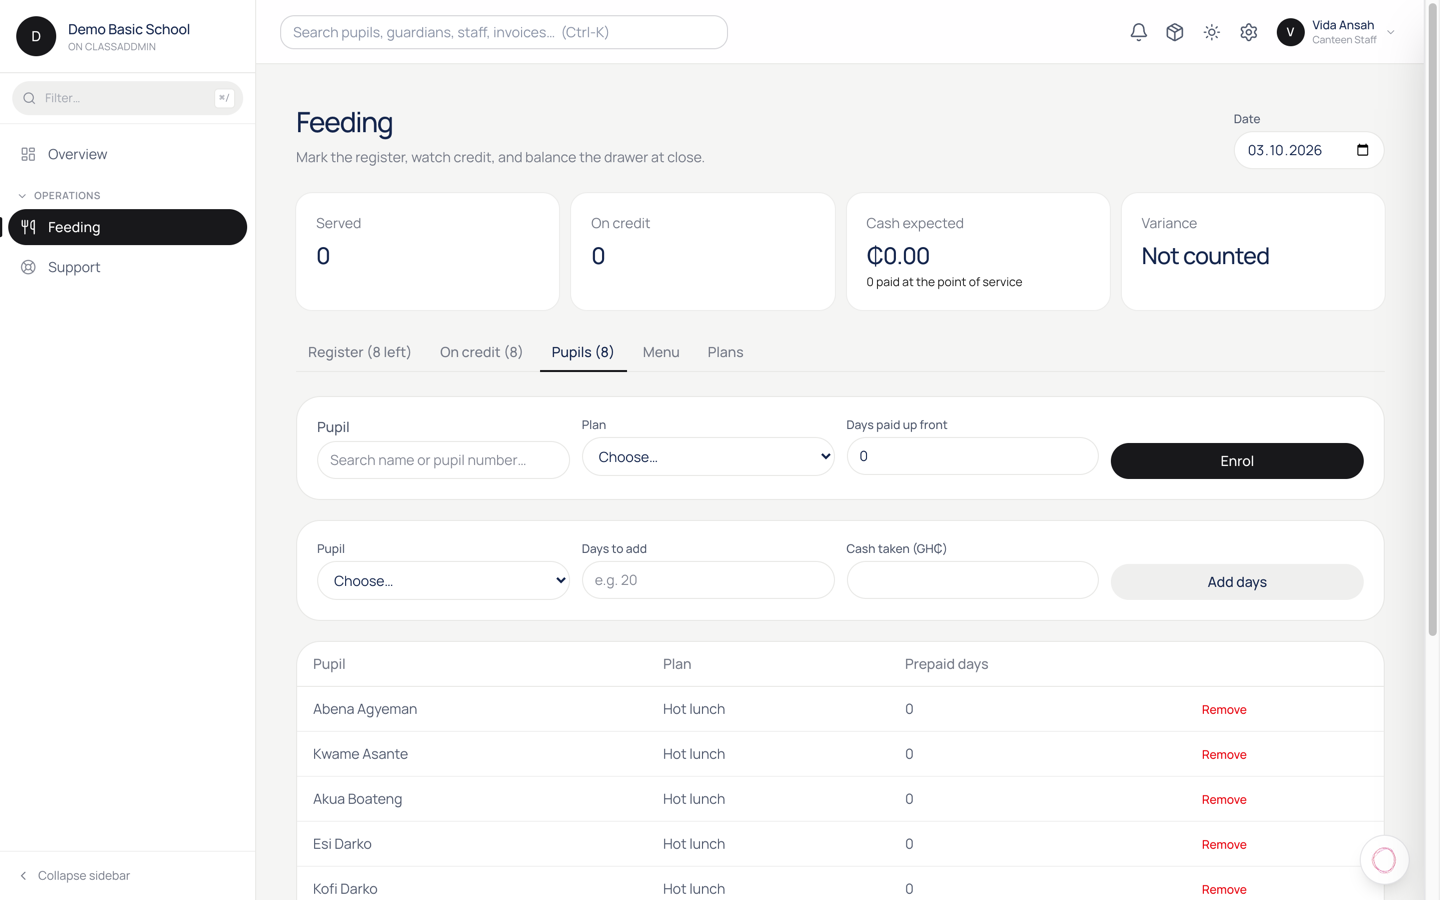
2. Put pupils on a plan

  1. Feeding → Pupils.
  2. Add a pupil, choose their Plan, and enter Days paid up front if they're starting with a balance.

Only pupils listed here appear on the register. A pupil with no plan is simply not a feeding pupil.

3. Publish the week's menu

  1. Feeding → Menu.
  2. For each day, type what's being served — for example Jollof rice with chicken.
  3. Save the day.

Where the menu shows up

The menu is what parents see in the app, on the home screen, for the days ahead. It's the main reason to keep it current: a parent checking whether to pack lunch is the person it's for.

Write it the way you'd say it. Jollof rice with chicken is better than Menu A.

Common gotchas

  • A pupil isn't on the register. They have no feeding plan. Add them under Pupils.
  • The menu is blank in the parent app. Nothing has been published for those dates. The app shows the days from today onwards, so yesterday's menu won't appear.
  • You changed a plan's rate mid-term. New charges use the new rate; meals already served keep what they were charged. That's deliberate — re-pricing the past would change balances parents have already settled.
  • Termly pupils show no balance. Correct. A termly plan is settled on the invoice, so there's nothing to top up and no balance to run down.

24.Serve the feeding register and close the day

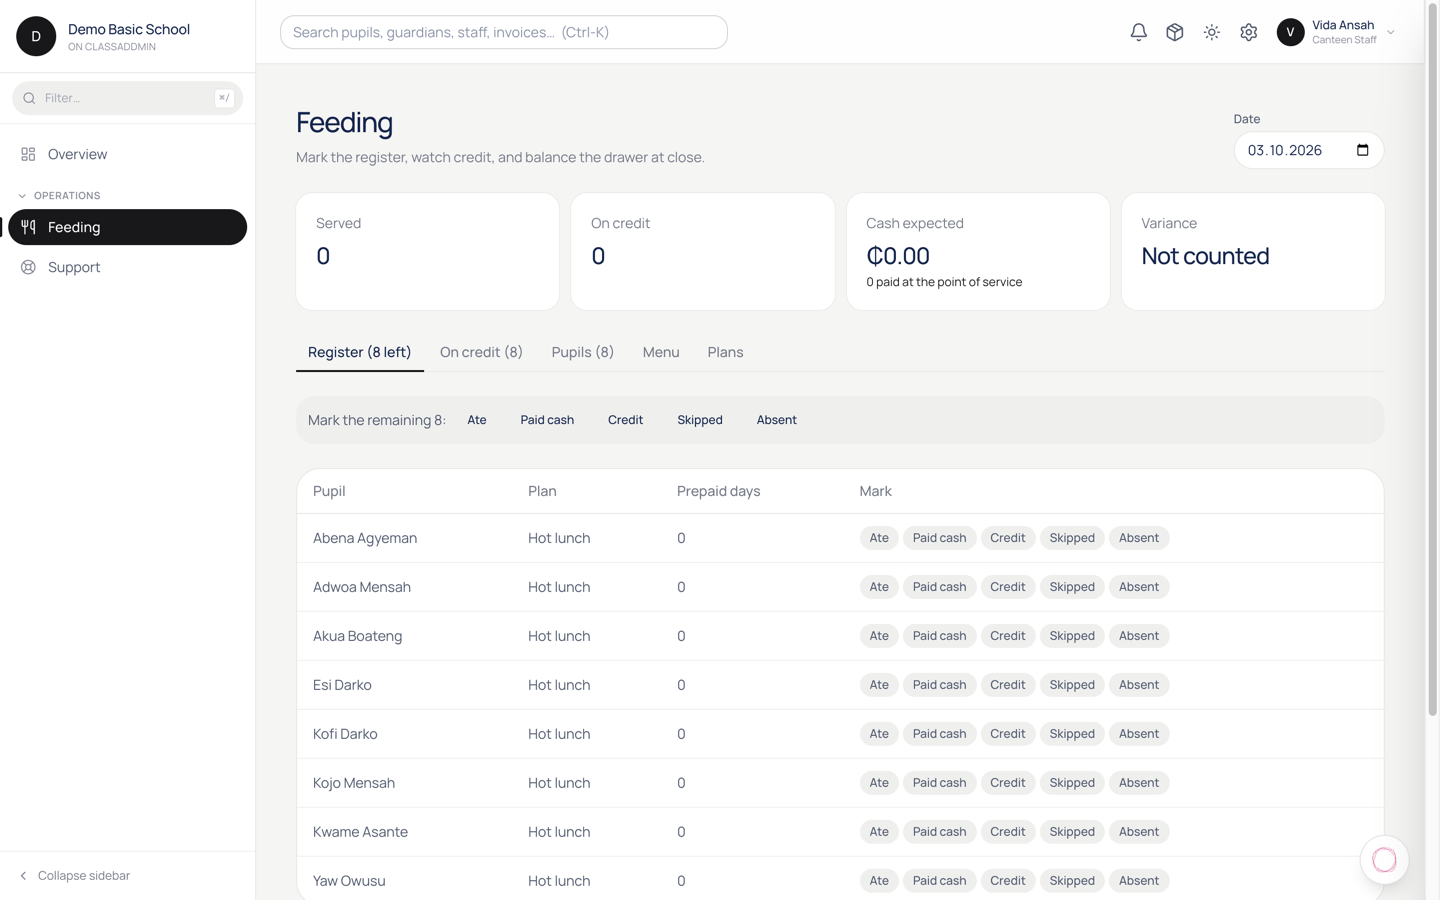
Serve the feeding register and close the day — screen

The register is the one feeding screen touched every day. You mark who ate, and everything else — balances, arrears, the cash you should be holding — follows from it.

Find it at Feeding. The register is the first tab, and its label tells you how many pupils are still unmarked.

Steps

  1. Open Feeding. Check the Date at the top is today.

  2. Work down the list. For each pupil, tap one of five marks:

    Mark Use it when What it does
    Ate The normal case Takes one day off a daily balance
    Paid cash They paid at the kitchen today Adds to today's expected cash
    Credit They ate but couldn't pay Adds to what they owe
    Skipped Here, but didn't take a meal Charges nothing
    Absent Not at school Charges nothing
  3. The count in the tab drops as you go. When it's gone, everyone is marked.

The distinction that matters is Skipped versus Absent. Neither charges anything, so it makes no difference to money — but it does tell you whether a pupil who's in school is choosing not to eat, which is worth knowing.

Close the day

At the end of service, still on the register:

  1. Scroll to Close the day. It shows the cash you should be holding, worked out from every Paid cash mark.
  2. Count the drawer and type the real figure into Counted (GH₵).
  3. Save.

If the two don't match, that's the point of doing it — you find out the same day, while someone still remembers. Count before you look at the expected figure if you can; it's easy to "find" the number you were expecting.

On credit

Feeding → On credit lists everyone who has eaten without paying, with how much. Its tab shows the count, so you can see at a glance whether it's growing.

Chase these while they're small. A pupil eating on credit every day for a term arrives at a number no family can settle at once.

Common gotchas

  • A pupil is missing from the register. They have no feeding plan — add them under Feeding → Pupils. The register only lists pupils on a plan.
  • You marked the wrong pupil. Tap the correct mark again; the latest one wins. Marks are per pupil per day, so you can't double-charge by tapping twice.
  • You're marking yesterday. Check the Date box. It's easy to leave it on a previous day after looking something up.
  • Expected cash looks too low. Only Paid cash counts towards it. Meals taken from a prepaid balance were paid for earlier, and credit hasn't been paid at all.
  • A daily-plan pupil ran out mid-service. Their balance can go negative — they still eat. Mark it Credit or take cash, and settle it under On credit.

25.Prepaid balances, top-ups and low-balance reminders

Prepaid balances, top-ups and low-balance reminders — screen

On a daily plan, a pupil's feeding is measured in days paid up front. Each meal served takes one day off. This page is how days go back on, and how families find out before they run out.

Termly plans have none of this — feeding is on the invoice, so there's no balance.

Take a top-up

  1. Feeding → Pupils.
  2. Find the Pupil.
  3. Enter Days to add — for example 20.
  4. Enter Cash taken (GH₵) — what the parent actually handed over.
  5. Save.

Both boxes matter. Days go on the pupil's balance; the cash is recorded as money received. Filling in days but not cash leaves the pupil fed and your books short.

Letting balances run negative

A balance can go below zero. That's on purpose: a child at the front of the queue at lunchtime should be fed, not turned away over an accounting rule.

What it means in practice is that "out of days" isn't a wall, it's a signal. Watch Feeding → On credit and settle balances while they're small.

Low-balance reminders

The school can text the paying guardian when a pupil's prepaid days run low, so families top up before it becomes credit.

  • It's off unless your school has feeding alerts switched on.
  • There's a threshold — the number of days left that triggers the nudge. Three is a sensible default: enough notice to act, not so much that it nags.
  • A guardian gets at most one per day, so a low balance sitting low over a week doesn't produce a message every morning.
  • Only daily plans trigger it. A termly pupil has nothing to top up, so texting them would be noise.

What parents see

In the app, a parent sees the days left on each child's balance and can top up from their phone. That's usually easier than cash at the kitchen, and it means the money is recorded without anyone handling notes.

Common gotchas

  • A top-up didn't change the balance. Check you filled in Days to add, not only the cash box.
  • Cash doesn't reconcile at close of day. Top-ups and meals paid for at the kitchen are different things. Close the day counts only Paid cash marks on the register.
  • A parent says they never got a reminder. Check: feeding alerts on for the school, the pupil on a daily plan, the guardian marked as the primary contact, and a phone number on their record. Any one missing and no message goes out.
  • The balance looks wrong after a plan change. Moving between daily and termly doesn't convert an existing balance. Settle or note the balance before switching.

Inventory

Stock, issuing items, and what the school owns.

26.Sell uniforms, books and stationery from stock

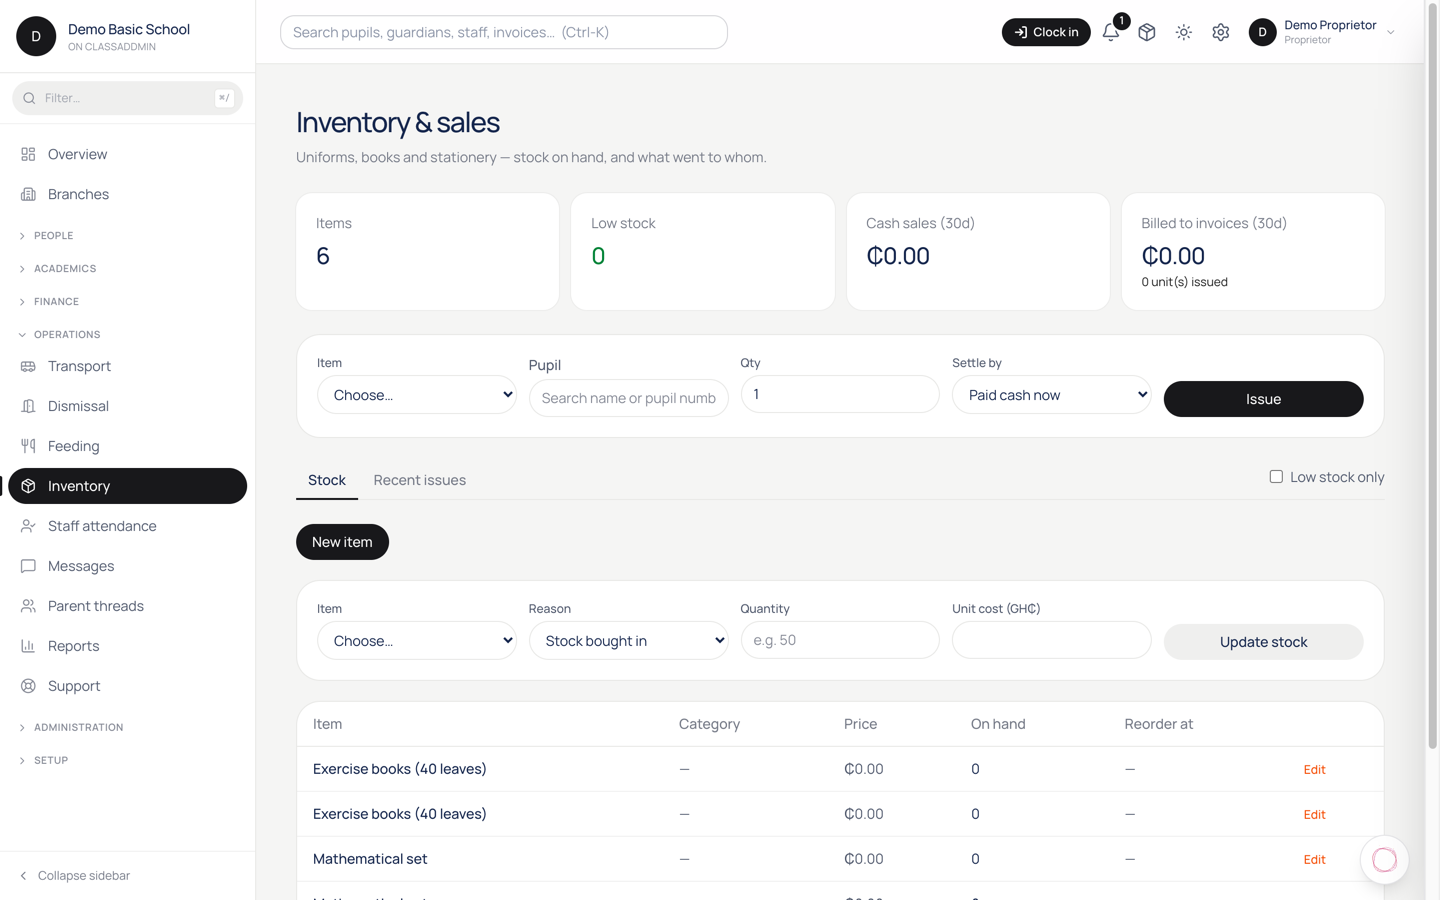
Sell uniforms, books and stationery from stock — screen

Inventory covers the things a school sells to families — uniforms, exercise books, stationery. It does two jobs: tells you what's on the shelf, and gets an item that left the shelf onto the right parent's bill.

Find it at Inventory, with two tabs: Stock and Issues.

Stock

The Stock tab lists every item and how many you have. Add an item with its name, price and how many you're holding.

Keep the count honest. If it drifts from what's in the store cupboard, the number stops being worth looking at and people go back to counting by hand.

Issue an item to a pupil

This is the part that matters — it's how a uniform becomes money owed.

  1. Inventory → the issue form.
  2. Pick the Item.
  3. Pick the pupil.
  4. Enter the Qty — how many.
  5. Choose Settle by:
    • Paid cash now — the parent is paying at the counter.
    • On credit — add it to what they owe.
  6. Save.

Stock goes down by the quantity either way. What differs is the money.

What "on credit" actually does

Issuing on credit writes a line onto the pupil's invoice. It is not a separate note in a separate place.

That means a school jumper handed over in September is chased by exactly the same fee reminders as tuition, appears on the pupil's statement, and shows up in your outstanding-fees figures. There's no second list to remember to look at.

It also means the family sees it. A parent opening their bill will find "School jumper × 1" alongside the term's fees, which is the honest way to present it.

The Issues tab

Issues is the history — what went out, to whom, when, and how it was settled. Use it when a parent queries a charge, or when the stock count doesn't match the shelf and you need to see what left.

Common gotchas

  • Stock doesn't match the cupboard. Something left without being issued. The Issues tab shows what was recorded; the gap is what wasn't.
  • A parent disputes an item on their bill. Find it in Issues — it carries the date and quantity.
  • You issued to the wrong pupil. Tell whoever runs fees. The charge is a line on an invoice now, so it's corrected there, not by re-issuing.
  • You issued on credit but took the cash. The invoice line stays until a payment is recorded against it. Record the payment normally; don't delete the line.
  • Nothing appears on the invoice. Check the pupil actually has an invoice for the current term — a credit line needs a bill to sit on.

Settings you set once

Payment channels, instalment plans, add-on modules, grading policy, look and feel.

27.Set up how parents pay you, and what your invoice says

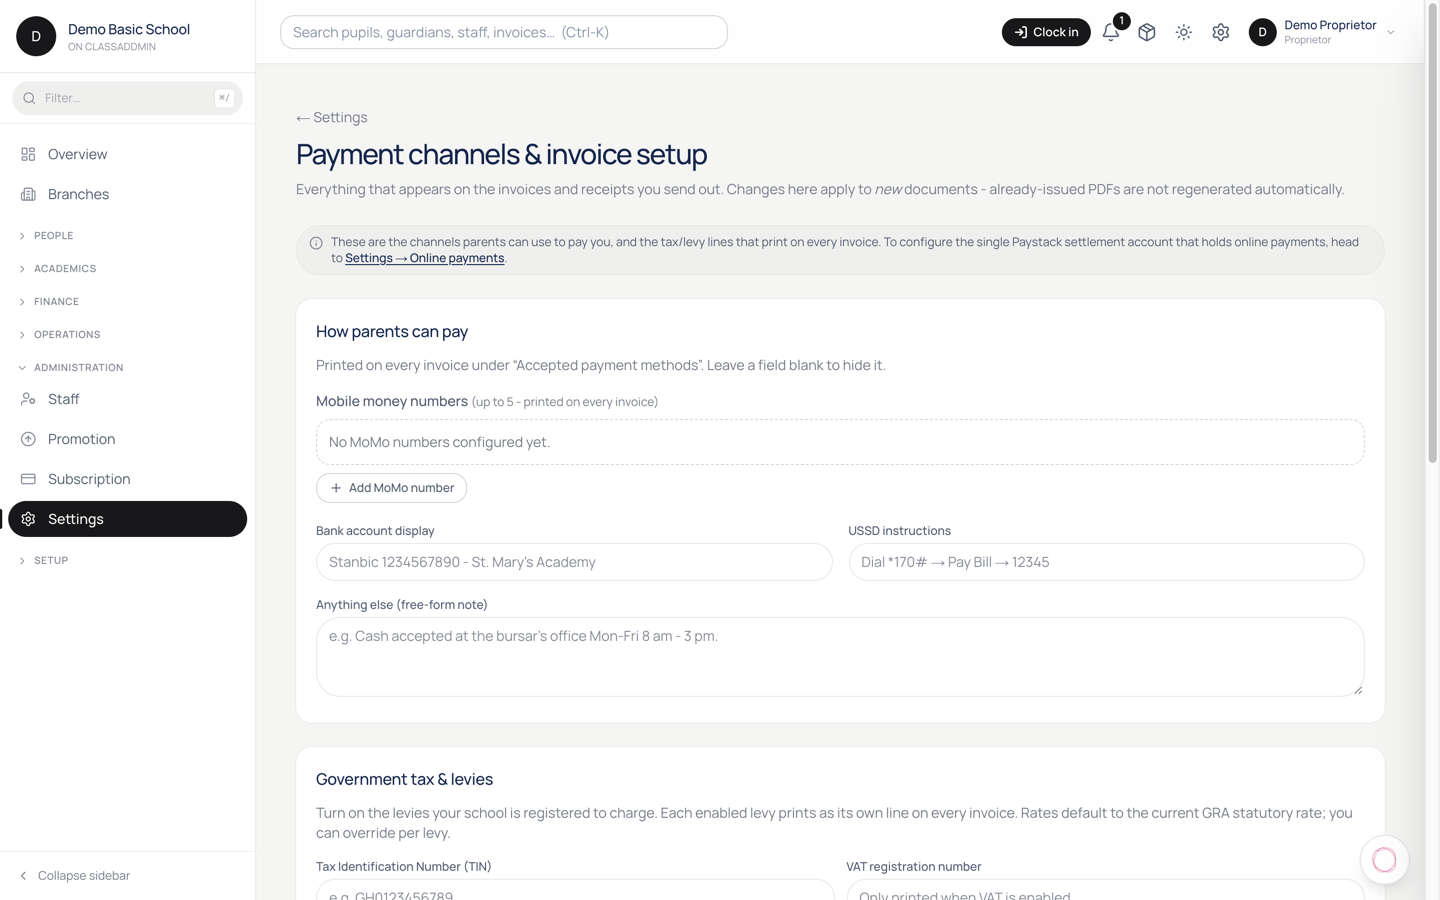
Set up how parents pay you, and what your invoice says — screen

This one page decides two things parents actually see: how they can pay you, and what your invoice and receipt look like when they open the PDF. Worth getting right once, before you issue a term's invoices.

Find it at Settings → Payment channels & invoice setup.

1. How parents can pay

Everything you put here is printed on the invoice, so a parent has your payment details in front of them.

  1. Mobile money lines. Add a number for each network you accept — MTN MoMo, Telecel Cash, AirtelTigo Money. Add as many as you use.
  2. Bank account display. Free text, exactly as you want it to read, for example Stanbic 1234567890 - St. Mary's Academy.
  3. USSD instructions. If you have a pay-bill short code, write the steps out: Dial *170# → Pay Bill → 12345.
  4. Anything else. A free-text line for the rest — for example Cash accepted at the bursar's office Mon-Fri 8 am - 3 pm.

Changes save as you go; you'll see Saved. appear.

This is separate from paying online

These details tell a parent how to send you money themselves. They are not the same thing as the Pay now button in the parent app, which settles into your Paystack account. Set both up if you want both: the card button for parents who'd rather tap, and these details for everyone else.

2. Government tax and levies

Toggle on only what your school is actually registered to charge, and set the rate for each:

  • VAT — Value Added Tax
  • NHIL — National Health Insurance Levy
  • GETFund Levy — Ghana Education Trust Fund Levy
  • COVID-19 HRL — COVID-19 Health Recovery Levy

Once on, each appears as its own line on the invoice and is included in the total, so a parent can see what they're paying and why.

Only switch these on if your school is registered to collect them. Charging a levy you don't remit is a problem with the Ghana Revenue Authority, not with ClassAddmin.

3. What the invoice looks like

  • Signatory name and Signatory title — whose name sits at the bottom of the invoice, for example Mrs. Mary Asante, Proprietor.
  • Invoice footer terms — your payment terms in your own words, for example Late payments attract 5% per term. All balances are due by week 2 of term.
  • QR code — turn on to print a code a parent can scan to pay.
  • Brand colour — the accent colour on the PDF.

Brand colour needs the Family plan. On other plans the colour picker is visible but greyed out, so you can see what upgrading gets you.

What happens after you save

Every invoice and receipt generated from now on uses these settings. Invoices already issued keep the details they were printed with — an old invoice won't retrospectively change its payment instructions, which is the correct behaviour if a parent is holding a printout.

If you change a MoMo number mid-term, re-issue or re-download the invoices you want to carry the new one.

Common gotchas

  • A parent paid to an old MoMo number. The number lives on the invoice they were holding. When you retire a line, keep it active with your provider until the term's invoices are settled.
  • The tax line looks wrong. Check the rate, not just the toggle — each levy has its own rate box, and they're independent.
  • Nothing appears on the PDF. These affect newly generated documents. Open a fresh invoice rather than a cached download.
  • The colour picker won't move. That's the Family-plan gate, not a bug.

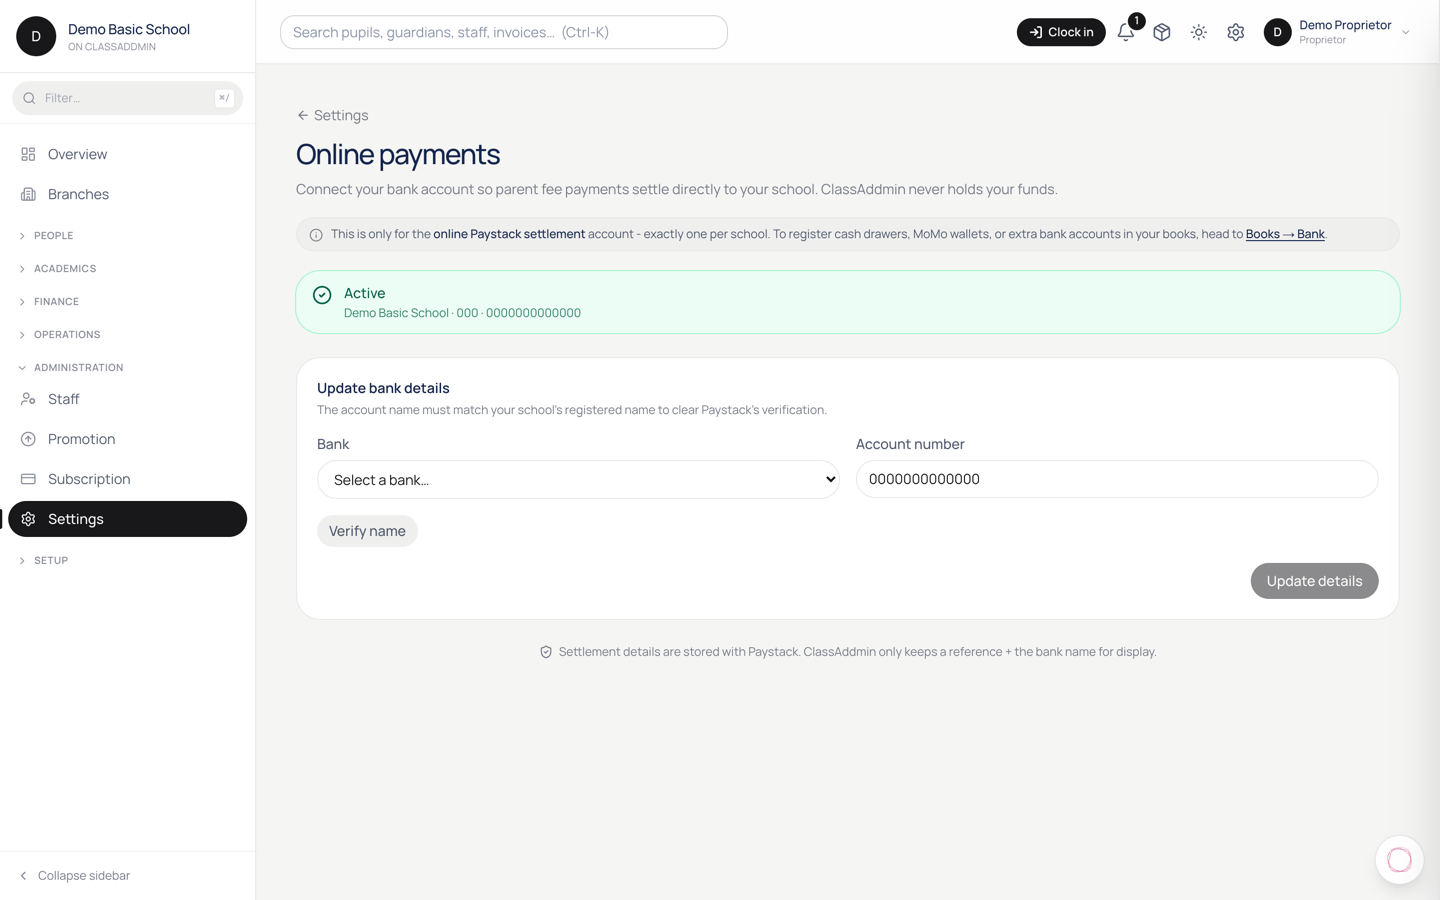
28.Set up the bank account online fees are paid into

Set up the bank account online fees are paid into — screen

When a parent taps Pay now in the app, the money has to land somewhere. This is where you tell ClassAddmin which bank account that is.

Find it at Settings → Payments.

Steps

  1. Settings → Payments.
  2. Enter your bank and account number — for example 1234567890123.
  3. Enter the account name as the bank has it, for example Academy Basic School.
  4. Save. The details are verified against the bank before anything is stored.

The three states

State What you see What it means
Not set up The form Parents can't pay online yet
Pending A Refresh button Still being validated — check back
Active Your current details Online payments are settling to you

Pending isn't an error. Validation can take a little while; click Refresh rather than re-submitting the form, which just starts it again.

What this does and doesn't cover

This account receives online payments only — the card and mobile-money payments parents make through the app.

It has nothing to do with the MoMo numbers and bank details printed on your invoice. Those are instructions for a parent sending money themselves, set up separately under Settings → Payment channels. A school can run either, or both:

  • Settlement account → parent taps Pay now → money arrives automatically, recorded automatically.
  • Payment channels → parent sends money themselves → someone records the payment by hand.

Until this is set up

Parents have no Pay now button. They can still pay by every other route, and your bursar records those as usual — but the easiest option for a parent is missing, and so is the automatic recording that comes with it.

Common gotchas

  • Verification fails. The account name must match the bank's records exactly. Academy Basic Sch. won't match Academy Basic School.
  • Stuck on pending. Use Refresh. Re-submitting restarts validation.
  • Money hasn't arrived. Settlement isn't instant — payouts follow the payment provider's schedule, not the moment a parent pays.
  • You changed banks. Update here. Payments already in flight settle to the old account.
  • A personal account. Use the school's account. Fees settling into an individual's account is the kind of thing an auditor asks about.

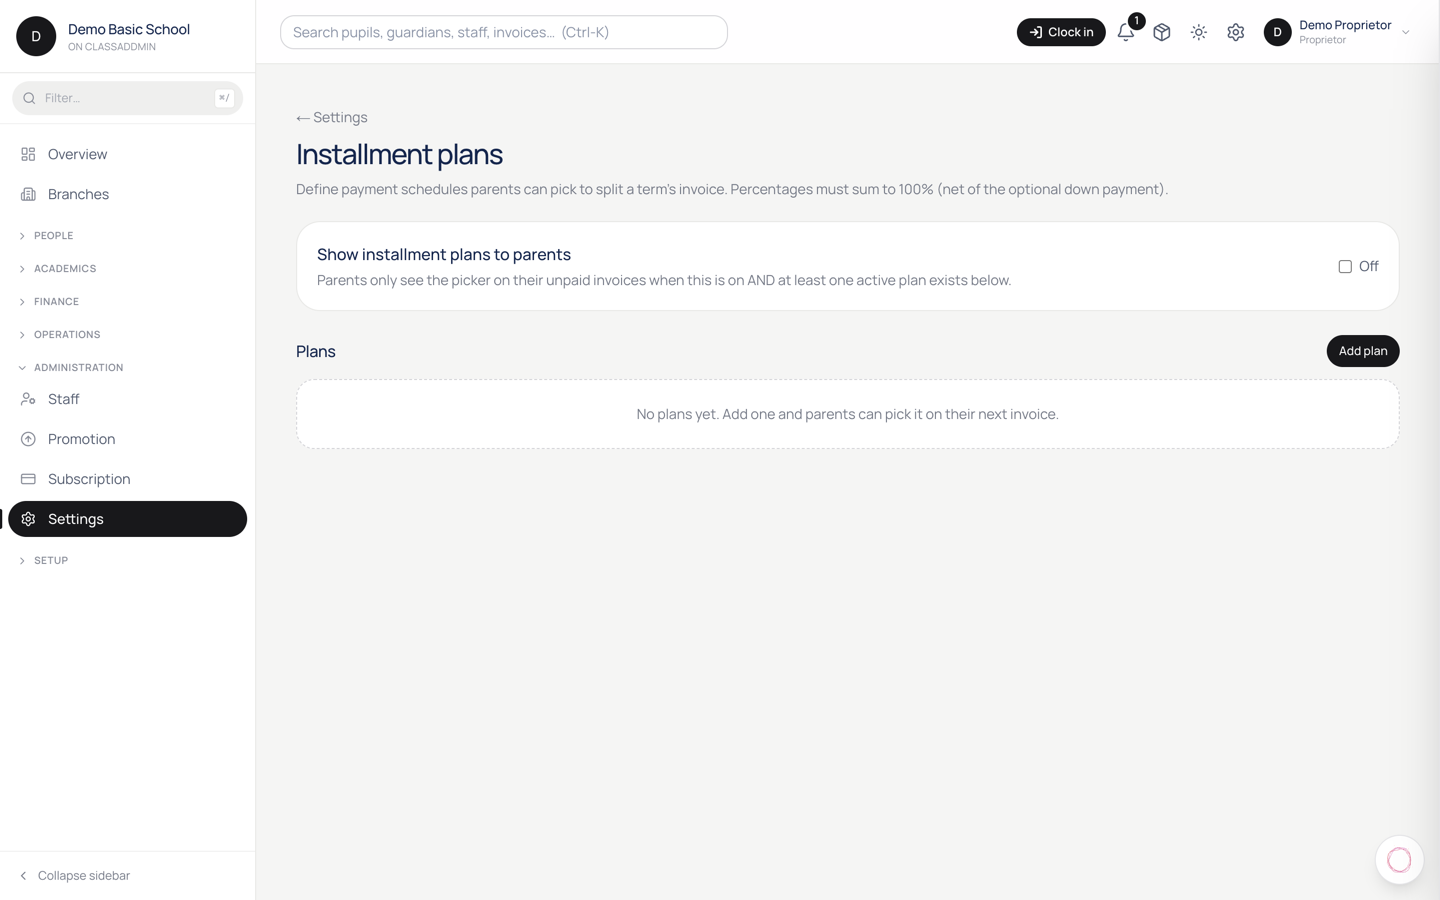
29.Offer parents an installment payment plan

Offer parents an installment payment plan — screen

When a term's fees are big enough that paying upfront is painful, offer parents an installment plan - a down payment plus monthly chunks.

ClassAddmin lets you define a plan template (e.g. "30% down + 3 monthly") and apply it to any invoice in one click. Parents see the plan in their portal and can pay each chunk on its due date.

Step 1 - Define a template (once)

You only do this once for the school; reuse for every parent.

  1. Settings → Installment plans.
  2. Click New template.
  3. Fill:
    • Name - "Standard 4-step", "5-month boarding plan".
    • Description - what parents see in their portal.
    • Down payment - % of invoice (e.g. 30%) or a flat GHS amount.
    • Reminder days - how many days before each step's due date parents should get an SMS (default: 7).
  4. Add the steps:
    • Each step has a % of remaining (after the down payment) and a due-date offset (days after issue, or anchored to month-end).
    • Example: 4 steps × 25% × monthly → "25% in 30 days, 25% in 60 days, 25% in 90 days, 25% in 120 days".
  5. Make sure the steps sum to 100% of the post-down-payment balance. The system blocks templates that don't.
  6. Click Save.

Step 2 - Apply the plan to a parent's invoice

  1. Open the invoice (Invoices → click the row).
  2. Click Add plan in the right rail.
  3. Pick the template.
  4. Click Preview - see the schedule with actual dates and amounts.
  5. Click Apply.

The parent's portal now shows:

  • The down payment as a single Pay GHS X.XX (Down payment) button.
  • After they pay that, the steps reveal - "Step 1: due 12 March, GHS 750" with a Pay button each.

The school's invoice balance updates as each step is paid.

Step 3 - Reminders

The system sends each parent an SMS at the reminder days before each step's due date, listing the amount and the portal link.

You don't have to do anything for this - it's automatic via the installment reminder cron.

If a parent misses a step

The step status flips to overdue the day after the due date. The parent's portal still shows the same Pay button - they can pay late. No automatic late-fee for now (could be wired in later if your school wants).

If a parent stops paying entirely, you can:

  • Cancel the plan - invoice → plan → Cancel. The remaining balance becomes due in full immediately.
  • Renegotiate - cancel the plan and apply a new one with the remaining balance as the new starting point.

Common gotchas

  • "Steps don't sum to 100%" - fix the percentages on the template; the system can't apply an unbalanced plan.
  • "Down payment is bigger than the invoice" - you set a flat amount higher than the bill. Use a percentage instead.
  • Parents say they can't see step buttons - they haven't paid the down payment yet. Step buttons reveal one-by-one as preceding ones clear.

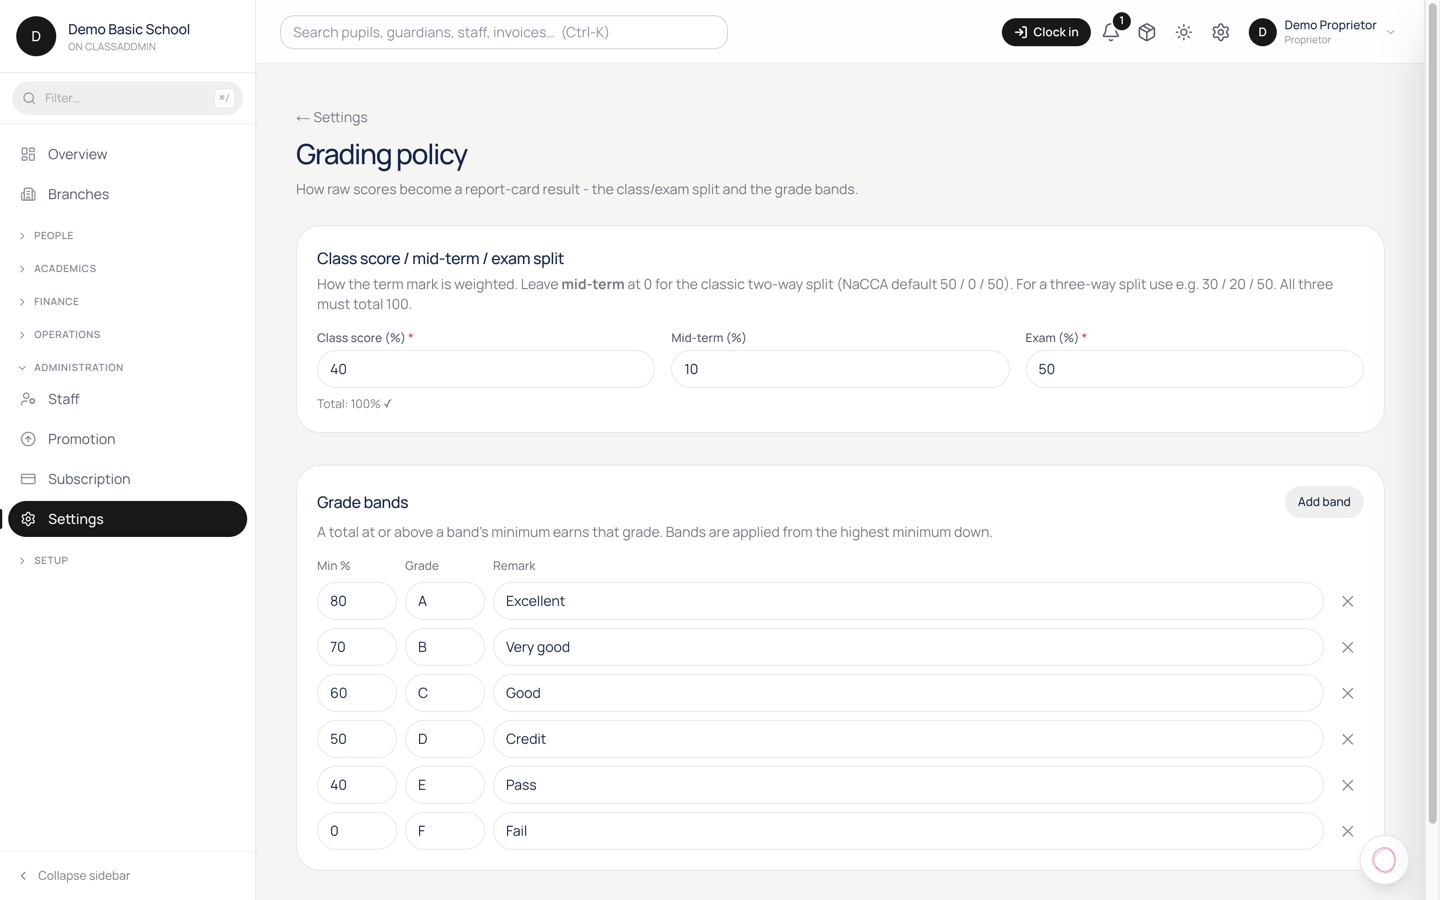
30.Set your grading policy — weights and grade bands

Set your grading policy — weights and grade bands — screen

Your grading policy answers two questions for every subject on every report card: how much each kind of assessment counts, and which letter grade a mark earns. Set it once, before you publish a term's reports, and every subject follows it.

Find it at Settings → Grading.

1. The weights

A pupil's mark in a subject is built from three buckets:

Bucket What it usually is
Class score Continuous assessment — classwork, homework, tests during term
Mid-term The mid-term examination, if your school runs one
Exam The end-of-term examination

Enter what each is worth as a percentage. A common Ghanaian split is class score 30, mid-term 20, exam 50. If you don't run mid-terms, leave it at 0 and split the other two.

The three must add up to exactly 100. If they don't, saving fails with "The class-score, mid-term and exam weights must add up to 100." That's deliberate: weights that sum to 90 or 110 would silently make every report card in the school wrong.

How a subject mark is worked out

Each bucket is averaged as a percentage of what was available, then weighted. So a pupil who scored 16/20 on one class test and 36/40 on another has a class-score percentage of 85, and with a class-score weight of 30 that contributes 25.5 to their subject total out of 100.

This is why the marks you enter are out of each assessment's own maximum, and you never have to convert anything by hand.

2. The grade bands

Below the weights, list the grades your school awards. Each band needs three things:

  • Minimum score — the lowest mark that earns this grade, 0 to 100
  • Grade — what's printed, for example A or 1
  • Remark — the words beside it, for example Excellent

Add a row per grade. They're stored highest-first, so a mark falls into the first band it reaches. A typical set:

Minimum Grade Remark
80 A Excellent
70 B Very good
60 C Good
50 D Credit
0 F Fail

Always include a band starting at 0, or a very low mark belongs to no band and prints blank.

Click Save. You'll see Grading policy saved.

What happens after you save

  • Every report card generated from now on uses the new weights and bands.
  • The broadsheet (Gradebook → Results) recalculates immediately — subject averages, class average and pass rate all follow the new policy.
  • Marks you already entered are not touched. Only how they're combined changes.

Because of that last point, changing the policy mid-term re-grades the whole school at once. Do it between terms if you can.

Common gotchas

  • "The weights must add up to 100." Add the three boxes on screen. A frequent cause is leaving mid-term blank rather than 0.
  • A subject total above 100. A mark higher than its assessment's maximum inflates that bucket. ClassAddmin refuses a score above the maximum when you enter it, so this normally means a mark was loaded some other way, or an assessment's maximum was changed after marking. Check Gradebook → the subject's assessments.
  • A pupil has no grade letter. Their mark sits below your lowest band. Add a band starting at 0.
  • Report cards look unchanged. They're built when published. Re-publish the class to pick up a policy change.

31.Change how ClassAddmin looks, and turn features on or off

Change how ClassAddmin looks, and turn features on or off — screen

Two settings that change the product itself: how it looks, and which features your school has.

Appearance

Settings → Appearance

  • Template — the overall look. Pick one and the whole dashboard changes immediately.
  • Preset — the colour scheme within that template.
  • Brand colour — or set your own, as a hex code such as #4f46e5.

Changes apply as you click, so you can see each one rather than guessing.

Whose screen changes

This is your school's look — every member of staff signing in to your school sees it. It isn't a personal preference, so pick something legible on the cheapest screen in the building rather than the nicest.

Your brand colour also reaches things parents see. Set it once, properly, and leave it.

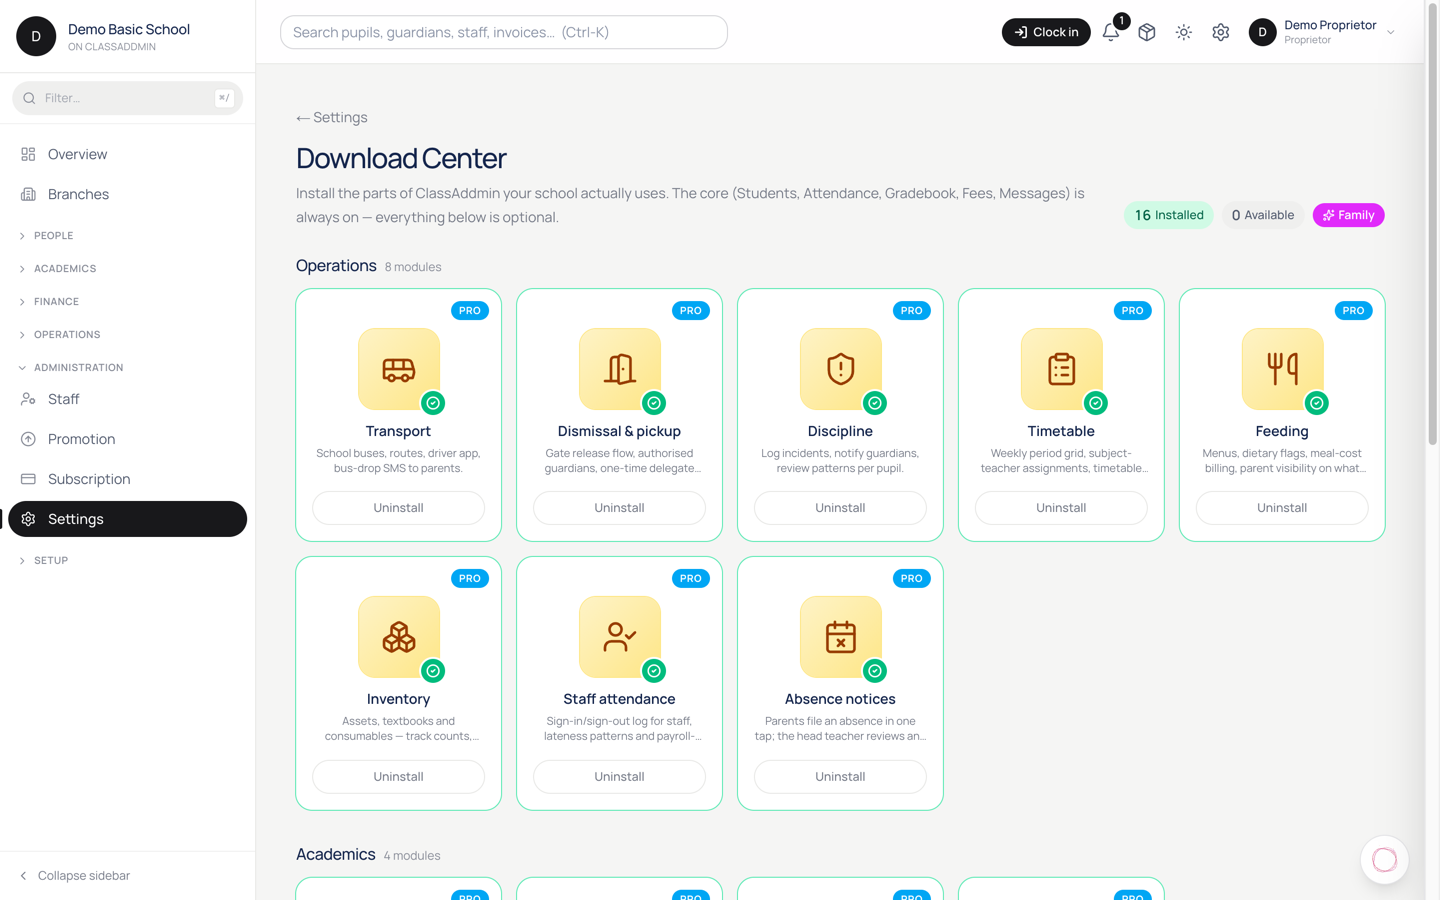
Modules

Settings → Modules

Modules are the optional parts of ClassAddmin — the areas your school may or may not need. The page reads like an app store: browse by category, each tile showing what the module does and which plan it needs, with an action at the bottom.

  1. Settings → Modules.
  2. Browse or filter by category.
  3. Click Install on what you want.

What happens when you install one

The feature appears in the sidebar for staff whose role allows it. Nothing else changes — installing doesn't create data or alter what you already have.

Some modules are included in your plan; others are paid add-ons. For a paid one, you choose monthly or yearly, see the price, and are taken to pay. It becomes available once payment completes.

Yearly is cheaper where a module offers both — the toggle shows the saving before you commit.

Removing a module

Turning a module off hides the feature; it doesn't delete what's already recorded. If you install feeding, use it for a term, then turn it off, the term's records remain — they simply aren't reachable from the sidebar until you turn it back on.

Common gotchas

  • A member of staff can't see a module you installed. Their role doesn't have permission for it. Check Settings → Roles.
  • A module tile says it needs a higher plan. It isn't available on yours. The tile shows which plan it belongs to.
  • The brand colour picker is greyed out. Custom brand colour on invoices needs the Family plan.
  • The dashboard looks wrong after a template change. Refresh the page. Templates apply immediately, but a screen open on another tab may still be on the old one.
  • You paid but the module hasn't appeared. It activates when payment completes. If you were bounced back without paying, nothing was charged — start again.

Oversight

Checking on the school without doing the day-to-day yourself.

32.Use the audit log to trace changes

Use the audit log to trace changes — screen

The audit log records every meaningful change to your school's data: pupils created, fees adjusted, payments reversed, staff invited, roles modified, journals posted. When something doesn't look right - "who deleted that invoice?" - this is where you find out.

Open the audit log

  1. Settings → Audit log (under Administration).

You'll see a chronological list, newest first. Each row is one change with:

  • When - timestamp.
  • Who - the user that did it, or system for automated changes.
  • Where - the table affected (students, invoices, payments, school_users, etc.).
  • What - the operation (INSERT, UPDATE, DELETE).
  • Which row - the record id.
  • Before / after - for updates, the values before and after the change as JSON.

Filters

The default view is everything in the last 7 days. Narrow with:

  • Date range - pick a window.
  • Table - show only payment changes, only invoice changes, etc.
  • User - show what a specific staff member did.
  • Operation - INSERT / UPDATE / DELETE.

You can stack these. "Show me every DELETE on payments by Sarah in March" is one query.

What's NOT logged

  • Reads - the log only captures writes. Looking at a pupil profile is not logged.
  • Failed mutations - if someone clicks "Delete" and the system blocks them, the attempt isn't recorded. Successful operations only.
  • AI assistant questions - separate log under Support → Help feedback.
  • Login attempts - Supabase Auth handles these; for sign-in trouble, message us.

Read the before/after JSON

For an UPDATE, the row shows two columns of JSON - the old values and the new. Use this to:

  • See exactly what changed. The diff is usually small (one field).
  • Restore manually if needed - copy the old JSON values back into the right form.

For a DELETE, the before column holds the entire row that was deleted. Use it to manually re-create the row if the deletion was a mistake.

Export

Click Export CSV to download the filtered view. Useful for:

  • Quarterly compliance reviews - share with your accountant or auditor.
  • Insurance claims - proof of who handled what.
  • Internal investigations - share with your school's board.

Practical investigations

"A payment disappeared from the books"

  1. Filter by table payments, operation DELETE, last 30 days.
  2. Find the row. The before column has the full payment data.
  3. Note who deleted it and when.
  4. Re-create the payment if appropriate.

"Someone keeps changing pupils' admission numbers"

  1. Filter by table students, operation UPDATE, sort by who to group.
  2. Find the pattern.
  3. Discuss with the staff member.

"A grade was changed after publishing"

  1. Filter by table gradebook_scores (or assessment_scores), UPDATE.
  2. Cross-reference the pupil + assessment.
  3. Note before/after.

Retention

The audit log keeps records for 3 years. Older entries are auto-pruned monthly. If you need longer retention for legal or audit reasons, export and archive externally.

Common gotchas

  • "User shows as system" - that's the cron-driven changes (auto-reconcile, auto-archive, etc.). Not a real user.
  • The log is huge and slow to load - use filters. The full unfiltered view is meant for export, not for browsing.
  • Can't see the audit log - your role doesn't have audit.view. By default only proprietor and head teacher do.

33.Manage your subscription and billing

Manage your subscription and billing — screen

ClassAddmin runs on a tiered subscription. Your tier sets which features your school can use, and how many SMS credits you get per month. You can upgrade, downgrade, or extend the subscription from Settings → Subscription.

The tiers

Tier What you get
Free (14-day trial) Full feature access for evaluation. After 14 days you must pick a paying tier or the app goes read-only.
Family SMS-on-staff-reply for parent threads, SMS broadcasts, standard support. Suits most basic & junior schools.
Plus All of Family + custom domain for parent portal, custom SMS sender ID, AI assistant unlimited use, accounting/books module, priority support, advanced reports.

Specific limits (SMS credits, AI questions/day, etc.) depend on your plan agreement.

See your current state

  1. Settings → Subscription.
  2. The header shows:
    • Current tier.
    • Status - trial, active, grace, expired, suspended.
    • Renews on or Expires on - when the next payment is due.
    • SMS credits remaining for this month.

Upgrade

  1. Click Change plan.
  2. Pick the higher tier.
  3. Click Confirm.
  4. You're charged the prorated difference for the rest of the month, then the new monthly rate from next billing cycle.

The new tier's features unlock immediately.

Downgrade

Same flow, but features may disappear. Specifically:

  • Going from Plus to Family removes: custom domain, AI assistant, books module access (existing data stays, but the page becomes read-only until you upgrade again).
  • Going from Family to Free: the app becomes read-only after the next renewal date.

You can re-upgrade any time.

Pay an invoice

The system charges your saved payment method automatically every month. If a card fails:

  • You get an email + SMS reminder.
  • The status flips to grace for 7 days.
  • After grace, status flips to expired - the app is read-only until you settle.

Settle by:

  1. Settings → Subscription → Pay outstanding.
  2. Pick a payment method (Paystack card or MoMo).
  3. Pay.
  4. Status flips back to active within a minute.

Update payment method

  1. Settings → Subscription → Payment method.
  2. Click Change.
  3. Add a new card or MoMo number via Paystack.

SMS top-up

If you've burned through your monthly SMS allotment:

  1. Settings → Subscription → Buy SMS credits.
  2. Pick a bundle (1000 / 5000 / 10000).
  3. Pay.
  4. Credits land in your account immediately.

Unused credits roll over month-to-month.

Cancel

  1. Settings → Subscription → Cancel subscription.
  2. Pick a reason (we read these).
  3. Click Confirm.

Your school keeps access until the end of the current paid period. After that, the app goes read-only.

If you cancel by mistake, you can reactivate up to 30 days later from the same page.

Common gotchas

  • "My SMS aren't sending" - out of credits. Top up.
  • "The app is read-only" - subscription expired. Settle the outstanding amount.
  • "Wrong tier - I need books module but I'm on Family" - upgrade to Plus.

Getting your data out

The download centre — exporting pupils, payments and records as spreadsheets.

34.Download all your school's data

Download all your school's data — screen

Everything your school has in ClassAddmin can be downloaded as one ZIP file of spreadsheets. It's there so your records are yours — for a backup, for an auditor, for your accountant, or because you're moving to something else and want to take your data with you.

Steps

  1. Settings in the sidebar.
  2. Under Data & oversight, click Data export.
  3. Click Download ZIP. The button reads Bundling… while it works.
  4. Your browser saves the file, named after your school. You'll see Export downloaded. when it's finished.

There's no limit on how often you can do this. Run it every term if you like.

What's in the file

One spreadsheet (a .csv, which opens in Excel or Google Sheets) per kind of record:

  • Pupils
  • Guardians, and which pupil each one belongs to
  • Academic years and terms
  • Classes, and which subjects are taught in each
  • Enrolments — which pupil was in which class, when
  • Fee structures and the items inside them
  • Invoices and their line items
  • Payments and what each one was put towards
  • Expenses
  • Payroll runs and payslips
  • Staff accounts

The files reference each other by id, so the relationships survive. A row in the payments file points at the invoice it paid, and that invoice is in the bundle too. This is what makes it a genuine copy of your school's records rather than eleven disconnected lists.

Keep it somewhere safe

The bundle contains guardians' names, phone numbers and email addresses, exactly as they're recorded in the system, along with every fee and payment for every family. It is the most sensitive single file your school can produce.

Treat it like the paper admissions register: don't email it, don't leave it in a shared Downloads folder on a front-desk computer, and delete old copies you no longer need.

Who can do this

The download contains exactly what your own account is allowed to see — it's built using your sign-in, not a master key. A proprietor gets the whole school. Someone with narrower access gets a correspondingly narrower bundle, so this can't be used to reach records you couldn't otherwise open.

The tile only appears under Settings for staff who can reach Data & oversight, which in practice means proprietors and heads.

Common gotchas

  • Nothing downloaded and no error — check your browser didn't silently block the download. Look for a blocked-download icon in the address bar.
  • "Not signed in." — your session expired while the page was open. Refresh and sign in again.
  • The ZIP takes a while on a big school. It's assembled when you click, not kept ready in advance, so a school with years of history waits longer. Leave the tab open.
  • Opening a CSV in Excel mangles phone numbers. Excel likes to drop the leading 0 or + and turn a long number into 2.44E+11. Use Excel's Data → From Text/CSV import and set those columns to Text rather than double-clicking the file.